Among the different tasks an Exchange Administrator is expected to perform daily, the tricky one is to ensure that the server keeps running without glitches. And no matter how simple it may seem, it is not an easy task.
Unexpected technical, software or human errors keep cropping up that interrupt the normal flow of activities on the Exchange Server. Thus, prompting the Exchange administrator to take immediate measures and get everything back to working.
Among those measures include the knowledge of handy tools and utilities that can save the day when common fixes don't resolve the problems. ESEUTIL is one of the most widely used inbuilt command-line utilities that can be used to repair the Exchange 2010 database in situations of database errors or corruption.
This article explains the process to repair corrupt Exchange 2010 database by using Eseutil switches.
What is ESEUTIL and Where is it Located in Exchange 2010?
ESEUTIL is a command-line utility, aimed at repairing minor issues within the Extensible Storage Engine (ESE) or Jet Engine of the Exchange database.
The utility is located in the Bin directory of the Exchange Server installation. It is used for performing various operations on the Exchange database, such as integrity checks, offline defragmentation, database repair, checksum test, etc.
It is automatically installed with the Exchange Server. It works on the dismounted or offline database files only. There are several switches that can be used with the utility to perform different operations on the database.
ESEUTIL Exchange 2010 Switches
Below are the various switches with their syntaxes that you can use with EseUtil to run different operations on the database and ensure database integrity.
- /MH – To check the database’s current status or state.
ESEUTIL /MH /database_name /database_name - /D –Defragments the offline database to reduce its gross size on the disk by discarding most empty pages and rebuilding indexes. For instance,
ESEUTIL /D /database_name /T unc_path /unc_path - /P – Repairs corrupt Exchange database by discarding pages that cannot be repaired. This function can result in data loss. Moreover, it fixes individual tables but not the links between the tables. For instance,
ESEUTL /P /database_path /database_path - /CC – Displays restored log files and control hard recovery after restoration from legacy online backups. For instance,
Eseutil /cc “Path of the restore.env folder” - /R – Replays transaction log files to restore a database to internal consistency. For instance,
ESEUTIL /r log_prefix /l log files="" folder="" path="" /d database folder="" path="" /database /log /log_prefix - /G – Verifies page level and ESE level logical database integrity. For instance,
ESEUTIL /G < Database File Location> - /M – Displays database file headers, transaction log files, checkpoint files, page header information, database page allocation, and metadata. For instance,
EseUtil /M database name="" /database> - /K – Verifies checksum on all database pages, log files, and checkpoint files. For instance,
EseUtil /K /database path="" /database - /Y – Performs a fast copy of large files. For instance,
EseUtil /Y /database path="" /database
How to Repair Exchange 2010 Database with ESEUTIL?
Step 1: Run EseUtil /mh command to check the database status
Step 2: Check the status of log files
Step 3: Perform repair (Soft Recovery [/i] or Hard Recovery [/p])
Step 4: Defrag the database offline
Step 5: Mount the database
Detailed steps to Repair Exchange 2010 Database with ESEUTIL Switches
To repair Exchange 2010 database with EseUtil, follow the steps given below.
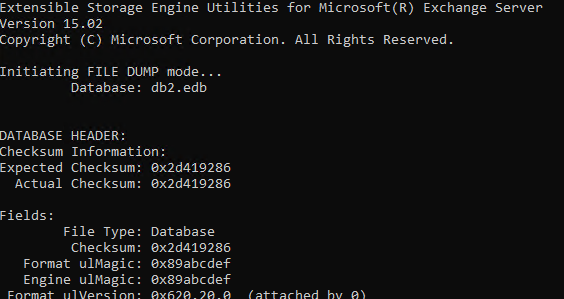
Step 1: Open the Exchange Management Shell or Command Prompt window and run the following command to check the database status:
EseUtil /mh "C:\Program Files\Microsoft\Exchange Server\V15\Mailbox\MBXDB01.edb"

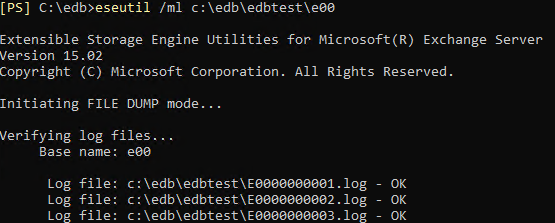
Step 2: Check the status of the log files.
ESEUTIL /ML C:\edb\edbtest\e00
Step 3: Perform Soft Recovery (EseUtil /r).
ESEUTIL /r “E00” /l “C:/LogFolder” /d"C:\Program Files\Microsoft\Exchange Server\V15\Mailbox\MBXDB01.edb"

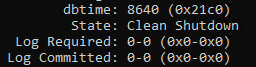
Step 4: Verify the database status after Soft Recovery. Run the following command to verify the state of the database. If it’s fixed, it should show Clean Shutdown.
EseUtil /mh "C:\Program Files\Microsoft\Exchange Server\V15\Mailbox\MBXDB01.edb"
If the database is fixed and shows the Clean Shutdown state, skip to Step 7.
Step 5: Perform Hard Recovery (EseUtil /p) if the Exchange 2010 database isn’t fixed with Soft Recovery. Make sure to back up the original database and logs before running the Hard Recovery as it can lead to data loss. The command is as follows:
ESEUTIL /p "C:\Program Files\Microsoft\Exchange Server\V15\Mailbox\MBXDB01.edb"
When you run the Hard Recovery on the affected Exchange 2010 database, you will see the following prompt. Click ‘Yes’ to accept the risk of data loss and proceed with the recovery.

Note: Hard Recovery may or may not repair your database based on the level of corruption. Even if it repairs, it will fix the database by removing or purging the irrecoverable mail items or mailboxes from the database that can lead to significant data loss. However, if you accept the warning and proceed, do not stop the process in between as it can permanently damage the database beyond recovery.
If Soft Recovery and Hard Recovery have failed or you want to avoid Hard Recovery due to the risk of data loss, use Exchange repair software, such as Stellar Repair for Exchange. The software can fix severely corrupt Exchange databases, recover all mailboxes, and save them as PST files with complete integrity. You can also export the recovered mailboxes from the corrupt database directly to a new or existing healthy database on your live Exchange Server or Office 365 mailboxes.
Step 6: Defrag the database offline to ensure database integrity and remove the white spaces to reduce the database size.
eseutil /d "C:\Program Files\Microsoft\Exchange Server\V15\Mailbox\MBXDB01.edb"
Step 7: Mount the database using the Exchange Admin Center or Mount-Database cmdlet.
Mount-Database –Identity MBXDB01
Step 8: Check the status of the database, i.e., whether it’s successfully mounted or not using the EAC or Get-MailboxDatabase cmdlet.
Get-MailboxDatabase -Status | Fl Name, Server, Mounted
If the Mounted status is shown as True, the database is mounted and online. Users who have their mailboxes in the recovered Exchange 2010 database can now access their emails and send/receive new messages.
Tip: If you have repaired the corrupt Exchange 2010 database using Hard Recovery, you should move all mailboxes from the recovered database to a new database. This is critical as the recovered database may fail again. Besides, the database is hard coded and thus, you can’t ask for Microsoft support if any issue arises in the future.
To Sum It Up
The article explains the complete process of repairing the Exchange 2010 database using the in-built ESEUTIL tool with detailed stepwise instructions. However, the tool might fail to fix issues within EDB files or recover them by purging the mail items or mailboxes, resulting in a data loss situation.
To overcome the limitations and avoid the risk of data loss, we recommended you use EDB repair software, such as Stellar Repair for Exchange. This reliable application repairs even severely corrupted/damaged EDB files and recovers inaccessible mailboxes in minimal time and with complete integrity. Unlike EseUtil, the software offers an interactive GUI that makes it easy to work with. It is compatible with a wide range of Exchange versions. Moreover, it also provides some advanced features, such as the option to export recovered mailboxes from the corrupt Exchange 2010 database directly to a live Exchange Server or Office 365 tenant, selective mail recovery, and more. You can check the detailed software steps to repair corrupt EDB files here.


 4 min read