A few years back, you could not transfer data or share files from different Apple devices using Bluetooth technology because of security concerns. But in recent macOS and iOS, Apple has introduced an alternative called AirDrop, which uses technology similar to Bluetooth to discover nearby devices and Wi-Fi. It helps transfer files from one device to another using a secure and encrypted protocol.
Transferring documents, photos, videos, map locations, etc., wirelessly to a nearby Apple device (Mac, iPhone, iPad, or iPod touch) using AirDrop is a cakewalk. But, at times, AirDrop may not work as expected and prevent you from transferring files. We’ll describe a few troubleshooting methods to fix the ‘Mac AirDrop not working’ issue. Read on to learn more.
Fulfill the Requirements to Share Files Using AirDrop
The sending and receiving Apple devices probably didn’t fulfill the AirDrop sharing requirements, restricting AirDrop to function as you expect. So, make sure the following requirements are fulfilled by your Apple devices to transfer files using AirDrop on Mac.
Check the Connectivity Requirement for AirDrop
Ensure that the sending and receiving Apple devices are within 30 feet or 9 meters. Also, in each Apple device, the Airplane Mode should be OFF, Wi-Fi & Bluetooth - ON, and Do Not Disturb - OFF. Also, make sure the Personal Hotspot is OFF. To verify, use the Menu bar, Control Center, and System Preferences.
Check the Compatibility Requirement for AirDrop
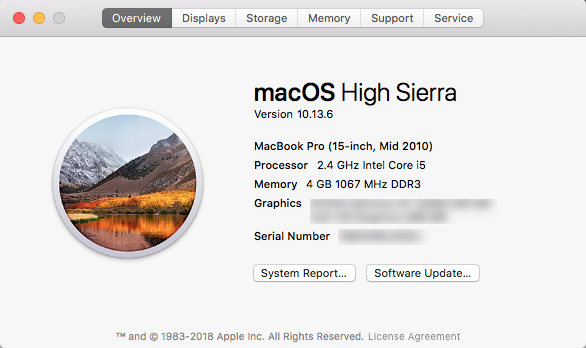
Ensure that the Apple devices are compatible with AirDrop. For Mac, the device model should be 2012 or later, excluding the 2012 Mac Pro. Plus, the device should run on OS X 10.10 Yosemite or later. To verify, go to Apple menu > About This Mac. For iPhone, iPad, or iPod touch, ensure that the device uses iOS 7 or later.
Check the Receive Requirement for AirDrop
Ensure that your Apple devices can receive AirDrop requests. To verify on Mac, open the AirDrop window from the sidebar of Finder. Make sure the “Allow me to be discovered by” option is not OFF on the bottom-right. If it’s OFF, then set it to Contact Only or Everyone.
In Contacts Only, both the Apple devices should be signed in to iCloud, and the email and phone that was associated with the sender’s Apple ID, should be stored in the contact list of the receiving Apple device. In Everyone, any nearby Apple device can discover the device. A similar setting should be applicable in the case of iPhone, iPad, and iPod touch.
To receive AirDrop requests from a legacy Mac model, open AirDrop > select “Don’t see who you are looking for?” to find the Mac and share files using AirDrop.
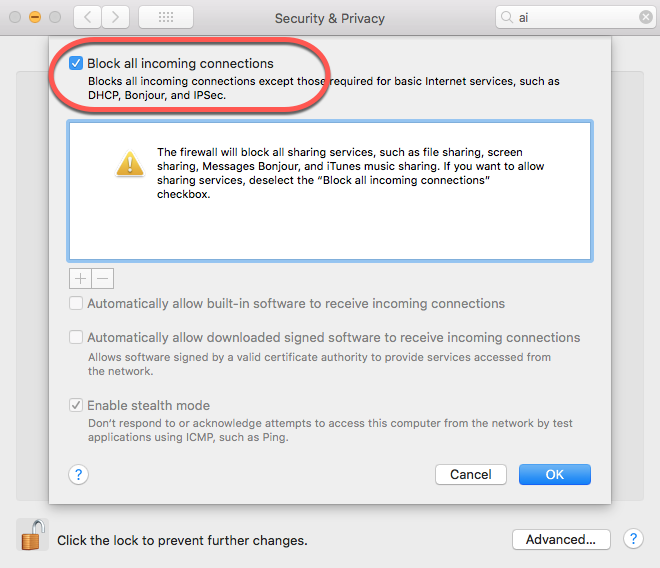
Also, ensure the incoming connection is not blocked on your Mac. To check, go to Apple menu > System Preferences > Security & Privacy > Firewall tab. Next, click the lock icon and provide the admin password. Click Firewall Options, then deselect “Block all incoming connections.”
If everything is as per the requirements, you should be able to transfer files using AirDrop. But you should know how to send and receive files correctly.
Use the Correct Way to Transfer Files Using AirDrop
Some of you may not know how to correctly transfer a file using AirDrop on macOS Big Sur 11 or earlier. The correct process to send and receive files in macOS is as follows:
1. Send Files Using AirDrop
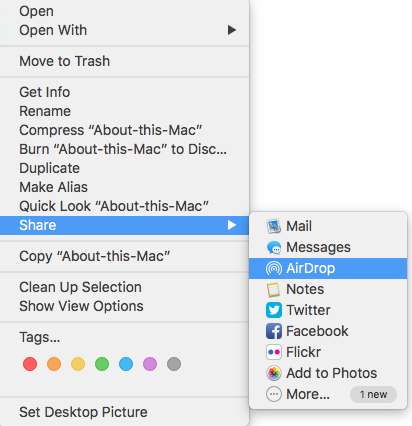
To send the file(s) to a macOS device, open the file, then click the Share 
2. Receive Files Using AirDrop
To receive file(s) on your macOS device, click Accept on the notification or message on the AirDrop window; otherwise, click Reject. The notification arrives when a nearby AirDrop device is sending files to your Mac. Once you accept the AirDrop file transfer, the files will be saved on your Mac in the Downloads folder. Open that folder to check the transferred files.
If you lose your valuable files due to the ‘Airdrop not working’ issue, proceed to recover data using a Mac data recovery professional software.
Use Mac File Recovery Software
Mac's data recovery (Pro version) software is quite handy in any logical data loss situation, such as accidental deletion, drive formatting, or corruption in the storage medium.
The steps to recover data using a Mac data recovery software are as follows:
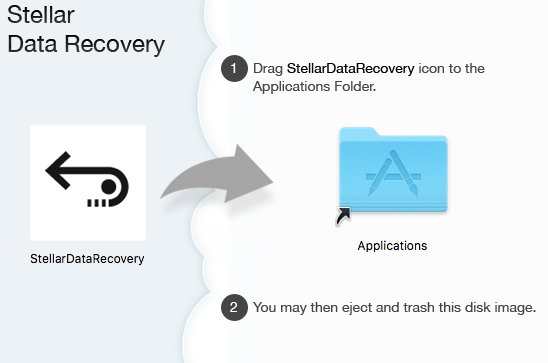
- Install and launch the free copy of Stellar Data Recovery Professional for Mac on a working MacBook Air/Pro, iMac (Pro), or Mac mini.
- Watch this video guide to know how to recover your lost data on Mac running on macOS Big Sur or earlier.
| The free copy of Stellar Data Recovery Professional for Mac is useful to scan the storage drive and preview files. And, to recover files, you need to activate the Mac data recovery software. Why wait when you have a 30-day money-back guarantee. |
Conclusion
We hope the DIY methods shared in this article helped you fix the Mac AirDrop not working problem altogether. First off, fulfill the requirements of the AirDrop data transfer. Next, send and receive files correctly. In case of any data loss, try out the recommended data recovery software for Mac to recover your lost data on macOS Ventura or earlier.


Data recovery expert on Mac & Windows platforms, with 10-year experience in writing

 6 min read