"Hi, I have lost several files within last six months on separate occasions, and my recovery tools failed to bring them back even though I did everything recommended to prevent loss of data. Is there any way to recover deleted files?"
"Hello, I used Shift + Delete to permanently delete few files on the desktop. I think I accidently selected a folder which was not supposed to get deleted. It had some really important files which I can't afford to lose. So far, I have tried 7 different programs, but neither of them is able to recover my files, except a few files that I deleted formerly. Can you help me?"
Whether you accidentally deleted your files or they got lost due to interruption in file transfer process, virus attack, or any other reason, you can't afford to lose them. Hence, we have listed some effective methods to recover deleted files in an efficient way. Read on to know how you can retrieve deleted files from Windows, Mac, iPhone, Dropbox or iCloud using simple DIY methods.
Simple Ways to Recover Deleted Files
Restore deleted files from
- Windows
- Mac
- iPhone
- Dropbox
- iCloud
Simple Ways to Recover Deleted Files
1. Recover Deleted Files from Windows
There are several ways to retrieve your important files from Windows PC. Whether the files are deleted mistakenly or lost due to force system shutdown, virus infection or interruption during file transfer process, you may follow these methods and get your files back easily.
Restore from Recycle Bin
In case you accidentally deleted files from your Windows PC, they can be restored from the Recycle Bin folder. Check this folder and follow the below mentioned steps:
- Go to the Recycle Bin.
- Search and select files and folders that you have deleted accidentally. (See Figure 1)
- Right-click on the selected items (s) or files, and click Restore. (See Figure 2)
- You can also drag-drop the selected files to the desired location.
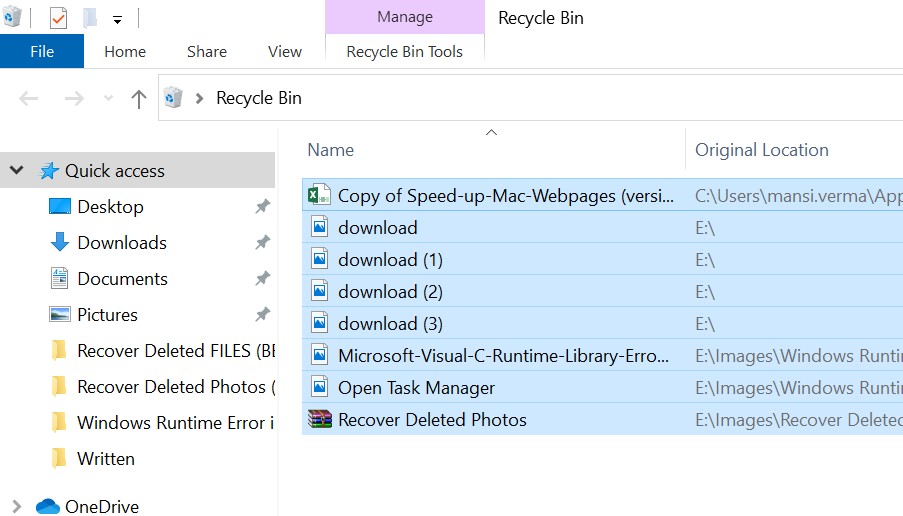
[Figure 1: Select files you want to restore]

[Figure 2: Restore Files from Recycle Bin]
However, if the files are deleted using Shift + Delete key or by emptying the Recycle Bin, the files will be permanently deleted from the system. Then, you will need to use a professional Windows data recovery software to restore them.
Use Windows Backup & Restore (a Windows 7 feature also available in Windows 10)
If you've been taking backup of your system files and folders on daily, weekly or monthly basis with Windows built-in utility Backup and Restore (Windows 7), you can easily get your data back. Follow the given instructions and re-gain access to your important data.
- Connect an external storage media to your PC.
- Open Control Panel and go to System and Security.
- Open Backup and Restore (Windows 7). You can also directly go to restore files from backup option as mentioned in this image. (See Figure 3)
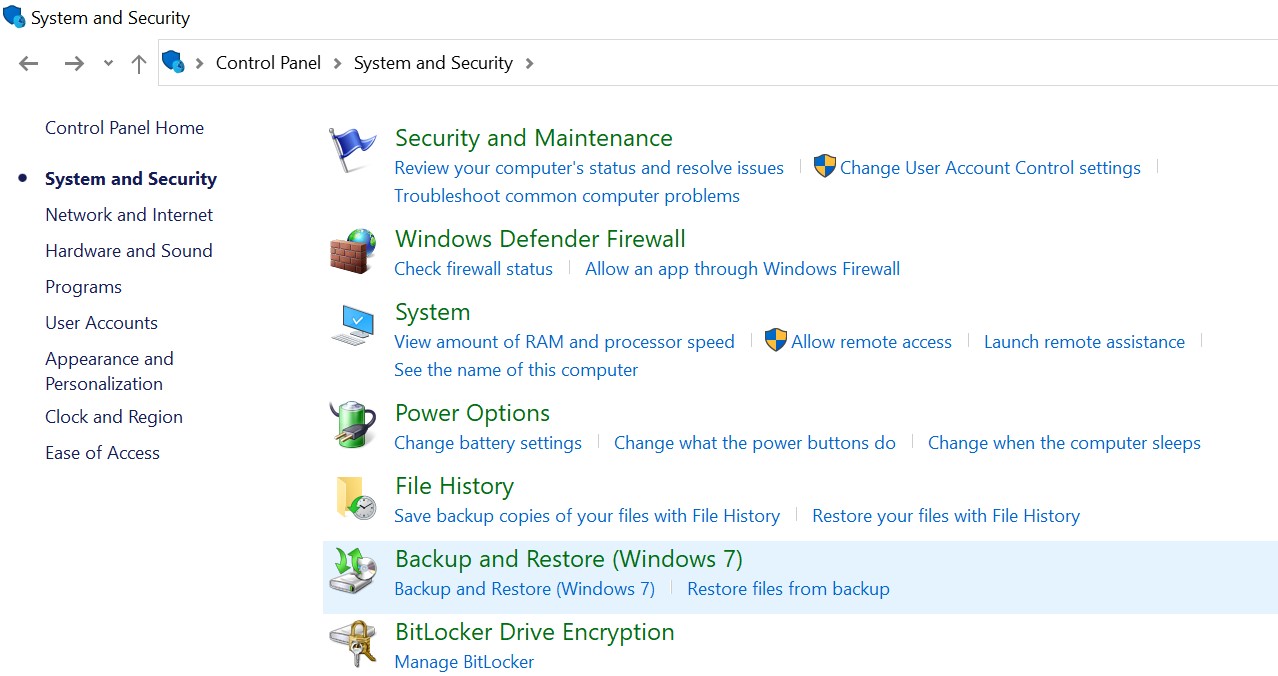
[Figure 3: Open Backup and Restore (Windows 7)
- Select either Restore my files or Restore all users' files. (See Figure 4)

[Figure 4: Choose Restore Users' file/Restore my files]
- Select the files you want to retrieve. (See Figure 5)
- Click 'Browse for files' or 'Browse for folder' and click Next. (See Figure 6)

[Figure 5: Select files from window]
NOTE: You will not be able to see the individual files when browsing for folders.

[Figure 6: Browse for Files/Browse for folders Window]
Choose the location where you want to Restore and check if you can see your files.
Restore with File History
If you have kept Windows utility 'File History' on to create backup of your system files and folders, then you may get your files back by following the given steps:
- Go to 'Control Panel', and open File History (See Figure 7).
- Open Restore Personal Files. You can view files as per the backup time (See Figure 8).
- Select the files and click Restore. (See Figure 9)
- Choose the desired location and retrieve the deleted files.

[Figure 7: Open File History]

[Figure 8: Restore Personal Files Screen]

CAUTION: Store your recovered files in an external storage device like HDD, SSD, etc. to prevent data overwriting
Use Google Drive Backup
Google drive can also be used to retrieve your pictures. If you had backup of your files on Google Drive, you can just sign in to your Google account on your system and follow the below said steps:
- Connect an external storage to your Windows PC.
- Sign in to your Google Account.
- Your files will show up on the screen. (See Figure 10)
- Select the files, click Download. (See Figure 11)
- Store the recovered files on the desired storage drive.

[Figure 10: Google Drive Screen]

[Figure 11: Download the files and store them]
Use a Professional Windows Data Recovery Tool
If you are not able to recover deleted files using the above methods, you may try a professional Windows data recovery tool such as Stellar Data Recovery Professional. This DIY (do-it-yourself) software can retrieve files lost due to emptied recycle bin, unexpected system shutdown, virus attack and other data loss scenarios. To recover the deleted or lost files with this recovery tool, follow the given steps:
- Install, and run Stellar Data Recovery Professional on the affected PC.
- From Select What to Recover window, select Everything and click Next. (See Figure 12)
- On Recover from screen, select the drive from which you want to restore the files and click Scan. (See Figure 13)
- On completion of the scanning process, the scanned results will show on screen.
- Select the files that you want to restore. You may also preview the files before saving. 6. Click Recover and proceed further. (See Figure 14)
- 6. Click Browse to select the location to save recovered files and click Start-saving. (See Figure 15)
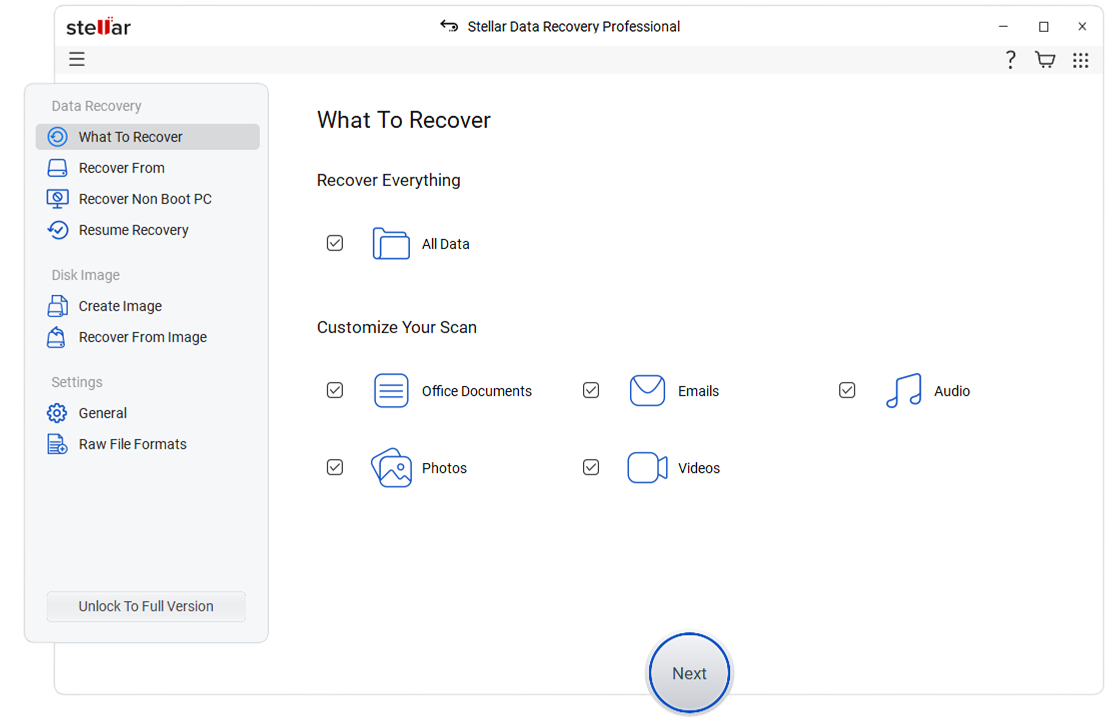
[Figure 12: Select What to Recover Screen]
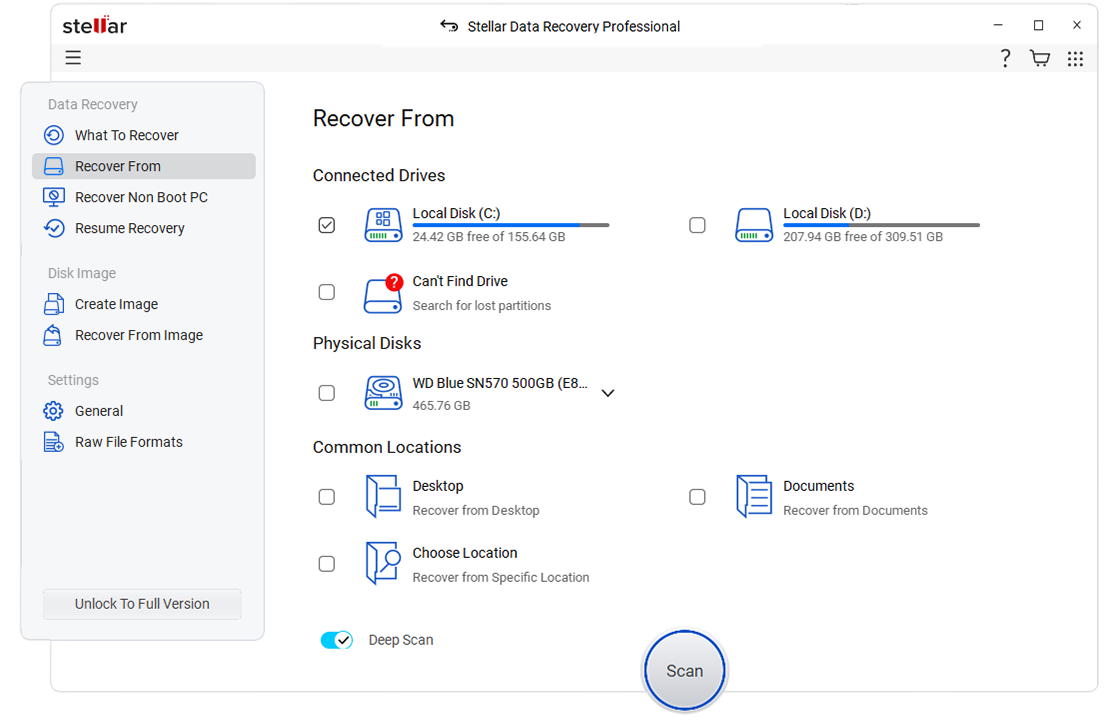
[Figure 13: On Recover from screen, select & scan drive]
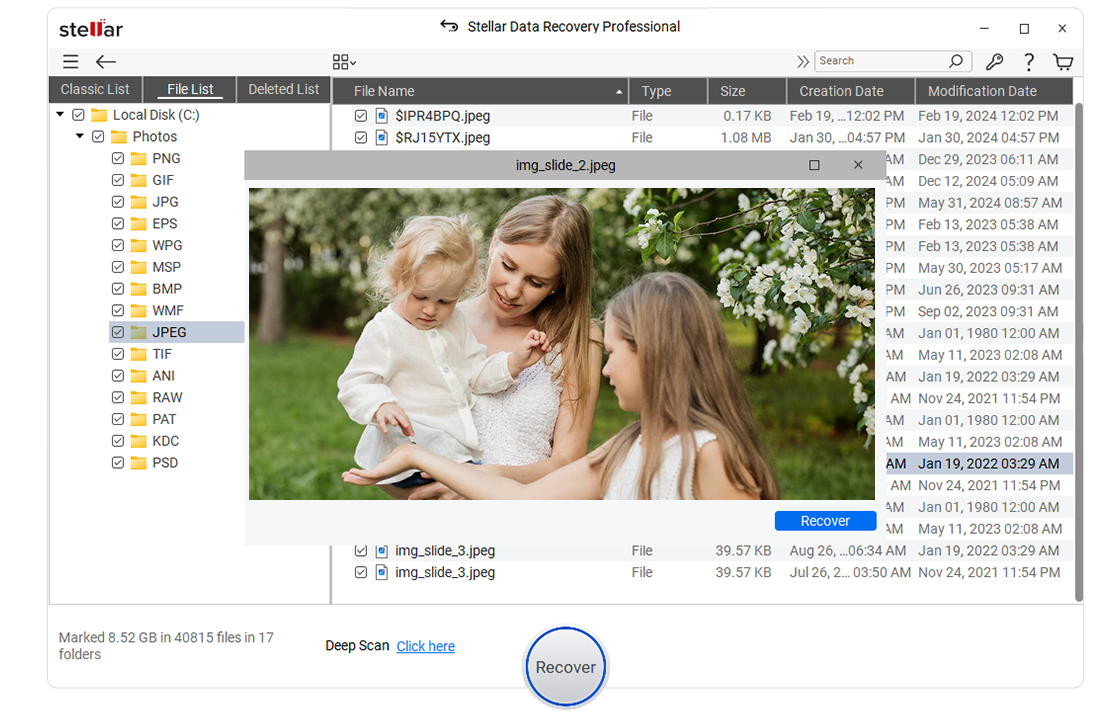
[Figure 14: Recover the selected files]
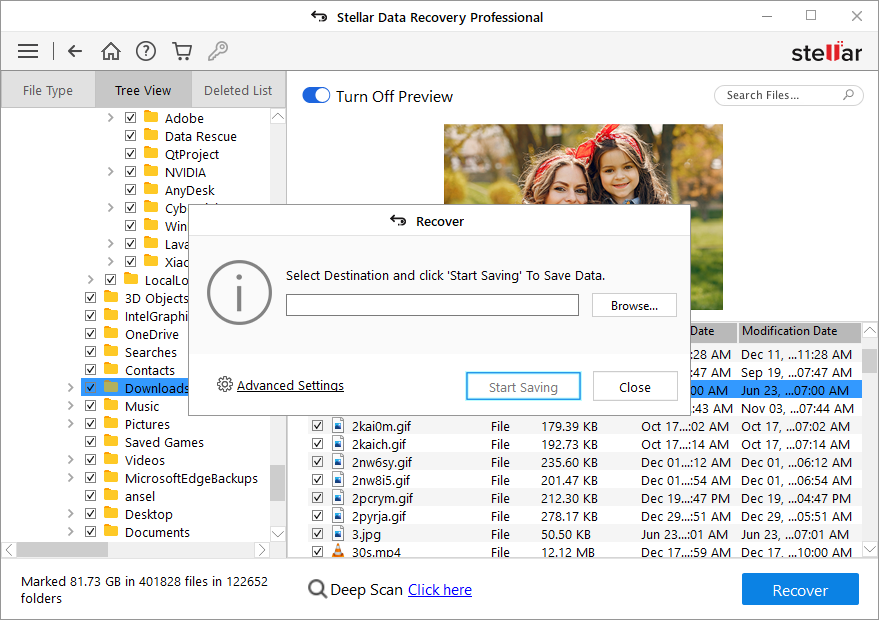
[Figure 15: Start-Saving the recovered files]
Store your files at the desired location or in external storage media.
2. Recover Deleted Files from Mac
Be it your office presentation, your family photo or a video that you shot on your trip, you can restore accidentally deleted files from Mac easily. There are plenty of ways to get back your crucial data by following the given methods.
Restore Files from Trash
If the files are lost due to accidental deletion in macOS, look for them in the Trash bin.
- Go to Trash bin and search for the deleted files.
- Select files and right-click on them.
- Choose Put Back from the options. (See Figure 16)

[Figure 16: Put Back your deleted files]
Your files will be recovered and restored at their original location.
NOTE: But keep in mind, if the option of Auto Delete is selected in settings, files not recovered from Trash will be automatically deleted in 30 days.
Use Time Machine Backup
Time Machine, macOS' built-in utility, lets you create a backup of your system files. If you turn on this utility to back up your files and folders, you can easily get them back to their original state. Follow the steps given and get your access back.
- Connect your Time Machine hard drive to Mac, and then choose Time Machine option from the menu bar.
- Select Enter Time Machine. You may also go to Apple menu > System Preferences > Time Machine. (See Figure 17)
- On the Time Machine screen, check out the available backups.
- Choose your last backup and navigate to your files backup.
- Select one or more items you want to retrieve and Restore.

[Figure 17: Open Time Machine]
All the recovered files will be restored to the specified location.
Use A Professional Mac Data Recovery Software:
You may use a professional Mac data recovery tool such as Stellar Data Recovery Professional for Mac to retrieve your lost files and pictures. It also works in case of external USB formatting, emptied Trash bin or file deleted from Time Machine.
- Download, Install and run Stellar Data Recovery Professional for Mac.
- From Select What to Recover screen, select Everything or particular data that you lost –documents, photos, audio, videos, or emails. (See Figure 18)
- On Select Location screen, choose the drive from which you want to retrieve files, and click Scan. (See Figure 19)
- You will see the scanning process with the details of files found and time left to complete the process. (See Figure 20)
- On completion of the scanning process, the files will show on the screen.
- Click Recover > Browse to select the desired destination, and click Save. (See Figure 21)


[Figure 18: Select What to Recover Screen]

[Figure 19: Select the drive from Select Location]
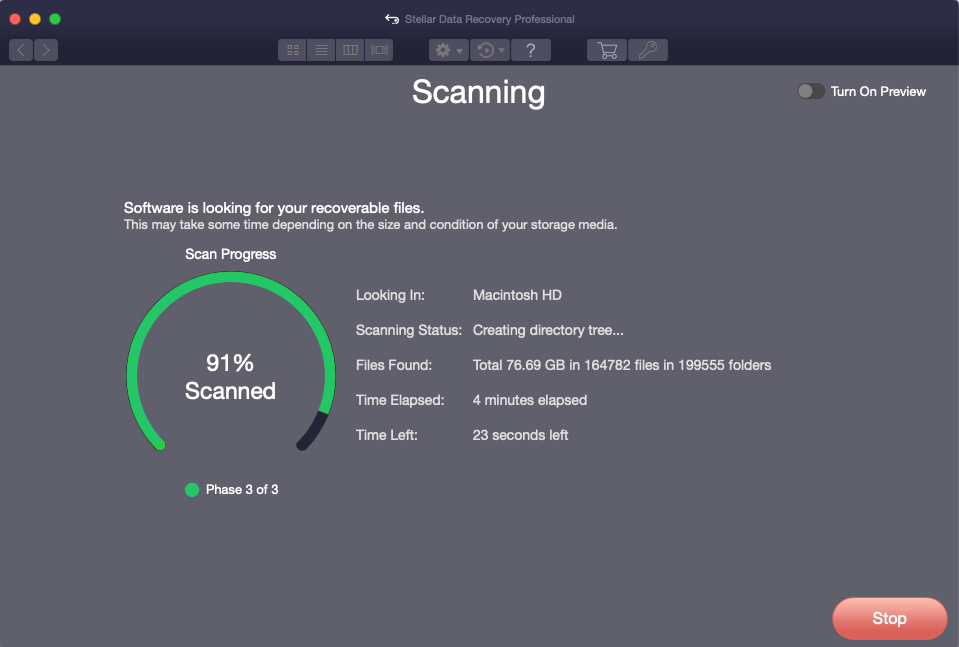
[Figure 20: Scanning process screen]

[Figure 21: Save recovered files]
- Connect an external storage media to store your retrieved files.
[Caution: To avoid data overwriting, make sure you do not save the restored files in the drive or volume from which you lost your files at the first place.]
3. Recover Files from iPhone
There could be chances that you may lose your essential files from your iPhone at any moment. However, there are a number of methods, given below, through which you may easily get your lost files back.
Use iTunes Backup
If your iPhone is synced with iTunes, you may use this Apple's backup utility to get your files back. Connect your iPhone/iPad/iPod to your Mac and open iTunes. To restore files from iTunes backup, go to Library > Application Support > MobileSync > Backup. Follow the given instructions:
- Select your device in iTunes and right-click on it.
- Choose 'Restore from backup…' option.
- Select the latest backup from the list.
- Click Restore and wait until the process finishes (See Figure 22).
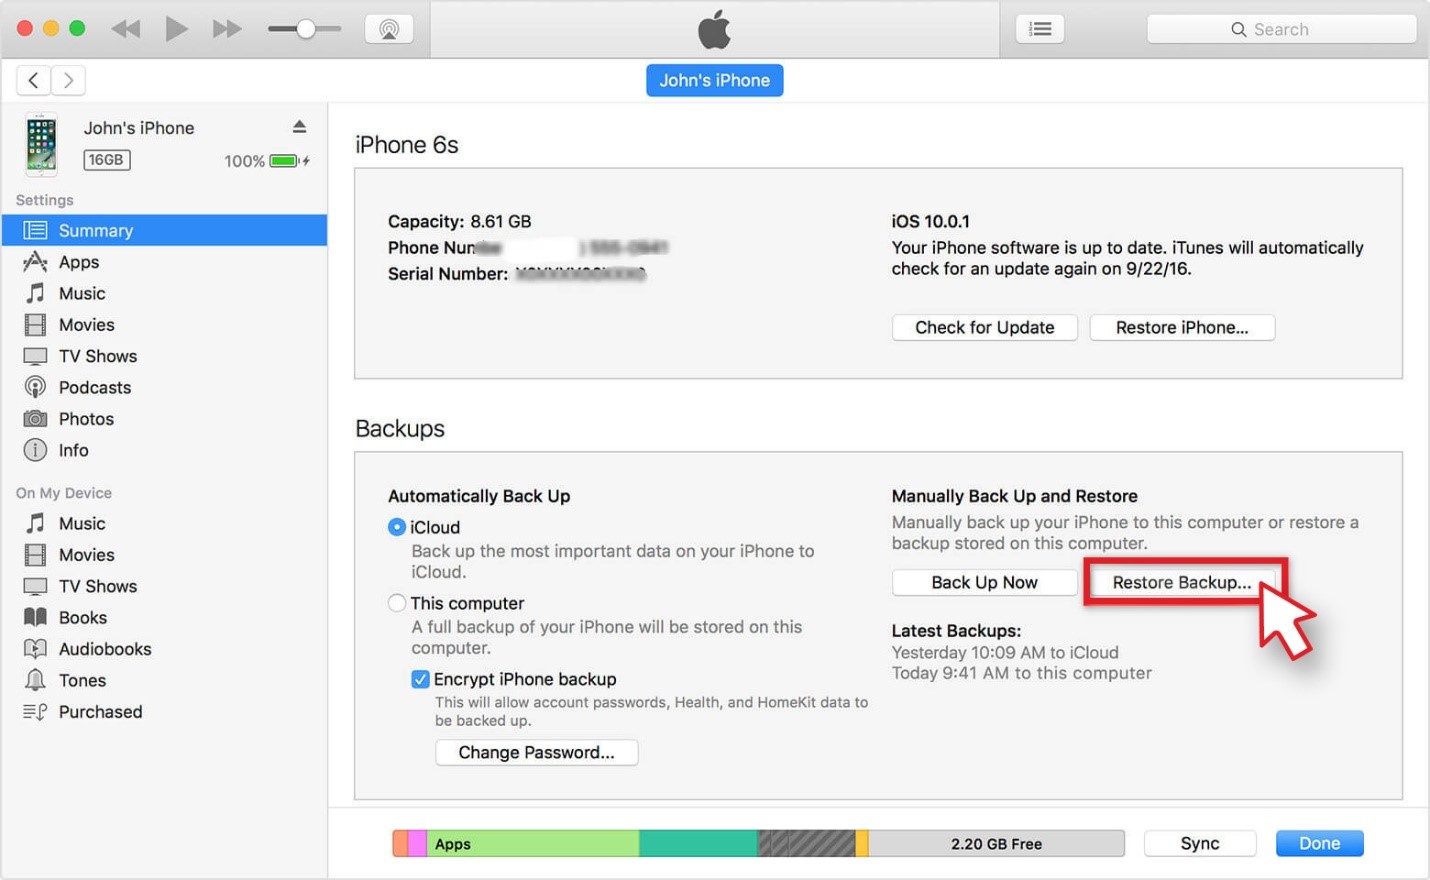
[Figure 22: Restore pictures from iTunes Backup]
Use iPhone Data Recovery Software
If you are not able to retrieve your lost files from iTunes, you may go with the best iPhone Data Recovery Software such as Stellar Data Recovery for iPhone. This software can restore deleted Contacts, Texts, Calendar, Photos, Videos, WhatsApp, Notes, and other data. It also can retrieve specific data from iTunes & iCloud backup files. It is also quite efficient at recovering encrypted iTunes backup files. You may try the demo version of the software to scan & preview files from iPhone.
4. Recover Deleted Files from Dropbox
If you have stored your files in Dropbox, you can retrieve them with just a few simple steps. Follow the instructions given below and get your access back to your important files.
- Sign in to your Dropbox account on dropbox.com.
- Find the files or folder that you want to restore.
- Click the … (ellipsis) icon, given at the right of the folder's name.
- Click Download and choose a desired location to save your files. (See Figure 23)

[Figure 23: Download files from Dropbox]
A folder will be downloaded as a single compressed file (ZIP file). You can extract it at the desired location and get your files back.
NOTE: If folder was already synced with Dropbox folder on your system, you will see Open option rather than Download. Click Open to access this folder on your PC.
What if I accidentally deleted file from Dropbox?
If you lost your files from Dropbox, just follow the below said steps and you will get your files back within a few minutes:
- Login in to dropbox.com.
- Click Files > Deleted files in the left sidebar.
- Select the name of the deleted file or folder you want to retrieve.
- Click Restore and wait until the process is done.
NOTE: You may also recover the shared files if you have Can edit access to it. If not, you won't be able to restore it.
5. Recover Files from iCloud
Apple's iCloud storage and cloud computing service lets you create a backup and access your documents, notes, photos, videos, contacts, and more. If you lost your files from iCloud Drive, you may recover them within 30 days. Whether you lost your data on iCloud.com or on your iOS device, iPadOS device, Mac or Windows PC, you can restore it with the following steps:
- Login to iCloud Drive on iCloud.com. (See Figure 24)

[Figure 24: Sign in to iCloud]
- Click Recently Deleted, given at the lower right corner of the window.
- Click Recover All > Recover. You may also select the specific files to recover and proceed further for recovery process.
The files will be restored at their location and you can access your data.
Tips to Avoid File Deletion in Future
You may lose your files at any moment due to accidental deletion, virus infection or some other reasons. Though you may recover them with the above-mentioned methods, yet safeguarding your crucial files is paramount. Though here are some of the best practices that will help you avoid file loss in future.
- Always create a backup either on Cloud Storage or external storage media device
- Be careful while emptying your drive or folders.
- Always make sure your antivirus is updated in the system.
- Don't attempt any hit or trial method to clean your disk/drive or volume.
- Don't attempt any file transfer process when your Laptop's battery is low.
- Keep a professional data recovery tool handy.
Wrapping Up
File deletion or loss can indeed turn out to be ugly if you don't have any backup. If you have backup of your data, you may retrieve your files from Google Drive, Dropbox, iCLoud, iTunes, etc. However, if you have lost your files permanently (without back-up), use a reliable data recovery tool to get them back. The software can retrieve data from empty Recycle Bin/Trash, virus infected systems, and even encrypted drive/partitions.
Download free trial now!


 5 min read