“Hello, world, Apple’s new macOS version is released lately. And so I’ve upgraded my Mac to the latest macOS Catalina 10.15. But things didn’t go well for me. After the upgrade, I found that several of my files were deleted in the process. Please help. I’ve no clue how to recover data after Catalina upgrade.”
Before upgrading to macOS Catalina 10.15, you must back up the data by using Time Machine backup drive. Time Machine ensures you won’t lose any data due to drive erasure that is performed when macOS is installed on your MacBook, iMac, or Mac mini.
Recover Deleted Files on macOS Catalina 10.15 & Big Sur
1. By using Time Machine
If you have backed up your Mac by using Time Machine before macOS Catalina upgrade, then follow the next steps to restore your Mac from the backup.
Step 1. Ensure you connect the Time Machine backup drive to your Mac.
Step 2. Restart your Mac and press and hold Command + R keys together. Release them when the Apple logo appears. Now, your Mac enters macOS Recovery Mode.
Step 3. From the macOS Utilities window, select “Restore from Time Machine Backup” then click Continue.
Step 4. Select your Time Machine backup drive—the restore source, then click Continue.
Step 5. Select the latest backup then click Continue.
Step 6. Then again, select a destination drive (Macintosh HD—the startup disk), then click Restore.
Step 7. Once the restoration process is over, restart your Mac.
Now, you’ll find all your data back to your Mac as it was before.
2. By using macOS Data Recovery Software
In case you didn’t back up your Mac before upgrading to macOS Catalina or Big Sur 11, don’t worry. Immediately stop using your Mac until you recover all your deleted files.
Steps to recover deleted files on Mac after upgrading to macOS Catalina are as follows:
Step 1. Download & install the free *Trial version of Stellar Data Recovery Professional for Mac (now compatible with latest macOS Ventura 13)

Step 2. Once the installation process is through, launch the software and follow the video/sequential steps for data recovery with Stellar.
Step 3. In “Select What To Recover” screen, specify the type of data that you wish to recover. In case you had lost all your files, go for everything then click Next.

Step 4. In the “Select Location” screen, specify the location of the drive from where data loss had occurred—“Macintosh HD” the startup disk. Toggle on “Deep Scan” then click Scan.

Step 5. For startup disk scanning, you need to allow macOS to oad Stellar Data Recovery extension.
Learn more: Recover Files from Ventura, Monterey, Big Sur, Catalina, Mojave & High Sierra Startup Disk.
Step 6. During the scanning process, you’ll find runtime preview of files. Click OK when the scanning process is over. The software will list all the scanned items.
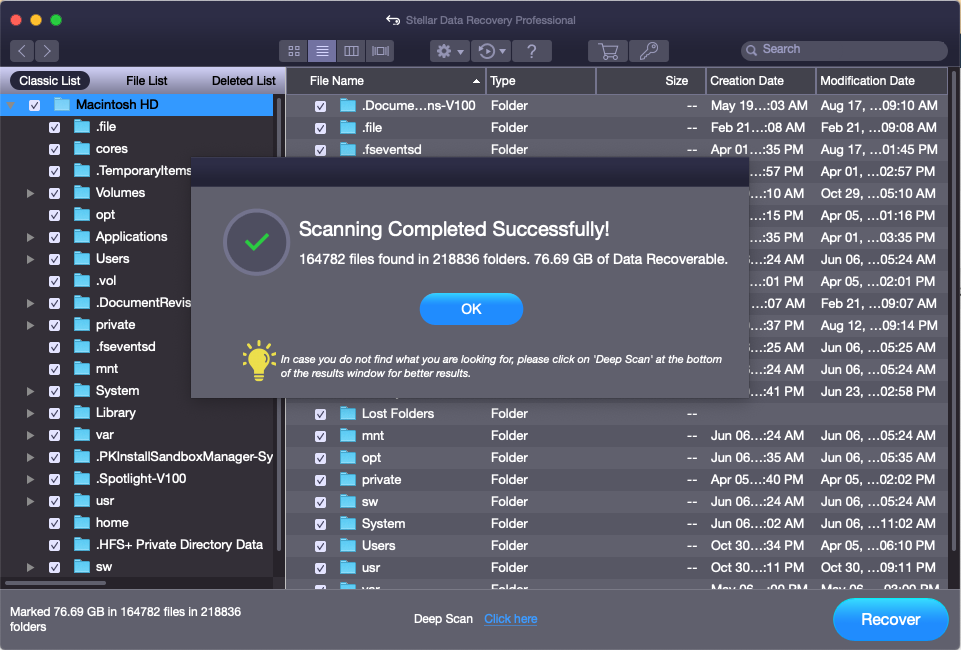
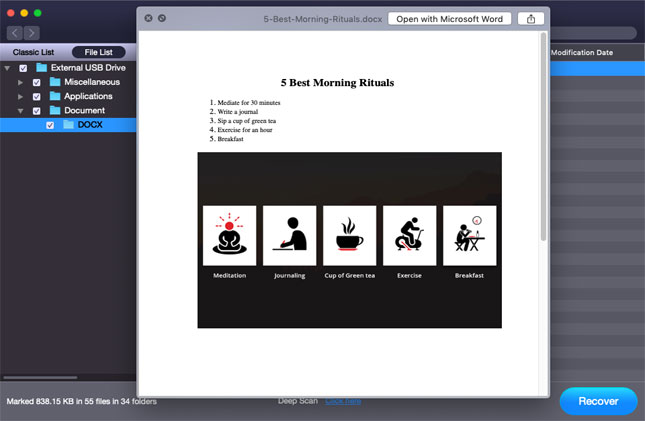
Step 7. Analyze the scanned data listed on the left pane by using three different views: Classic List, File List, and Deleted List. Double-click any file from the right pane to preview.
Step 8. Select all the required data from the interface, then click Recover. You’ll be prompted to enter a saving destination.

Step 9. Click Browse and specify a different drive—preferably an external one— to save the data. Click Save to save the recoverable files.
Step 10. Wait till the data recovery task is completed successfully. Navigate to the save location to find all your files intact.
Note: *Trial version of the Stellar Data Recovery software allows free scan and preview. You’ll need to purchase its license key to save recoverable files and unlock all the inactive features, including drive monitor.

There you go; you’ve recovered your files deleted after upgrading to macOS Catalina 10.15. Now you can transfer those files back to your Mac. Nonetheless, don’t forget to back up your data by using Time Machine.
Also, if you care for your important data, then maintain at least three copies of it. One copy is present on the Mac. And the other two copies on two different backup media types (hard drives, solid-state drives). Further, keep one backup copy in an offsite location—say cloud storage space—to deal with a natural disaster.
Related Article: How to Repair and Restore macOS Catalina Startup Disk
Conclusion
We hope this article helped you recover files deleted after upgrading to macOS Catalina. There are two approaches you can take. The first approach is relevant when you have a backup of your Mac. Follow the steps mentioned in the article to recover the deleted/lost files from Time Machine backup on macOS Catalina 10.15.
The second approach requires you to use data recovery software on Mac. You can directly download & install the software on the affected Mac, without the fear of data corruption. Launch the software and recover data from the startup disk. Save the recoverable data to an external storage medium. Check the recovered files and restore them to your Mac.


Data recovery expert on Mac & Windows platforms, with 10-year experience in writing
 6 min read