“Immediately after upgrading from Big Sur to Monterey on my M1 MacBook Air, most of my Time Machine backups stopped working. Any assistance to resolve the issue would be appreciated.”
Source: Apple Communities
Several users have reported that while trying to back up their Mac using Time Machine post-upgrading to Monterey, it initially works fine but stops a few minutes before the completion of the backup process. The control panel of Time Machine keeps on showing the last backup as the one taken immediately before the Mac was upgraded to macOS Monterey.
Are you facing a similar issue on your Mac after upgrading to macOS 12 Monterey? The problem in question here is undoubtedly a matter of urgency as Time Machine is one of the most important features on Mac. Any trouble with it might put you in the risk zone of data loss. So, follow the tricks and solutions provided in this post to fix the issue.
1. What to do if Time Machine is not working?
Being an integral part of every cautious Mac user’s backup precautions, Time Machine plays a critical role in safeguarding valuable data from being lost. Thus, you cannot afford any malfunction in this feature on your Mac system. Here is what you can do to resolve this issue.
Check for space availability on external hard drive
Instead of going for the other solutions, check the basic things first. Every hard drive has limited space and if you keep on using it for a longer time without cleaning it, the space availability might be less for further usage. Check the disk space available on your external hard drive through Disk Utility. Not having sufficient free space might be the reason why your hard disk is not working with Mac Time Machine. If this is the case, try freeing up the space by deleting unnecessary files on your hard drive.
Compatibility of external hard drive used with Mac Time Machine
If the external hard drive you are using on your macOS Monterey-powered Mac is not correctly formatted, it will become incompatible with the Time Machine feature. This is a probable reason for the Mac Time Machine not working issue. The default file system for most external hard drives is FAT and NTFS (suitable for Windows), but the Time Machine does not support these file systems. Moreover, the APFS file system supported by Mac is also not compatible with Time Machine. Check the file system of your external hard drive as under:
- Connect the hard drive to your Mac system.
- Open Finder and select the drive from the sidebar on left.
- Right-click and select Get Info option. Alternatively, press Command + I.
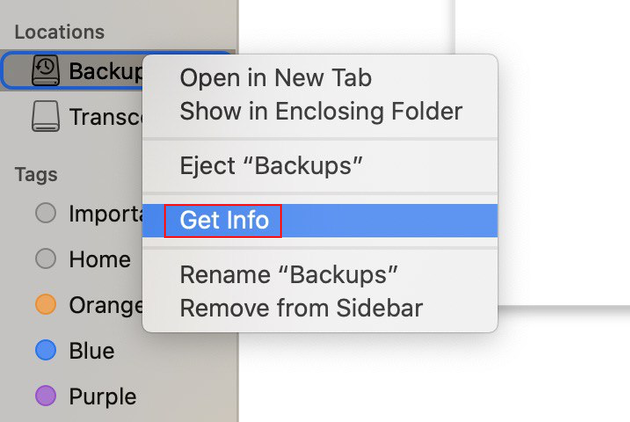
- The file system format of your hard drive will appear in the Backups Info window.
If the format of your external hard drive is one of the unsupported file system formats, you need to reformat your drive and change the file system. To change the file system format, follow the steps below:
Step 1: Connect the external drive to your Mac system.
Step 2: Open the Finder from Dock and click Applications > Utilities > Disk Utility.
Step 3: From the list on the left side of Disk Utility window, select your external drive.
Step 4: Click Erase button on the top of window.
Step 5: In the pop up window, change the format of your drive to Mac OS Extended (Journaled) and click Erase.
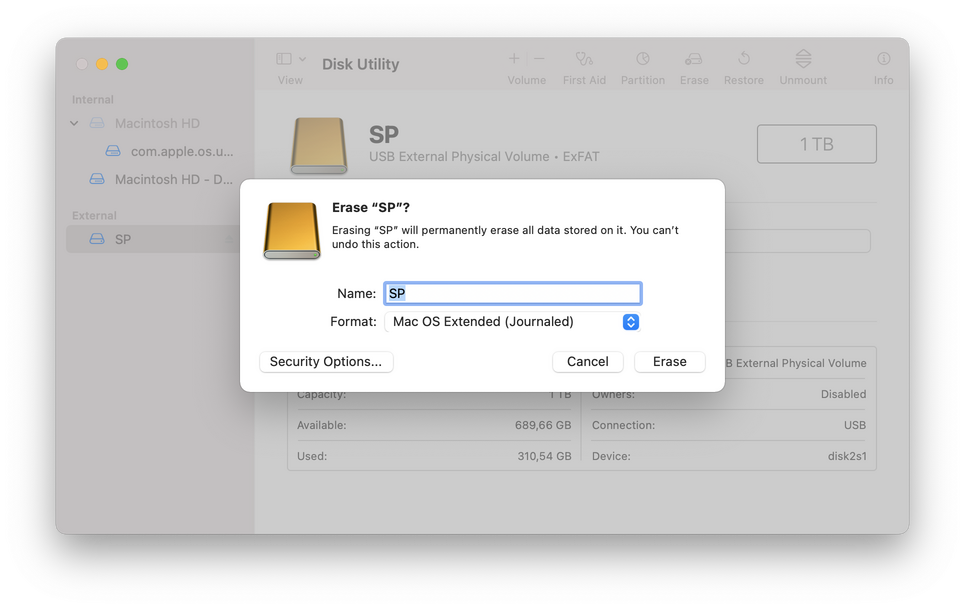
Now, your external hard drive is compatible with the Time Machine on macOS Monterey.
2. How to fix repeated backup failures of Time Machine?
You connected the external hard drive to the Mac and started to take backup through Time Machine, and the backup process started. However, after some time when you checked, you found that the backup process has failed. If you are facing this problem on your Mac after upgrading to the new macOS 12, here is how you can resolve this issue:
Clear-up the Time Machine temporary files
While taking the backup on your Mac, Time Machine creates some temporary files to facilitate the process. If the backup is repeatedly failing on your Mac’s Time Machine, you need to get rid of those temporary files. To do this, you need to close the Time Machine and follow the steps below:
Step 1: From the Apple Menu, select the System Preferences option.
Step 2: In the System Preferences window, click Time Machine anddeselect the Backup Automatically option.
Step 3: Close the System Preferences window and open Finder from Dock.
Step 4: Select the external hard drive from the sidebar.
Step 5: Open the Backups.backupdb folder.
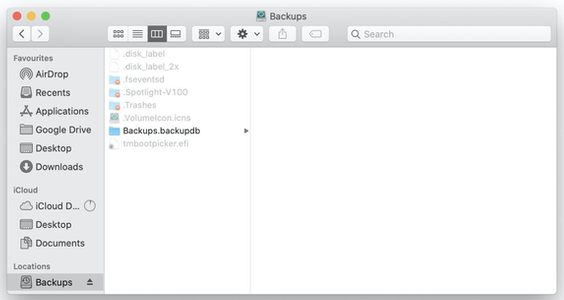
Step 6: Select all the files with .inProgress suffixed to their names and move them to Trash.
Step 7: Restart your Mac for the changes to take effect.
Launch Time Machine and start a new backup for your Mac machine.
3. Recover lost data due to Time Machine malfunction
Mac users are highly dependent on Time Machine backup to restore the data if it gets corrupted, damaged, or lost. But how to recover the data if the backup itself is damaged? Relax! There is no need to worry as there are ways to recover the data.
The possibilities of data loss are unavoidable in the following cases:
- Stuck in the middle of creating a backup on Time Machine.
- Erasing the external hard drive to change the file system format.
- Deleting the Time Machine’s working files.
There might be other scenarios of data loss when the Time Machine on your macOS Monterey fails to back up the data.
Whatever be the reason for data loss, you can still recover your data using Stellar Data Recovery Professional for Mac. Rated as one of the best data recovery software, it is capable of retrieving data from APFS, HFS, HFS+, ex-FAT, and NTFS drives. It is a comprehensive data recovery solution that can recover your data even from a crashed Mac system. You can easily recover files deleted from Time Machine external hard drive without any expert assistance, using the DIY Stellar Data Recovery Professional software.
Watch the video to know more about the software:
Conclusion
There could be various possible reasons for the Mac Time Machine is not working on macOS Monterey issue. However, the problem has nothing to do with your macOS. It might be caused due to incompatibility of the file system of the hard drive and other minor issues that can easily be resolved. You can recover your lost data using the solution provided above, even in the case of Time Machine’s failure.


Tech Enthusiast and Senior Writer at Stellar®
 6 min read