Solid State Drives (SSDs) are a new generation of computer storage devices. They are basically flash memory drives that use a grid of cells to store data. This makes them substantially faster than mechanical hard drives.
The grid of cells present inside an SSD is used over and over again to write, access, and erase data. However, this writing and rewriting process can only happen for a limited number of times before the SSD stops working. This limit is called the “Total Bytes Written” or TBW. When an SSD reaches this limit, it starts to slow down. Evidently, when this happens, it takes longer to access files and may also cause delay while booting up the system.
Let’s try to understand how users can identify SSD wear level on their Mac and what precautions they can take to ensure that data isn’t lost from the worn out SSD.
What is SSD Wear Level?
As explained earlier, each block on an SSD microchip can only withstand a certain amount of write/erase cycles before getting fully consumed. To put it to actual numbers, every single level cell (SLC), which is a fundamental unit of SSD, can withstand 50,000 to 100,000 write/erase cycles before becoming wear prone.
This is where wear leveling comes into play. Wear leveling is a technique used for identifying the usage level of an SSD and extending its lifespan. This technique arranges data in such a way that write/erase cycles are evenly spread across all blocks present on the SSD. Wear leveling is used in most of the SSDs to improve their lifespan. It’s handled by the SSD's micro-controller or firmware and controlled by algorithms.
Now let’s take a look at the two fundamental types of wear leveling algorithms in SSDs.
1. Dynamic Wear Leveling
Dynamic wear leveling is used by the SSD microchip blocks that undergo rewriting and are repositioned as new blocks. The algorithm chooses an empty block to store and write data and the micro controller keeps a track of the number of writes to each block. A major drawback of dynamic leveling is that the data blocks are not updated frequently, which can lead to uneven wearing.
2. Static Wear Leveling
Static wear leveling uses the same concepts as dynamic wear leveling, with one major distinction. When the number of block erases falls below a specific threshold, the unused blocks start to move so that low usage blocks can also be utilized. This results in more effective leveling, leading to somewhat slower write performance offset by increased device longevity.
Should you be worried about SSD Wear Leveling?
Ideally, no! You shouldn’t worry about SSD wear leveling as it’s backed by algorithms developed to make the SSD more efficient. That being said, there are some tradeoffs that come with the technique. For example, it increases the longevity of drive while compromising the speed in the long term.
How to detect a possible SSD failure in advance?
Self-Monitoring Analysis and Reporting Technology (S.M.A.R.T.) is a system that allows users to monitor a drive’s health. S.M.A.R.T. report lets users know about any problems with the drive so that they can take a backup of essential files and repair or replace the failing drive.
Here are some basic ways to check the S.M.A.R.T. status of your SSD in Mac.
1. Through Disk Utility
- Open Disk Utility from the path Applications -> Utilities -> Disk Utility.
- In the left sidebar, choose the desired drive from the list. It's critical that you select the “drive” rather than a partition. On many Mac systems, the drive may be referred to as "Apple SSD SM0256G Media," whereas the partition may be referred to as "Macintosh HD."
- If you don't see your boot drive, select "Show All Devices" from the View menu in Disk Utility's top left corner. If the phrase “S.M.A.R.T. status” appears in the disk information overview, you've correctly selected the disk rather than the partition (see the figure below).
 Macintosh HD">
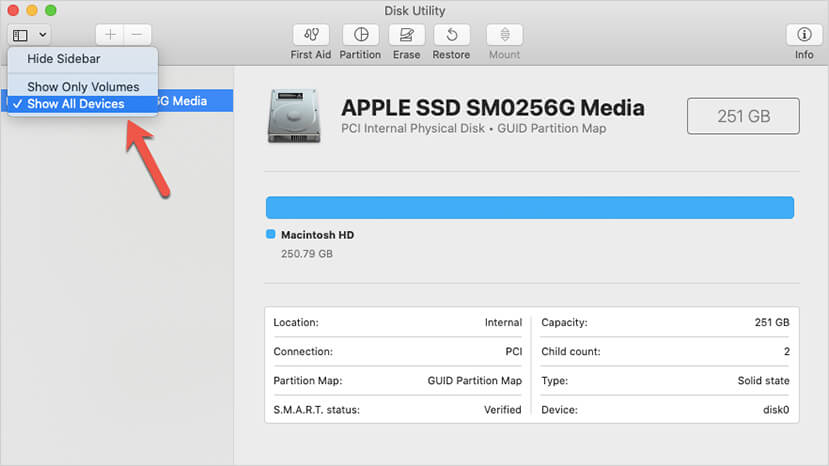
Most of the time, the S.M.A.R.T status will show as "Verified," which indicates that the drive is in good working condition. However, if the S.M.A.R.T. status is displayed as "Failing," make sure you take a complete backup before having it replaced.
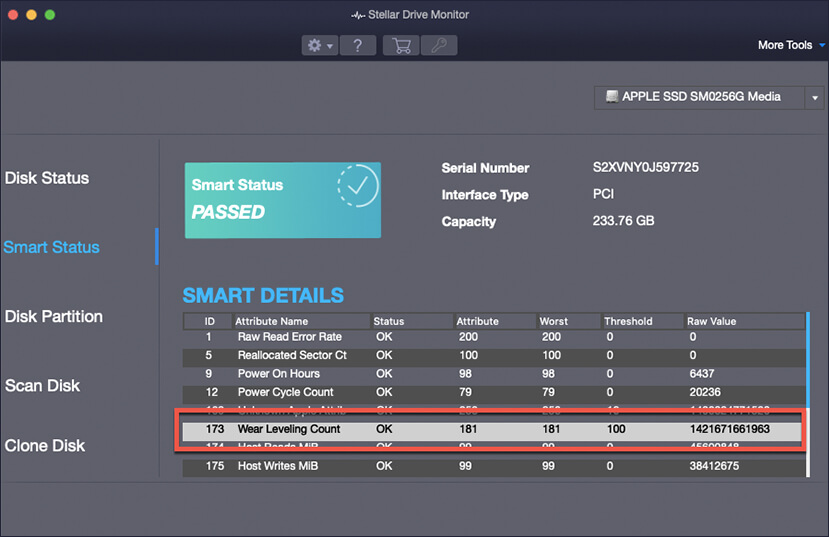
2. Use Stellar Drive Monitor
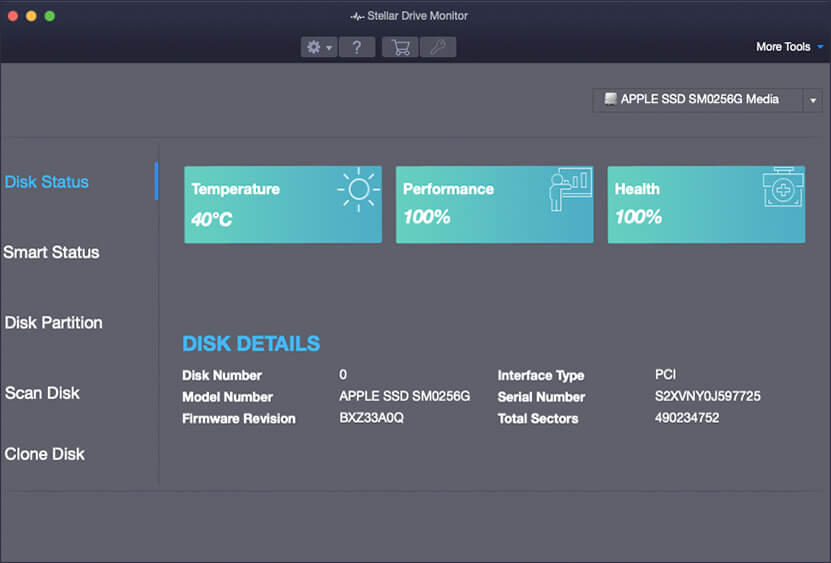
Stellar Drive Monitor is a sophisticated disk health monitoring utility that’s part of the Stellar Data Recovery software. It can assess the present state of the SSD by using a variety of health indicators. This software is used by various home users and IT professionals for diverse functions - from SSD/HDD health checkups to data recovery, all at an affordable price.
Here’s how to use Stellar Drive Monitor:
- Purchase Stellar Data Recovery Professional from its official website. Thereafter, download and install the software using the setup wizard.
- Launch the application and enter the license key you have received on email after purchasing the software.
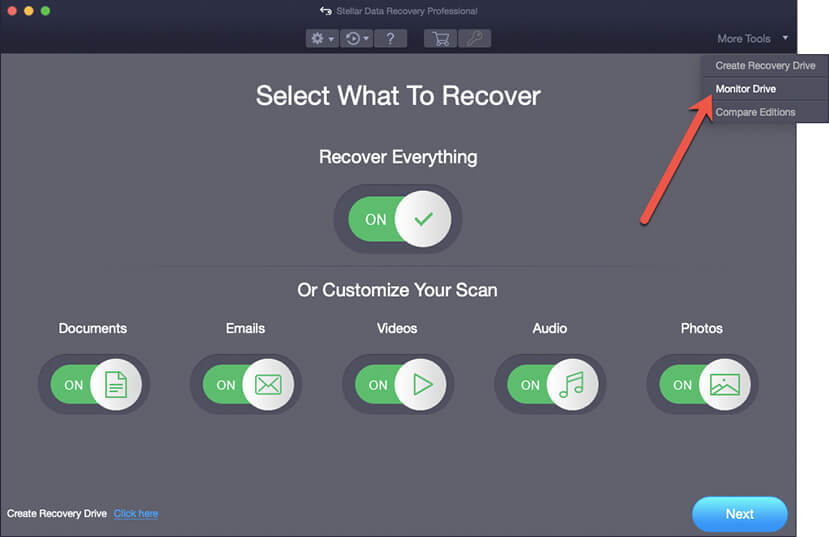
- Once the software is activated, go to the More Tools option on the top right corner of the software interface and click on the dropdown arrow. From the dropdown menu, select the ‘Monitor Drive' option.
- The Stellar Drive Monitor screen appears.
- Select your drive and review or analyze the drive health information to determine the state of the SSD.
If you found any issues after conducting the health checks on the SSD, then take backup or move your data elsewhere before the SSD wears out completely.
SSD Backup Techniques
1. Clone your SSD with Disk Utility
On Mac, Disk Utility can be used to clone a failing hard drive. But remember that the system refers to the cloning process as “Restore” since you're restoring data from the source drive to a new drive. These are the steps to be followed:
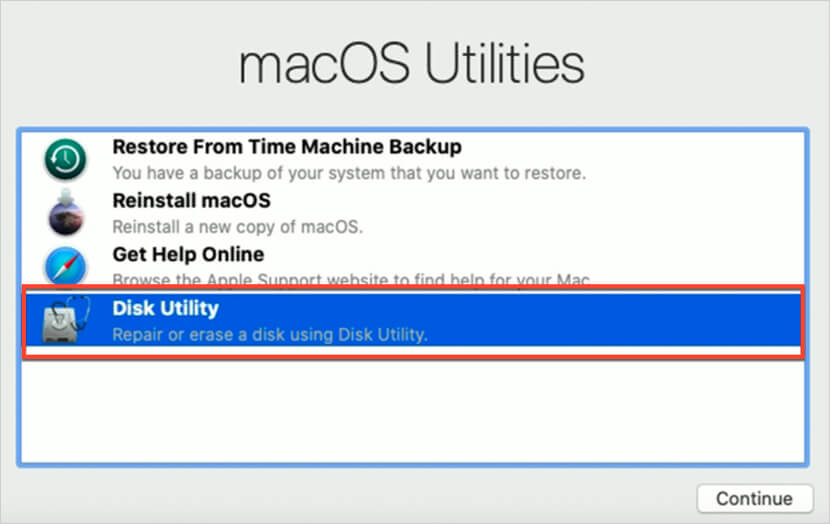
- Connect a destination drive to your Mac and restart the Mac.
- As the Mac is booting up, hold down Command + R simultaneously. You'll be taken to the Apple Recovery Menu. On this menu, click on Disk Utility.
- In Disk Utility, select your SSD and click the Restore button. Wait for the process to complete. It may take time depending on the amount of data on the drive.
- When the restore process is finished, click on Done.
2. Backup using Time Machine
Time Machine is Apple's proprietary application to back up all the files on Mac. Once you enable it, you’ll have the option to back up the files on your Mac hourly, daily, or weekly. It will examine your Mac frequently for new, updated, and deleted files, in order to create new backups. As long as the storage device has space, it will also keep a weekly backup. The older backups will be erased when the storage device runs out of space.
Here’s how to use Time Machine to back up a Mac:
- Connect your Mac to an external drive.
- From your Mac’s menu bar, click the Apple icon on the upper-left corner of the screen.
- Select System Preferences in the next step and then select Time Machine from the application menu.
- Now select the Backup disk option and then choose the drive you wish to back up. Click the Use Disk option to initiate the drive’s back up procedure.
- Finally, select the Backup Automatically option from the dropdown menu. This will immediately begin backing up your Mac.
Learn More: How to set up Time Machine and restore deleted data
What to do if S.M.A.R.T. status shows “Failed” and you don’t have a backup?
“I am having problems with my external SSD. The S.M.A.R.T. status is showing as “failed” in Disk Utility application and the SSD isn’t mounting on my MacBook Pro. My backup was disabled due to which I’m unable to recover my files. Is there any tool to recover my lost data as well as monitor my SSD’s health simultaneously?”
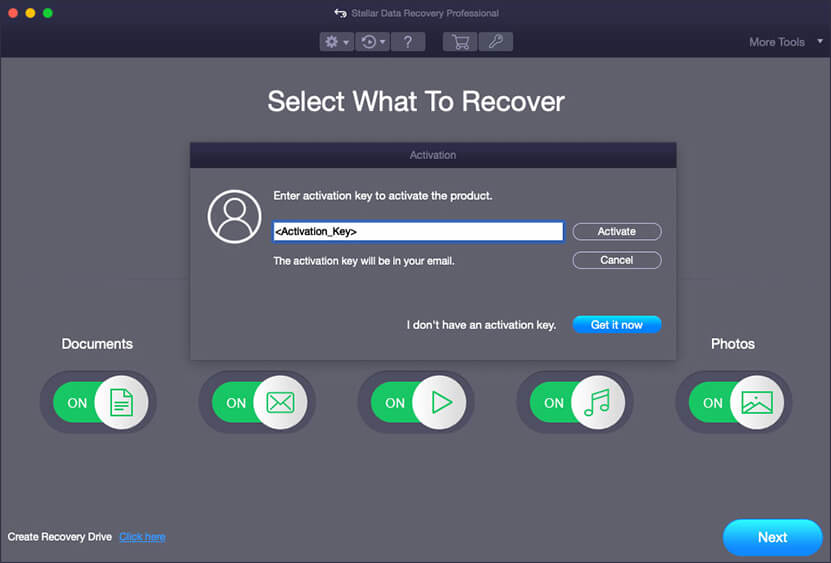
"If you’re stuck in a similar situation and looking for an all-in-one tool to recover lost data and monitor your SSD’s health frequently for avoiding any further damage, you should consider using easy-to-use SSD data recovery software - Stellar Data Recovery Professional.
Stellar Data Recovery helps users to recover lost data on Mac and track SSD/HDD health in real time. Not just that, Mac users can utilize the software's Drive Monitor functionality to clone their storage drive, generate a backup, or protect against irreversible data loss when it is seriously defective.
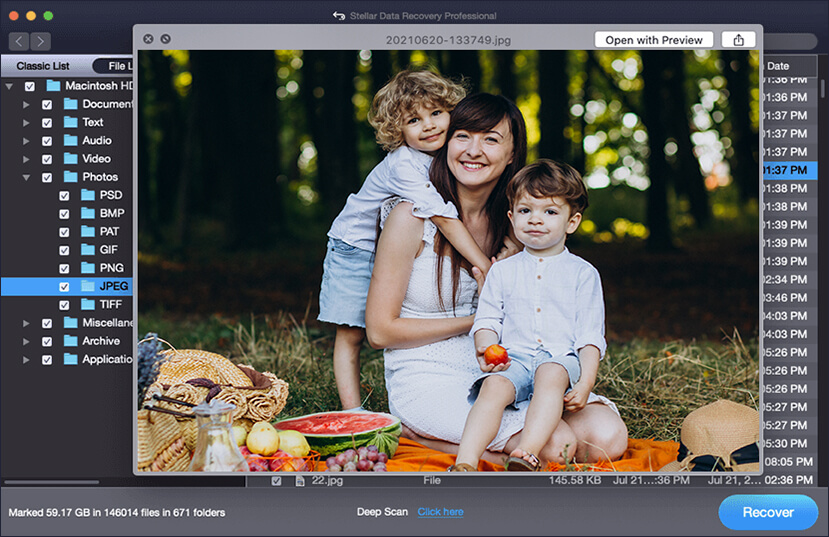
If you’ve lost data from your failing SSD, you can recover it using Stellar Data Recovery Professional using 3 simple steps:
- Select what kind of data you wish to recover.
- Select the drive from which to recover and perform a Deep Scan.
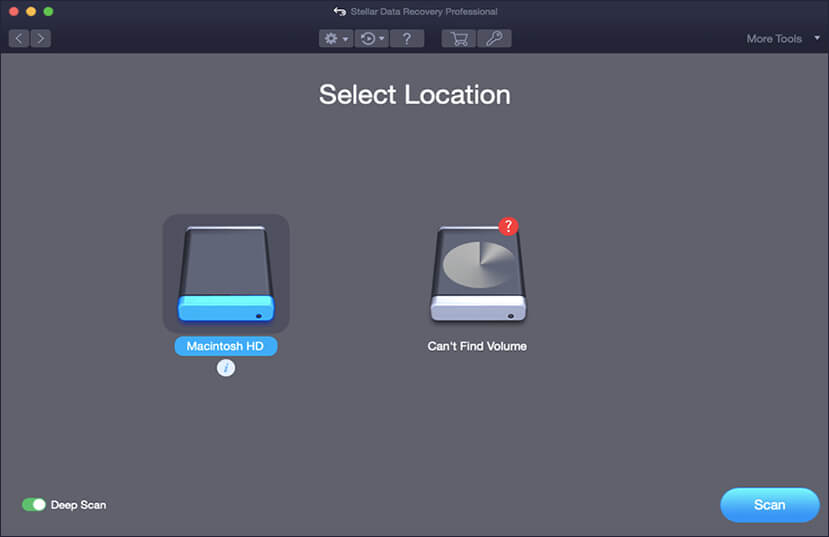
- Preview recoverable files and save to the destination of your choice.
The Premium version of the software offers some additional features that help you repair corrupt photos and videos on Mac. The Technician version offers the value of Premium edition and runs on 3 systems.
People also ask
In Conclusion
SSD wearing due to continuous use is certainly an issue that can increase the cost of operation for Mac users in terms of replacements or using SSD health checkup software. But so far, it appears to be a rather uncommon problem that will hopefully not affect the current generation of Mac models. But if it does happen, it’s highly recommended to invest in SSD S.M.A.R.T. tester software for checking the health of the drive frequently.


 6 min read