Summary: Encountering error code: 0xc0000001 on Windows 10? This Blue Screen of Death (BSOD) error may lead to booting errors on your system. Read this post to know how to fix error code 0xc0000001. Also, we have articulated a way to recover lost data with the help of a professional Windows Data Recovery Software.
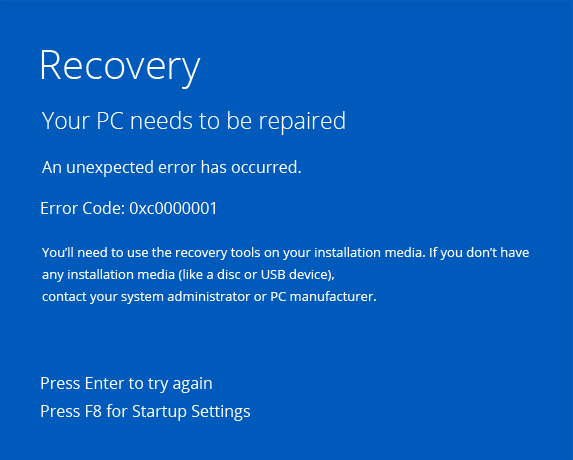
Many Windows users are reporting an error code 0xc0000001 on their Windows PCs (See Image 1). A blue screen with this error code means that you can?t boot the system normally. It may occur due to corrupt or missing system files, faulty app/programs, hardware issues, or damaged boot sectors.


Due to this error, your system may get stuck at a booting loop, reach an unbootable condition; and worse, it may lead to a complete system crash. In such conditions, your system and data are at stake! You may recover the important files, documents, and more by using a Professional Data Recovery Software. However, in order to fix the 0xc0000001 BSOD error, try the following troubleshooting methods.
Fix Error Code 0xc0000001 on Windows 10
- Perform Startup Repair
- Uninstall Problematic Software in Safe Mode
- Use Command Prompt
- Run System Restore
- Reset your PC
- Reinstall Windows 10
Caution: Performing some of the above methods to fix this error code may result in total data loss. Hence, we suggest you restore your data from PC before performing any of these methods. You can recover any type of lost data with the help of a professional Windows Data Recovery tool such as Stellar Data Recovery Professional.
This DIY (Do-it-yourself) Software can recover files, documents, emails, photos, and more. It also features a ?Create Recovery Drive? option, which helps you recover data even from an unbootable or crashed Windows PC.
Watch this video to recover your lost data:

Method 1: Run Startup Repair
If your system is not booting due to error code 0xc0000001, you can run Startup Repair to fix this issue. Turn on Windows PC and as soon as the Windows logo appears on the PC, press the Power button (repeat this step three times.) After the third interruption, Windows 10 will open the Automatic Repair environment.
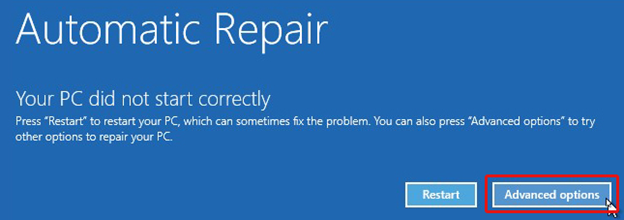
a. In the Automatic Repair environment, click Advanced option (See Image 2) on the screen, and follow the given steps to perform Startup Repair.

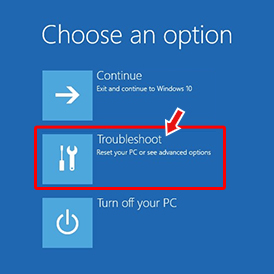
b. Select Troubleshoot. (See Image 3)

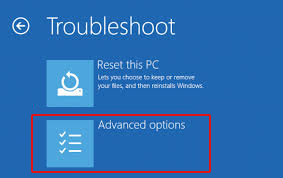
c. Choose Advanced Options from the screen. (See Image 4)

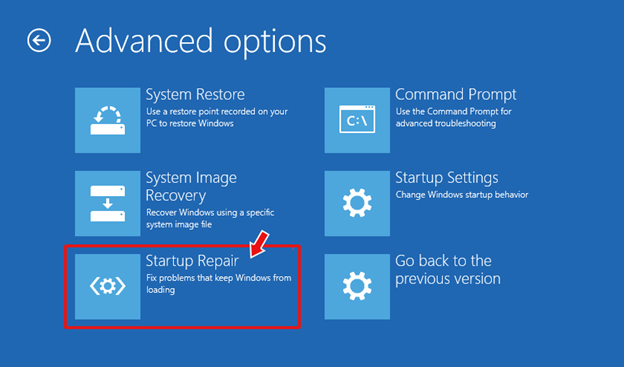
d. Click Startup Repair and proceed. (See Image 5)

e. Choose the type of account and type your password. (See Image 6)

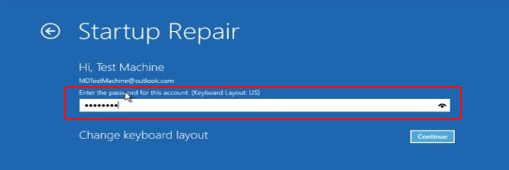
f. Click Continue. Once it is done, the Startup Repair will start.
g. Follow the instructions given on the screen for completing the Startup Repair process.
h. Now, check if the issue is fixed by restarting the system.
Method 2: Uninstall Problematic Software in Safe Mode
Sometimes this error may occur due to a malicious or corrupt third-party app/software or program. You may fix the issue by uninstalling the problematic program or software in Safe Mode with the help of the following troubleshooting steps:
a. Take a fresh or formatted USB device and convert it into a USB installation media by using Window?s media creation tool.
b. Boot your system with this USB Installation media.
c. Click Repair your computer and proceed further.
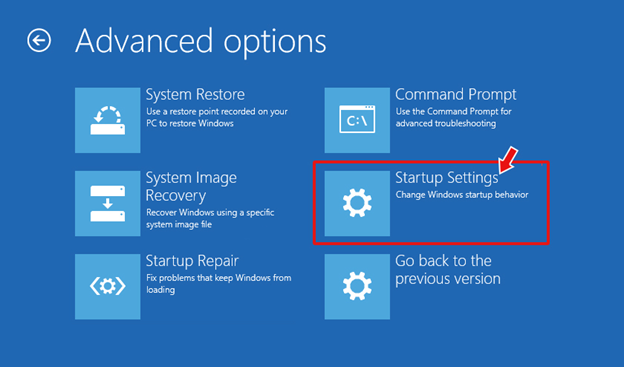
d. Follow Troubleshoot > Advanced options > Startup setting. (See Image 7)
e. Click Restart. Then press F4 to enable the Safe Mode. (See Image 8)


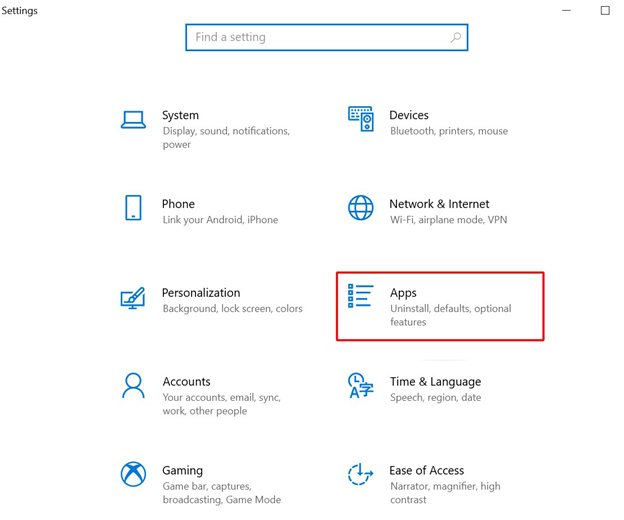
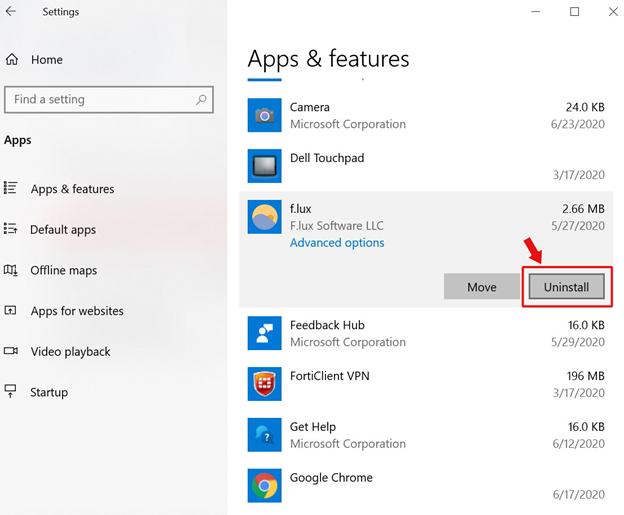
f. Open Settings by pressing Windows + I key and open Apps. (See Image 9)

g. Locate the problematic applications/software and click Uninstall. (See Image 10)

h. Now, reboot your system again and see if the error is fixed.
Method 3: Use Command Prompt Utility
If your system is in a non-bootable condition, you may use a USB installation media, created using the Windows Media Creation Tool, to change the BIOS setting and make sure to boot it from USB.
a. Enter into Automatic Repair setup and proceed by clicking Troubleshoot.
b. Click Advanced Options.
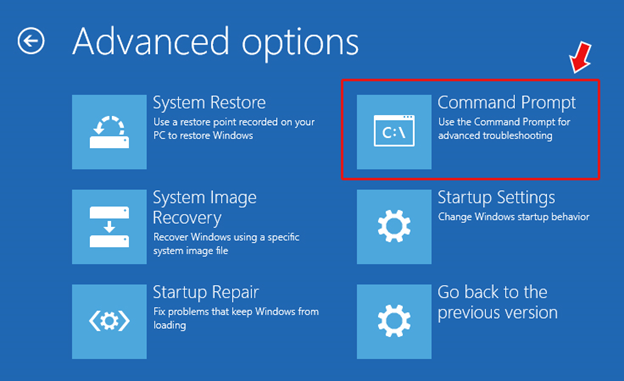
c. Select Command Prompt. (See Image 11)

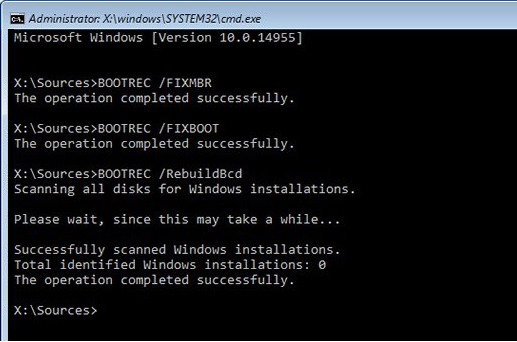
d. Enter in Command Prompt, run the following commands to fix the boot error:
- bootrec /fixmbr
- bootrec /fixboot
- bootrec /rebuildbcd (See Image 12)

Method 4: Run System Restore
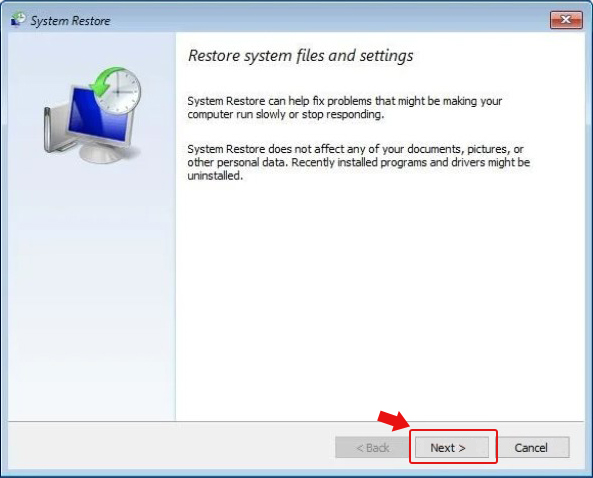
You can perform System Restore to fix error code 0xc0000001 on Windows 10. However, in this process, you may end up losing all of your system data. Hence, first backup your data or recover it with the help of a professional data recovery tool. To perform System Restore, follow the given steps:
a. Boot your system with a USB Installation media and click Repair your computer.
b. You will reach the Automatic Repair environment, click Advanced Options.
c. Follow Troubleshoot > Advanced options > System Restore. (See Image 13)


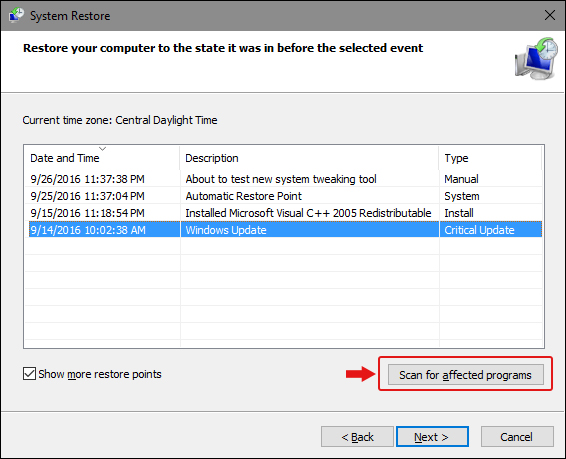
d. Click Next and select a restore point you want to use on the system. (See Image 14)

e. Follow Scan for affected programs. Apps will no longer be available on the creation of restore points. (See Image 15)

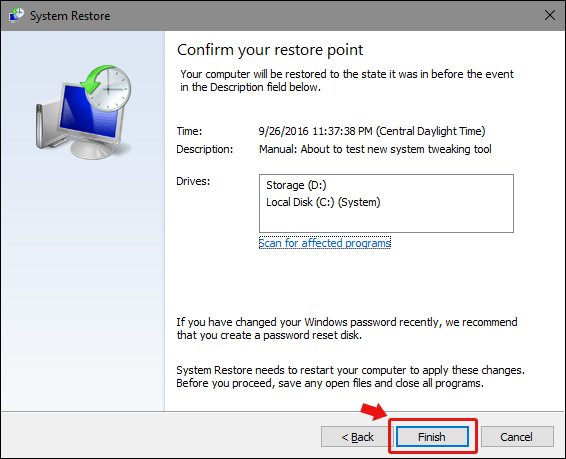
f. Follow Next > Finish. Once it is done, find if the system is free from this error. (See Image 16)
Method 5: Reset your PC
Windows 10 features a utility for resetting PC allows you to remove apps, software, programs, settings, and drivers causing problems for the system. Using this method, you may choose to keep files while resetting the PC or remove everything stored on it. To Reset the system, follow the given steps:
a. Boot into your system with USB Installation media.
b. Open Settings by pressing Windows + I and go to Update & Security.
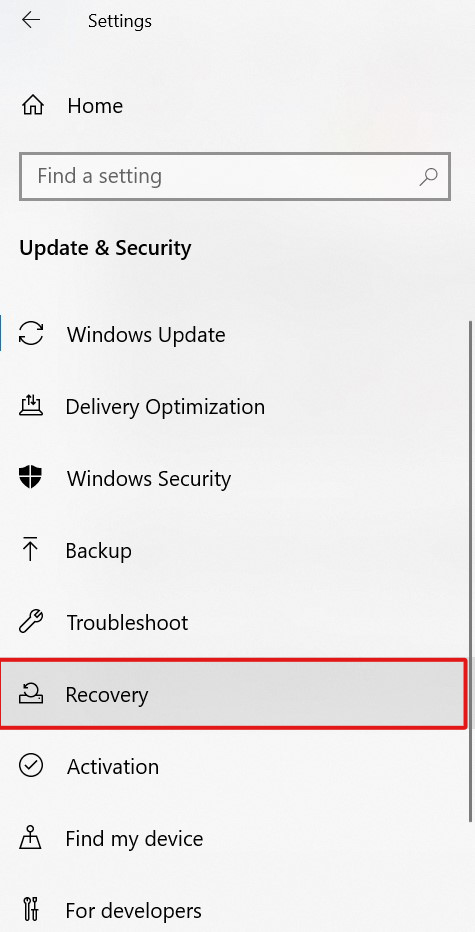
c. Click Recovery from the open window. (See Image 17)

d. Under Reset this PC, click Get Started. (See Image 18)


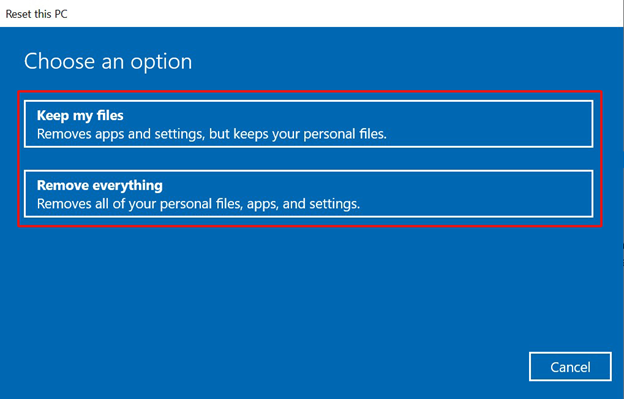
e. Click Keep my files (if you want to save your data) or click Remove everything (if the data isn?t important to you.) (See Image 19)

f. It is recommended you choose ?Remove everything? to get rid of corrupt or faulty settings, drivers, apps, etc. and clean up your system.
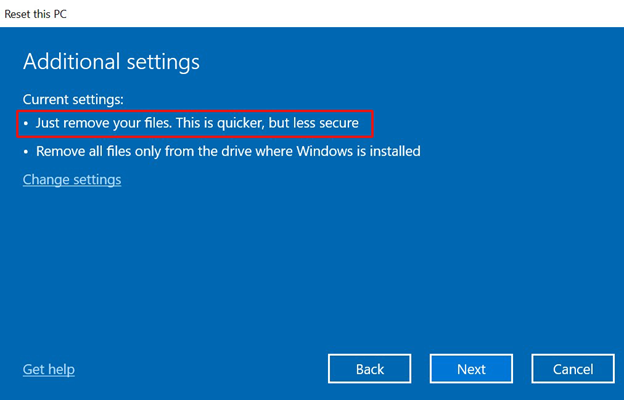
g. Click ‘Just remove your files’ > Next. (See Image 20)

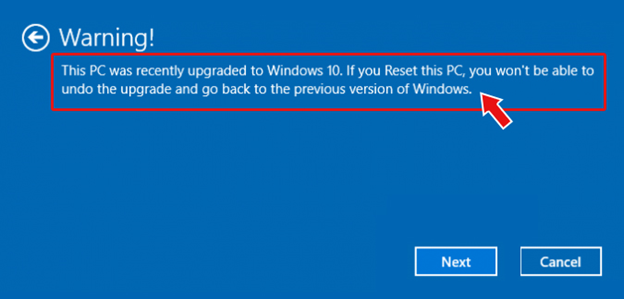
h. A Warning message will appear on the screen, click Next. (See Image 21)

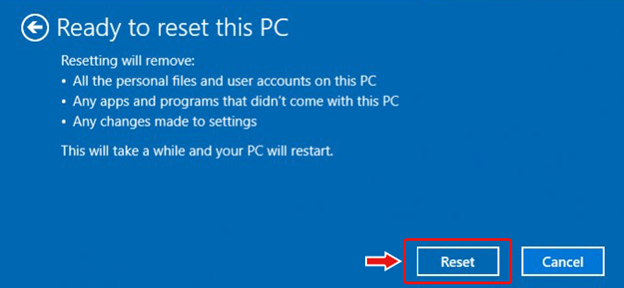
i. Click Reset when prompted to proceed. (See image 22)

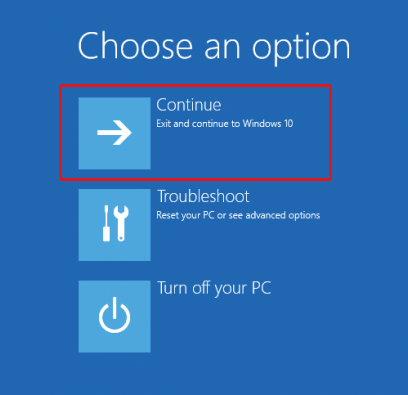
j. Click Continue. (See Image 23)

k. Wait for the process to finish and check if the problem has been fixed.
Method 6: Reinstall Windows 10
Decisively, if all the aforesaid methods don?t work to fix the error code 0xc00000001, you will be left with only one option, i.e., Reinstall Windows 10. You may use the same USB media installer that you used to perform Startup Repair, System Repair, Command Prompt, and Resetting the PC. Reinstalling Windows 10 will clean your system data as installing new Windows needs formatting of the drives and it creates new partitions in the system. Thus, if you have already recovered important data from the system with an efficient data recovery tool such as Stellar Data Recovery Professional, you can proceed with reinstalling Windows without any second thought about the safety of your data.
Conclusion
Error code 0xc0000001 is a blue screen error on Windows 10, which may occur due to several reasons such as corrupt system files, faulty software/programs, hardware changes, and more. You may try out all the tested methods mentioned above to get rid of this error. However, some methods like System Restore, Reset the PC and Windows Reinstallation completely wipe out the data from the system. Therefore, it is recommended that you first recover your data on Windows PC with a secure data recovery tool such as Stellar Data Recovery Professional and then proceed with fixing the error. Once you are done with retrieving the data and keeping it safe, you may then proceed for fixing the error.


