Summary: Global Address List or GAL is automatically created by Microsoft Exchange Server containing details of all users or mail-enabled objects in the Active Directory forest. In this article, you will learn the steps to export the GAL from Exchange Server to CSV format using the PowerShell cmdlets. You can also use a GUI-based EDB to PST converter tool, such as Stellar Converter for EDB, to quickly export the GAL to CSV format.


The Global Address List (GAL) is a list of all the people in the given organization which is accessed by computers over LDAP, CardDAV, and other applications for various reasons. Why would you need to export the global address list from your Exchange Server? There are a few reasons that could be either you are migrating to Office 365 or you are decommissioning your Exchange Server and moving to another platform.
Let?s start with the export of the GAL using the Exchange Management Shell as there are other ways to export the GAL depending on your situation you can use one solution or the other.
After you open the Exchange Management Shell you will use several commands to be able to export your data. There is no magic button to export the Global Address List and to do so you would need to list all your mailboxes and export the needed criteria.
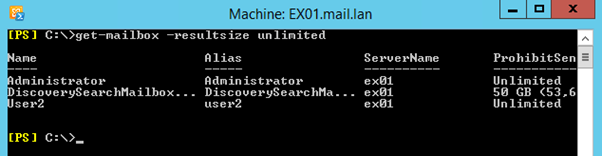
First, we need to get the list of all the mailboxes by using the Get-Mailbox PowerShell cmdlet as below with the unlimited value for the resultsize parameter. This depends on the number of mailboxes you have.

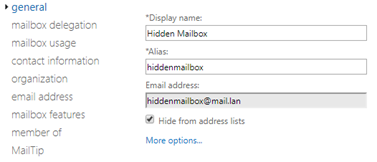
Now, this command will list all the mailboxes including those that are marked as hidden. If you open the mailbox from the Exchange Admin Center you will find the hide from address list tick box enabled.

If you do not want to export these mailboxes since these are system or notification mailboxes you would need to add an exception to the command below
get-mailbox -resultsize unlimited | ?{$_.HiddenFromAddressListsEnabled -eq $false}

If you would want to your hidden mailboxes to be listed, just removed the second part. The next part is for exporting all the necessary details from the mailboxes to get your address book by using the Get-User PowerShell cmdlet and filtering out the details needed using the Select cmdlet as if we use the Get-User alone, it will export all details of the mailboxes like Object Category, Creation date, IsValid and other items that you wouldn?t need in your export. To get what can you export as in the field names, you can so by using the Get-User | Select * command which will list all the details as below.
get-mailbox -resultsize unlimited | ?{$_.HiddenFromAddressListsEnabled -eq $false} | get-user | select *From the results you can pick and choose the information needed for the export


Once you are ready from the criteria you need to export, you would need to build the Select command and add it to the Get-Mailbox command as below to export all the needed information from the desired mailboxes. In this example, we are exporting the Display Name, Work Phone, and Email Address but of course, you can customize it with any field.
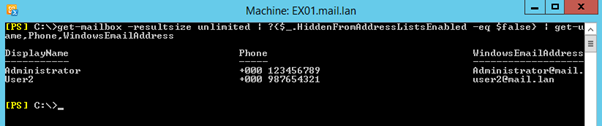
get-mailbox -resultsize unlimited | ?{$_.HiddenFromAddressListsEnabled -eq $false} | get-user | select DisplayName,Phone,WindowsEmailAddress
The next part and final part of this is to export it results into a CSV file. This can be done using the Export-CSV command. The command we need to add is the Export-CSV <destination> as below
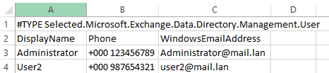
export-csv c:\GAL-Export.csvRemember to enclose your path in inverted commas if you have spaces in it as it will fail. The only problem with this is that it exports the and extra information row in your CSV so if you automate this process you would need to add something that removes the first row.

To remove this we must add the ?NoTypeInformation at the end of the command as below.
Export-CSV c:\GAL-Export.csv -NoTypeInformationOnce we have all this settled and in place, we need to add all the steps together to export the whole address book as desired. This example below will export the Display Name, Work Phone, and Email Address for all users which are not hidden in the address book into a CSV in C:\GAL-Export.csv.
Get-Mailbox -ResultSize Unlimited | ?{$_.HiddenFromAddressListsEnabled -eq $false} | Get-User | Select DisplayName,Phone,WindowsEmailAddress | Export-CSV c:\GAL-Export.csv ?NoTypeInformationOf course the below is possible if your Exchange Server is in good working condition. If your Exchange Sever is not working you can resolve to export from the Offline Address Book (OAB) on Outlook.
To do this from Outlook, you would need to open the Address book and select the list that contains the global address book copy (OAB) which is an offline copy of the GAL. Select all the contacts you wish to export and right-click on the selection. You cannot directly export them as first you need to import them to the contacts by choosing Add to contact.
This should be your last resort if you have some missing contacts as the synchronization between the GAL and the OAB could take some time as 24 hours by default. So if you made a number of changes before having problems in your Exchange Server, these will not be visible in your OAB as it hasn?t been updated yet. Also if you would have needed to export the hidden mailboxes from the address book, it would not be possible as the OAB only holds contacts that are visible. Another thing to consider is that when exporting a large number of contacts it would take a considerable amount of time while the performance would be degraded.


The final and most effective solution to export the GAL for old restore of an Exchange Server you need to use an application called Stellar Converter for EDB which can easily export all the information you need with a click of a button. Stellar Converter for EDB can open EDB files which natively would take a considerable amount of effort to restore, not considering you would need the exact Exchange Server version and a lot of time to set up. Stellar Converter for EDB can also export to PST and other formats while exporting to Live Exchange Servers or Office 365 tenants.

