External hard drives are a boon for all. They prove to be extremely useful as backup destinations, for temporary data storage and as portable libraries. As such, you would hardly find a user without an external drive in possession. However, like all hardware, external drives are often hit by problems. These include hardware failures, un-detection, virus infections etc. after which, your external hard drive not recognised.
This article will be describing a very common problem where a 3.0 external hard drive is not detected on a Windows 8.1 PC.


Keep in mind that data recovery software for hard drive will help you recover data from non recognised external hard drive while assuring that you’d be able to access all of your recovered files and folders without any trouble.
The Problem ? 3.0 External hard drive not detected on Win 8.1
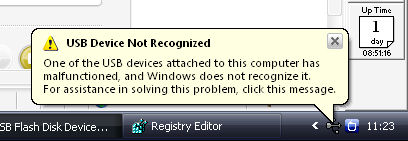
Quite a few users of Windows 8.1 complain that their 3.0 external hard drives are not recognised on their computer. After connecting the hard drive at a USB 3.0 port, they expect to hear the familiar connection sound and an Auto-Play pop-up. However, neither of those happens. Possible reasons behind such behaviour could be:

- Problem with the USB port
- Problem with the hard drive
- Driver issues
- Other complex problems
Whatever is the issue, before you start panicking, there are quite a few fixes which you can try to find out the real cause behind the problem and possibly to even fix it.
Common Fixes you can try
First try out the simplest tricks to rule out the most common errors:
- Connect the drive on some other port of the computer
- Connect some other hard drive or flash drive to the same 3.0 port
- Connect the drive to another computer
- Connect the drive using some other supported cable
If the drive is still not detected, move on to more complex fixes:
- Check if it is listed in Device Manager
Open Device Manager by typing ?Device Manager? in the Search box of the charms-bar and click on the icon. Alternatively, you could press Windows + R keys, then type diskmgmt.msc in the Run dialog box that opens and finally press Enter. If the computer is detecting it, it will be listed in the window that opens.
- Find out what the issue is through the system error displayed in the Device Manager window
If you find the drive listed in the Device Manager window but you see a yellow exclamation mark adjacent to it, it could indicate a driver problem. To know for sure, right-click on the device and select. You?ll be able to see a short error description in the window that opens. If it is not self-explanatory, search for the error on the Internet to understand it better.
- Update Driver if prompted
It you?ve not put your Windows updates on automatic mode, you might have missed out on a crucial driver update. In such a case, you?ll be able to see the message related to this in the window that opens on right clicking on the device as described in point 2 above. Click on the Update Driver button to install the latest copy of the driver software.
- Roll back faulty driver updates
If this problem occurred after you updated your device driver, roll back the changes by clicking on the Roll Back Driver button to bring it back to the previous stage. In this case, you could report the matter to support and find out if it is a known issue and if they have an update for it.
- Manually set the driver in case it is not done automatically
If you have multiple drives connected to the computer, sometimes, automatic drive letter assignment can create problems. In such a case, manually setting a unique drive letter to the un-detected drive can solve the issue. To do this, right-click on the capacity of the drive listed in Device Management and click on ?Change Drive Letter and Paths?. Subsequently set a unique letter for the drive.
- Un-install and reconnect the hard drive
If none of the above solutions work, you could try uninstalling the driver for the hard drive. For this, right click on the drive from the list in the Device Manager and click on Uninstall. Once that completes, unplug the hard drive from the computer and wait for a few minutes. Then plug it in again, if everything is fine, the driver should reinstall automatically and you should see the familiar things happening.
- Reinstall USB drivers
A problem or corruption with the USB drivers could also be the reason behind your troubles. Reinstalling them will fix the problem in this case. Expand the USB (Universal Serial Bus) controllers section in the Device Manager and right-click and uninstall each driver. Then restart the computer. Once it boots up, all drivers should re-install automatically.
- Disable USB selective suspend setting
This fix is less popular but often proves effective. Click the battery icon visible on the task-bar. Click on the ?Change Plan Settings? link placed adjacent to your currently selected plan. Now choose ?Change advanced power settings? and in the next window, expand USB Settings to the last level. Click the link adjacent to Plugged in option, then from the drop-down menu select disabled option.
- Format the hard drive
If none of the above fixes work, you could try formatting the hard drive. If you have a backup of your data, formatting shouldn?t be a problem. However, if you don?t, you will probably need external hard drive recovery software to recover your data from the drive once it becomes operational after the format.
- System Restore
If everything else fails, the only option left could be to do a system restore to an earlier date when everything worked fine. Backup your recent data and restore the computer to an earlier system restore point.
Concluding Lines
At least one of the above fixes should definitely make your external hard drive visible on the computer. However, if the problem persists, you might have to contact the support for that hard drive or replace it.

