Contents
Your yearning to shoot pitch-perfect photos may go unfulfilled due to a shortfall in the camera’s imaging calibre or other technicalities of the craft. Probably, your camera settings were not up to mark or there wasn’t sufficient lighting at the time of shoot. Due to these reasons, photos may turn out grainy, blurry, dark with strange spots, dull, or have other shortcomings.


Photoshop is a great solution for such issues in photos- it can fix damaged photos and make them look better.
In this blog post, we’ll share the key features of Photoshop that you can use to fix the color, brightness, and other noise in your damaged pictures. We’ll also outline a specialized photo repair software that can fix severe corruption in images including RAW file formats.
How to fix damaged photos by using Photoshop

Photoshop can fix damaged and distorted photos. The raster graphics editor reduces color and luminance noise along with correcting other flaws such as red eye, blemishes, spots, etc. in the photos.
Watch this video to know how to repair a damaged photo in Photoshop

Use the below methods in the latest Photoshop CC, CS6, CS5, and lower versions.
Methods to fix damaged photos in Photoshop:
- Use Noise reduction filters
- Use Lab Color Mode
- Use Photoshop retouch & repair tools
Use Noise reduction filters
What you can fix: Spots, grains, dots of red, green, and blue, color fringing, halos, shadows, pixelation, luminance noise (black, white, and grey dots), banding etc. in photos
Colored artifacts or distortion in your photos mostly occur due to wrong camera or light settings. Noise filters in Photoshop are the best way to remove such color issues in the images.
Photoshop offers two mode to reduce noise in the pictures – basic and advanced. If you don’t get satisfactory results in the basic mode, try the advanced version.
How to reduce Noise in Basic mode in Photoshop

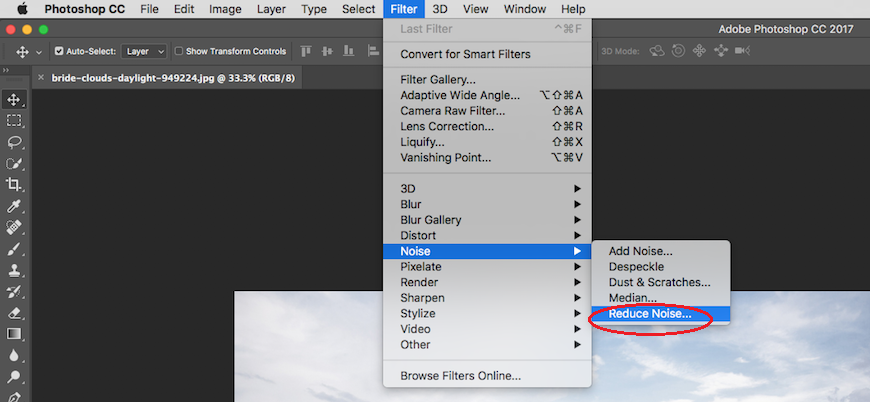
- In the top bar select and follow Filter > Noise > Reduce Noise
- Zoom in and out the area from where you want to reduce noise with the + / – button below the image preview
- On the right pane, select Basic

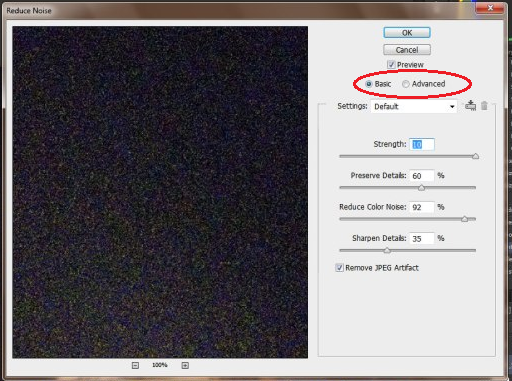
- Adjust the Strength, Preserve Details, Reduce Color Noise, and Sharpen Details sliders. Try various combination settings to get the balanced picture
- Preview the results after check-in the Remove JPEG Artifact box
- Click OK on top
| Note: Some Photoshop filters that you can use to reduce various types of noise in photos – Despeckle, Dust & Scratches, Reduce Noise, Sharpen, and Sharpen Edges. |
How to reduce Noise in Advanced mode in Photoshop [

- In the top bar select and follow Filter > Noise > Reduce Noise
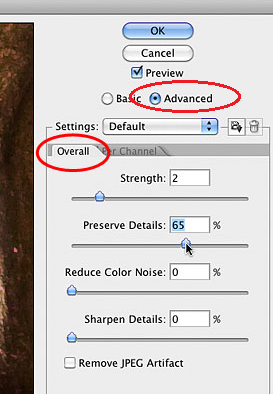
- Select Advanced
- Select Per Channel tab
- Select the Channel one by one and adjust the Strength and Preserve Details sliders for each
- Preview the changes and click OK
2. Use Lab Color Mode
What you can fix: Luminance noise – brightness issues, black, white, and grey dots in the photo
Luminance noise affects the brightness in the photos. It occurs due to inappropriate light and ISO settings during the shoot.
How to reduce Luminance Noise with Lab Color Mode

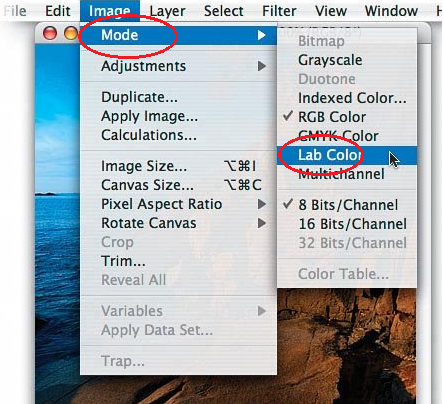
- In Photoshop menu, go to Image>Mode>Lab Color
- Go to Layers, create a copy of layer by dragging the current image background layer to the Create New Layer icon seen below
- Go to the Channels tab, create a copy of Lightness channel by dragging the current channel to the Create New Channel icon seen below. Name the new channel so as not to confuse with the original one while making changes.
- Channels tab has the Lightness channel (for brightness) and channel a and b (for colors). Click on the Lightness channel, adjust the respective values to reduce the luminance noise
3. Use Photoshop retouch & repair tools
What you can fix: The old damaged photos, blemishes, spots, red eye, etc.
Photoshop offers a variety of retouch and repair tools to improve and enhance the damaged photos. You can easily fix imperfections such as red eye, spots, blemishes, scratches, etc. in your pictures. The retouch and repair tools are boon for photographers who need to repair their client’s old damaged photos.
Some of the efficient Photoshop retouch and repair tools are Clone Stamp tool, Healing Brush tool, Spot Healing Brush tool, The Patch tool, Red Eye tool.
How to use Clone Stamp tool
The Clone Stamp tool lets you to copy one area of an image over another of the same image, which has the same color mode.
- Select the Clone Stamp tool
- Drag it over the area of the photo you want to repair
How to use Healing Brush tool
The Healing Brush tool fixes imperfections. You paint with the sampled pixels from an image or pattern like in Clone Stamp. Additionally, the Healing Brush matches the texture, lighting, transparency, and shading of the sampled pixels to the pixels you are going to repair.
- Select the Healing Brush tool icon
- Click the brush sample and set brush options (Mode, Source, Aligned, Sample, and Diffusion)
- Set the sampling point by placing the pointer over an area of the photo
- The sampled pixels are blended with the existing pixels
How to use Spot Healing Brush tool
The Spot Healing Brush removes spots, blemishes, circles, and anomalies in your photos. It is similar to the Healing Brush but doesn’t require you to specify a sample spot. It automatically samples from around the retouched area.
- Select the Spot Healing Brush tool from the toolbox
- Choose a brush size in the options bar
- Choose Replace to preserve noise, grain, and texture at the edges of the brush stroke
- Choose a Type option in the options bar (Proximity Match, Create Texture, Content-Aware)
- Select Sample All Layers in the options bar. Deselect Sample All Layers to sample only from the active layer.
- Click the area you want to repair
How to use the Patch tool
The Patch tool repairs a selected area with pixels from another area or a pattern. It matches the texture, lighting, and shading of the sampled pixels to the source pixels.
- Select the Patch tool icon
- Drag in the image to select the area you want to repair
- Select Source in the options bar
- To adjust the selection, shift-drag in the image to add to the existing selection
- Adjust the Diffusion slider
- Position the pointer inside the selection and drag the selection border to the area you want to patch
- Release the mouse button
How to use Red Eye tool
The Red Eye tool removes the common red eye issue in your photos.
- Select the Red Eye tool in the RGB Color mode
- Draw a box around the red eye in the image. Red eye is fixed.
Note: You can visit helpx.adobe.com to know in detail how each can be used to repair your damaged pictures.
Easy way to repair damaged and corrupt pictures
Use Stellar Repair for Photo – a DIY photo repair software
What you can fix: Repair corrupt and damaged photos including grainy, blurry, broken, pixelated, with grey bands, or giving errors. Fix issues like corrupt headers, JPEG file data, invalid JPEG file structure, etc.
Stellar Repair for Photo provides a fast and easy way to repair corrupt, broken, or damaged photos. The best thing about this photo repair tool is that it can repair RAW file formats of all popular camera brands like Nikon, Canon, Sony, Fuji, Olympus etc. Unlike Photoshop, the software can repair multiple photos at a time. You don’t need to juggle with the functions or settings to get the desired results.