Summary: Unable to open JPEG files because you don’t have the permission to view it is a common issue Mac users often face and is quite frustrating.Therefore, this blog highlights some ways to eliminate the issue and fix JPEG files.


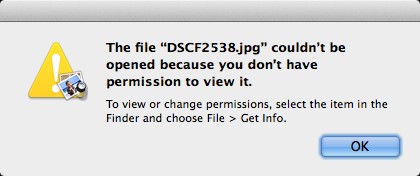
Mac users often report that at times when they try to access their JPEG/JPG files all that appears on the screen is ?The file cannot be open because you don?t have the permission to view it? error.
Nothing can be worse than this, as you don?t have the read and write permission to your own JPEG files, how ironic that is. Well, that?s what the purpose of the blog is as it sheds light on some of the different methods to deal with the error and fix JPEG files.

That said, implement these go-to procedures to fix the error. Prior to initiating the repairing process, it is recommended to backup all your files so that in case something unexpected happens at least you can restore your original files.
If you don?t have the permission to open your JPEG/JPG files, the following might be the reasons:
- The problem could be due to a third-party installer. To elaborate, you may have multiple accounts on a Mac device and it is possible that you might have installed a third-party application while logged in to another user account; therefore, install applications with your normal user account
- You might not have the root ownership of the files and folders
- Files and folders might have been affected due to power interruption
- Files have been infected by viruses or the storage media has bad sectors
Methods to fix the error:
i. Delete some files in the library
If you?re unable to open JPEG/JPG files, quit the photo viewing application and backup all your photos. Then go to the Finder menu bar, hold down the Option key, and select Go < Library. Under the Library folder, delete the following items:
- Containers/com.apple.Preview
- Saved Application State/com.apple.Preview.saved state
- Preferences/com.apple.Preview.LSSharedFileList.plist
- Preferences/com.apple.Preview.SandboxedPersistentURLs.LSSharedFileList.plist
- Caches/com.apple.Preview
After deleting the items, try opening JPEG/JPG files, if everything works fine, then well and good else proceed with the next step.
ii. Run Disk Utility
The problem could be with your Mac hard drive and to fix the error, you need to run Disk Utility in order to regain access to your photos.
There might be a probability that your drive is corrupt or damaged and that is causing the issue. Disk Utility is the preferred way to eliminate disk-related issues as it scans the disk?s structure for errors and automatically fixes it.
To fix the error, follow these steps:
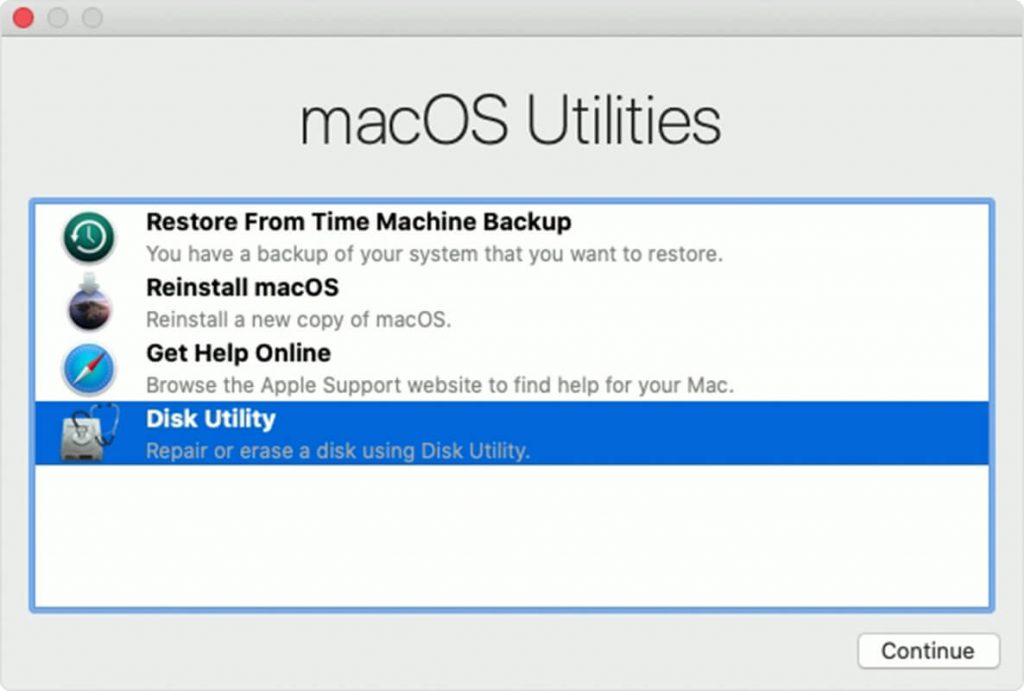
i. Restart your Mac and hold down ?Command + R? until the Apple logo appears on the screen. macOS Utilities is displayed, select Disk Utility

ii. Select the required hard drive and click on ?First Aid? followed by ?Run?

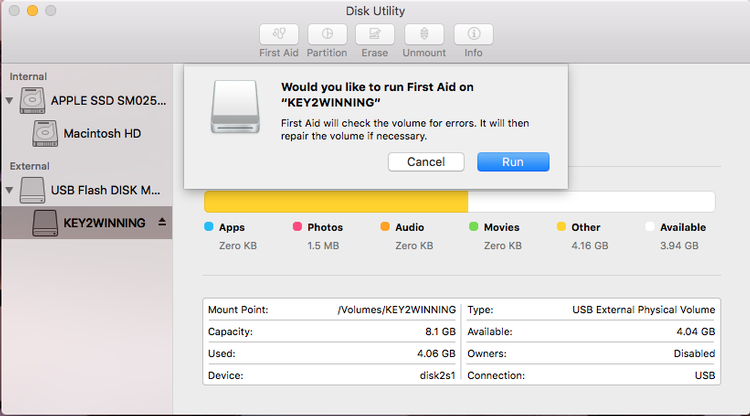
iii. Disk Utility analyzes the Mac hard drive for errors. If Disk Utility finds any error on the drive, then it automatically fixes the error and repairs the disk.
iii. Run a reliable software to fix JPEG files
Although it won?t fix the error yet if the error is in the JPEG/JPG files, then it can easily and efficiently repair the affected files. Above all, the repairing process is pretty much simple and within a few clicks, you can repair your photos.
- The software has minimal system requirements; hence, it can be easily downloaded. Launch the software and on the home-screen select click on ?Add File? to add the corrupt or damaged JPEG/JPG files.
- The software lists all the files. Further, you add or remove files and once the files are chosen, click on Repair to start the repairing process.
- Once the repairing process is complete, preview the files to ensure that the repairing process is 100% successful.
- Select the files and click on Save to save them at the preferred location.
To Sum Up
Now the issue is not an issue anymore as you have a solution to repair the error and again have the permission to your JPEG/JPG files. Further, the blog also highlights a JPEG repairing software if the file itself is corrupt or damaged. Above all, the key to safeguarding your files is to have a relevant backup.

