Summary: Lots of users have reported that CHKDSK utility deleted their data after running it through CMD (Command Prompt). Here we are sharing with you the detailed guide how lost CHKDSK files recovery is possible using DIY recovery software.


Check Disk or CHKDSK is a system tool that helps to verify the file system integrity of a volume and fix the logical file system errors including bad sectors. It is commonly used when the system shows various boot errors and for repairing the disk. However, it doesn?t work every time.
This is indeed true as CHKDSK utility marks the bad sectors on the hard disk in order to help Windows understand not to store or read data from those marked bad sectors. If data is stored in those bad sectors, it will be lost permanently since Windows stops accessing those marked bad sectors. However, if you don?t use CHKDSK utility, even when the system is prompting, you are inviting more trouble as this could be a sign of bad hard drive health, which can lead to a disk failure and ultimately data loss. This is a catch 22 situation so you need to be very careful about when to use CHKDSK utility in Windows.


To understand this, you need to know how CHKDSK utility works and what you can do next to recover deleted files and data in case CHKDSK utility deletes or further corrupts your hard drive data.
How CHKDSK Utility Works?
When you run CHKDSK, this utility does whatever it needs to do in order to fix the logical file system. CHKDSK?s attempt to ?fix? an issue could also result in data loss. CHKDSK process consists of five stages out of which three are major while two are optional stages. You can also see different stages of CHKDSK when you run the utility in CMD.
Stage 1. Checks and Verify Files
Stage 2. Checks indexes on Volume
Stage 3. Checks Security Descriptors for each Volume
Stage 4. Verification of Data (optional)
Stage 5. Verifies Free Space (optional)
Note: Stage 4 and Stage 5 are two extra passes to look for bad sectors that are performed when you use parameter /r while running CHKDSK; e.g. chkdsk X: /r where X is the drive letter.
Before running CHKDSK you should always remember,
- CHKDSK can only check and repair logical disk errors in the file system
- CHKDSK can?t check network drives
- It marks found bad sectors as ?bad?. This helps Windows understand not to store data at bad sectors to avoid data loss.
- Do not use parameters with CHKDSK if you don?t know how parameters work.
- Close all files, programs, and folders before running CHKDSK utility. If you don?t follow this rule, you may lose data or damage your hard drive file system.
Recover Files Lost due to CHKDSK Command
Now that you have understood how CHKDSK utility works, and how it can lead to data loss; it?s time to learn how you can recover files that are lost after using CHKDSK command. For this, you need the windows data recovery software, which can help you recover data from a corrupt or formatted hard drive. Stellar Data Recovery- Standard, is a safe and secure data recovery tool that can help you recover data deleted by CHKDSK utility.
Follow these steps to recover files lost after running CHKDSK:
Step 1. Remove the hard disk from the PC or Laptop. Use an HDD enclosure or SATA to USB converter to connect the extracted hard drive with another PC. This is important in order to successfully recover the data. If you use the software on the same PC from where data is to be recovered, you may overwrite the data and thereby make it impossible to recover.
Step 2. Follow these instructions,
- Download and Install Stellar Data Recovery- Standard on different PC


- Launch the software

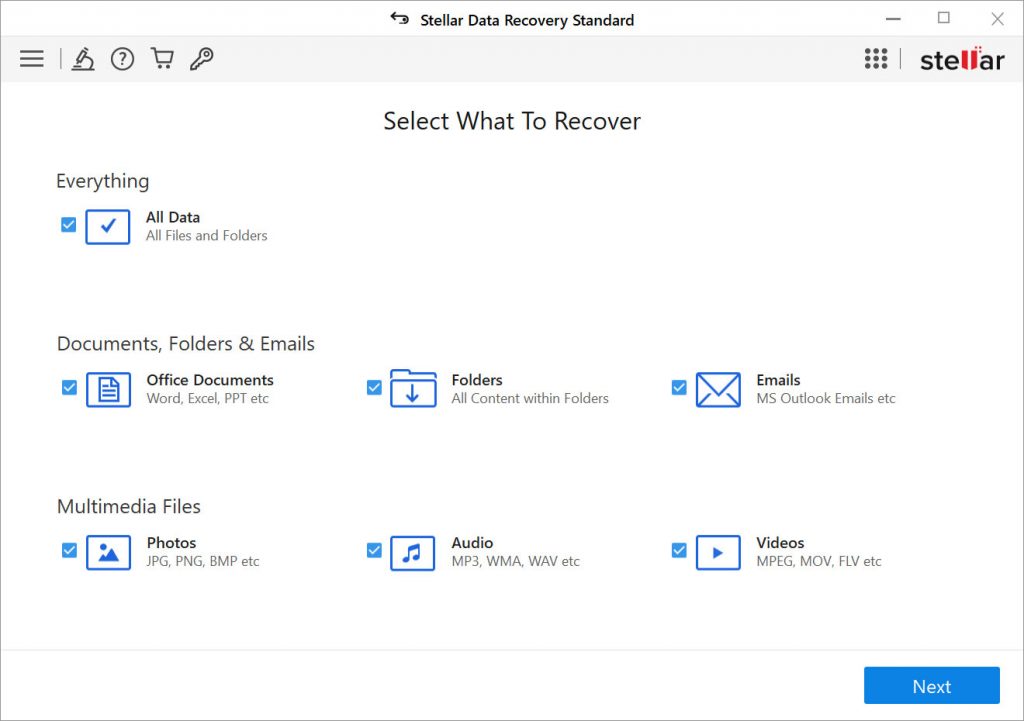
- Choose which files you want to recover. Check the ?All Data? checkbox to recover all file types and then click ?Next?
- Select the external hard drive check box. Turn on ?Deep Scan? toggle switch that appears on the bottom-left.
- Click on ?Scan? button to begin the scan process. Deep Scan can take a while depending on the size of hard disk and amount of deleted data found during the scan process. Deep Scan digs deeper and recovers traces of data.


- When finished, in the left Tree View pane, you see all your recovered folders and files. Click on the ?File Type? tab. Select the folder containing specific file types.
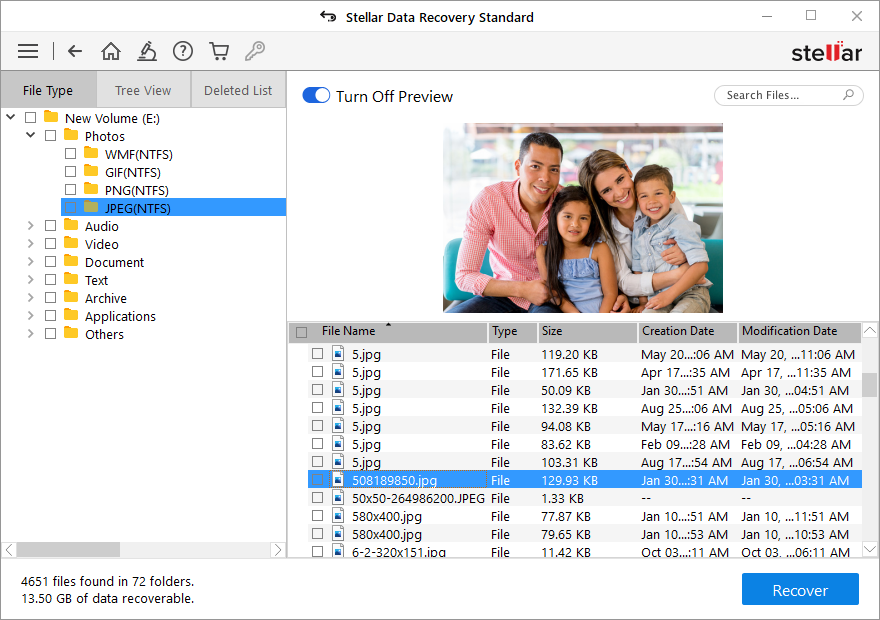
- Check the checkboxes of the files and folders you want to recover and then click the ?Recover? button.
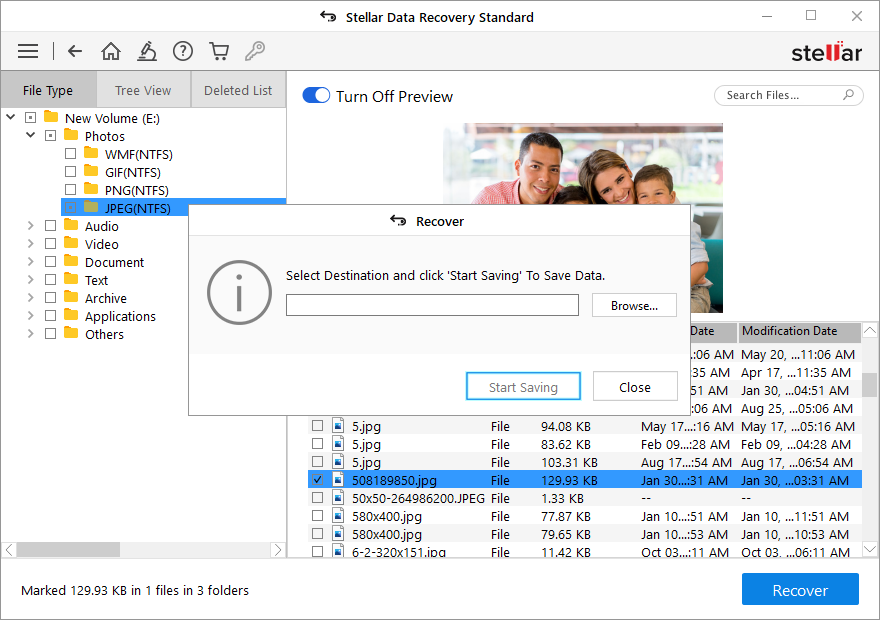
- Click the ?Browse? button to select the location where you want to save the recovered data. Make sure not to select the same drive. Finally, click the ?Start Saving? button.
Recovered data from your hard drive, which was lost after running CHKDSK command, will be saved at your desired location. Copy the data from the saved location to the affected external hard drive and reconnect that drive to your original PC.
Conclusion:
CHKDSK is a useful utility that can help you keep your hard drive healthy and detect any issues before it fails. You should be conscious about how and when you run CHKDSK on your system. However, if you ever face any data loss situation due to any reason, use the Stellar Data Recovery- Standard for Windows tool to recover deleted data from a formatted, re-formatted, or even a severely corrupt hard drive.
As always, if you have any suggestions or feedback, share with us via comment section down below.

