Summary: Minidump file helps you pinpoint the cause behind blue screen errors. If you’ve recently encountered a BSod (Blue Screen of Death) error on your system, read this blog to learn how to fix it using a minidump file. Additionally, keep data recovery software handy to retrieve files from the blue-screen affected system.


Contents
The Blue Screen of Death (BSOD) is displayed on a Windows computer when a fatal system error or system crash occurs. The error message usually includes information about the file that caused the crash, which can help diagnose the problem. When a BSOD occurs, Windows may create a minidump file. You can use the minidump file to pinpoint the cause of the BSOD. This article will show you how to use a minidump file to fix the BSOD error on your Windows computer.


What is a Minidump File?
A minidump file is a small memory dump created when Windows encounters a blue screen of death error. This file contains information about the crash that you can use to troubleshoot the issue. The minidump file is located in the Windows folder and has a .dmp extension. To read a minidump log file, you’ll need a debugging tool like BlueScreenView. BlueScreenView is a free debugger from NirSoft that you can download from the NirSoft website.
Enable Minidump File on Windows
Unfortunately, the memory dump or minidump file feature is not enabled in Windows by default. To use it, you need to enable it first.
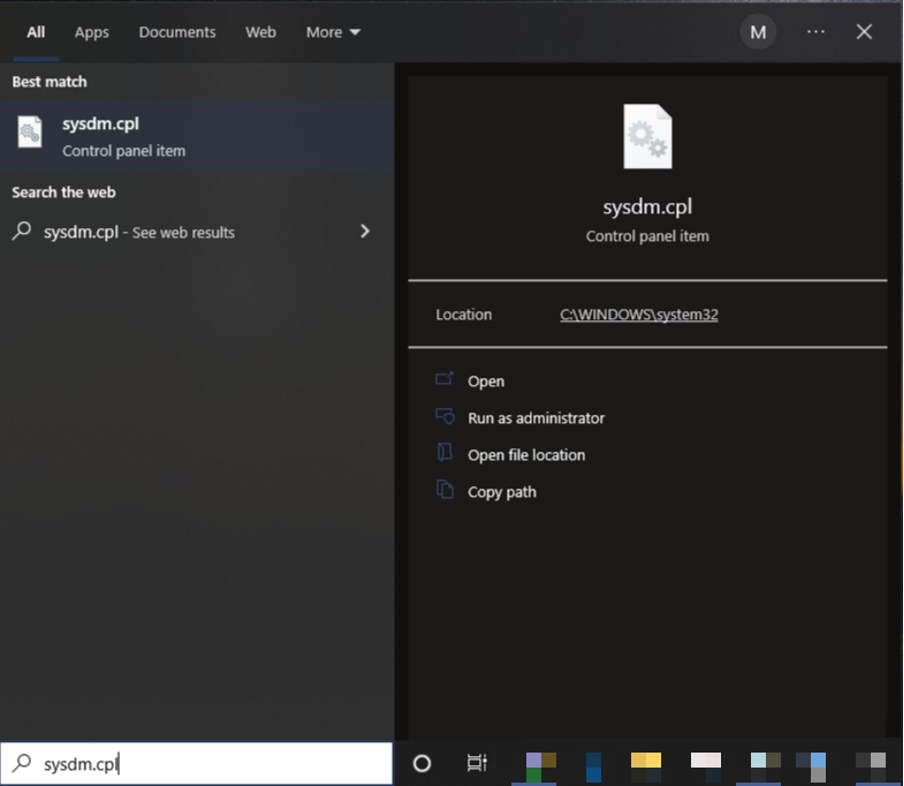
1. Type sysdm.cpl in the Windows search bar and click Open. It will open up the System Properties from the Control Panel.

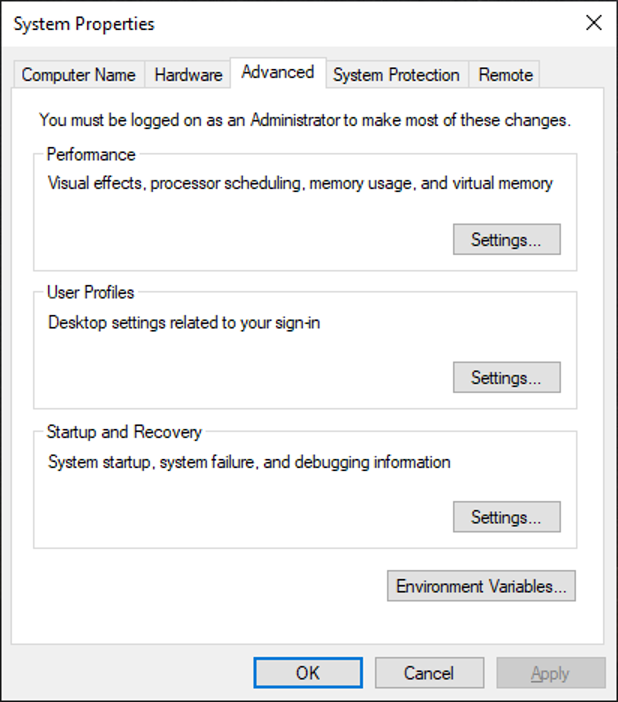
2. Go to the Advanced tab.
3. Under Startup and Recovery, click Settings.

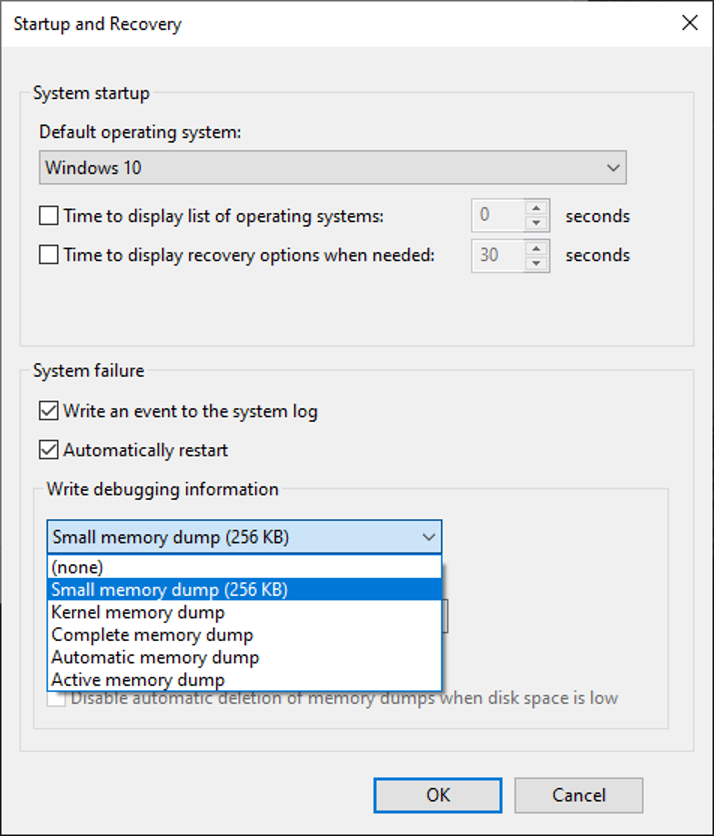
4. Check the following options:
- Write an event to the system log
- Automatically restart
5. Under the Write debugging information drop-down menu, select Small Memory Dump (256KB) and click OK.

That’s it. You have successfully enabled the minidump file on your PC. Whenever a BSOD error occurs on your computer, the system will save the Minidump file to the following directory: “%SystemRoot%\Minidump” This directory also translates to “C:\Windows\Minidump“. Although you can change the directory location, it is advised not to do so.
Use a Minidump File to Fix BSOD Error
Now when you have enabled the minidump file, how can you use it when a Blue screen of death error occurs? To use a minidump file to fix a BSOD error, you will need to use a utility. You can use the BlueScreenView tool to open and view the contents of a minidump file.
1. To use the BlueScreenView, you will need to download and install it from here. Download the compatible version for your computer (32-bit or 64-bit).
2. Once you have installed the BlueScreenView, you can launch it and open the minidump file.
3. In the app, you can view the contents of the minidump file and see what might have caused the blue screen of death error (at the bottom). You can see the error caused by the last column of each line.

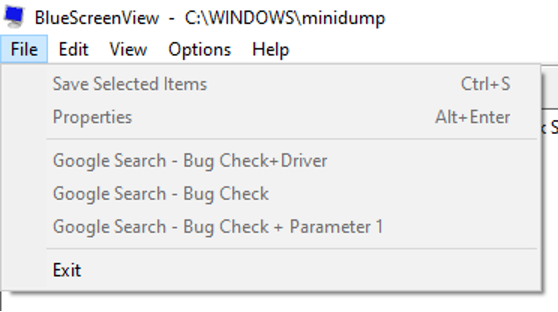
4. Right-click on any line and select “Google Search – Bug Check + Driver” or “Google Search ? Bug Check” or “Google Search ? Bug Check + Parameter 1” to search for more solutions for the BSOD problem.
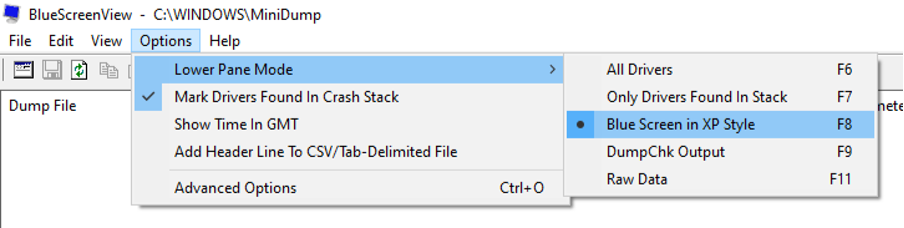
Find BSOD Stop Code Using a Minidump File
You can also use BlueScreenView to see the exact blue screen that Windows displayed when the BSOD occurred.
1. To do so, select Options from the main menu, then select Lower Pane Mode and then Blue Screen in XP Style.

2. Double-click anywhere on the line to see more information about the BSOD issue (in the upper or lower pane).
What If A Crashed PC Cannot Load Windows?
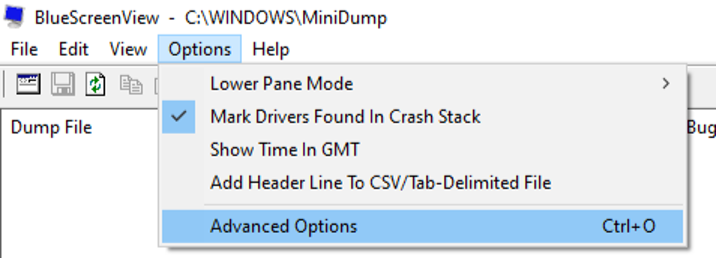
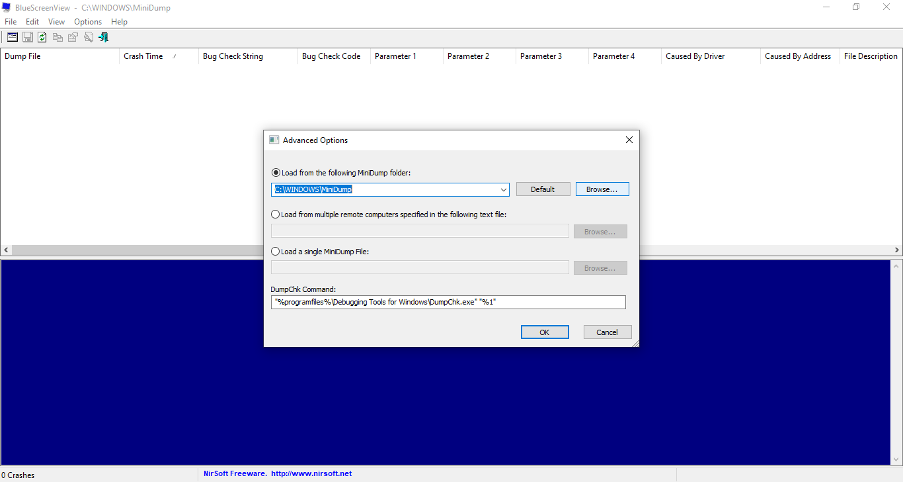
When a BSOD error occurs, your PC may stop loading Windows. In that situation, the minidump file also comes up very handy. You can move the Minidump (C:\Windows\Minidump\) folder to another functional computer and analyze the minidump files from there. For that:
1. On the BlueScreenView app, go to Options >> Advanced options (Ctrl + O) or select the Advanced Options icon from the File menu.

2. Once you click Browse, BlueScreenView will look in the transferred Minidump folder for the minidump files.

Use Data Recovery Software To Recover Lost Data
By now, you have a brief idea about the minidump file and how you can enable and use it to fix BSOD errors on your PC. But what if you log in to your PC and see your data is lost due to the error? Thankfully, it is possible to recover your lost data using a do-it-yourself data recovery software. There are dozens of software claiming to recover the lost data due to BSOD error, but not all are capable of it. We recommend you try Stellar Data Recovery Professional to restore your data.
The software recovers deleted files from Internal SSD, HDDs, SSDs, USB cards, and more. You can recover all sorts of files, whether a document, image, video, or email. Even if your driver is corrupted, formatted, or encrypted, Stellar Data Recovery Professional will do the recovery. It even supports data recovery from completely unbootable systems, which may be the case with you. You can even preview the lost data before you hit the Recover button. The software supports the latest Windows 11 and older versions 10, 8, and 7.
All the above features sound interesting, and you now have strong reasons to try Stellar Data Recovery Professional. You can download the software for free, allowing you to preview the recoverable data. Once you are fully satisfied, you can confidently buy one of the premium plans. After downloading the software on your PC, follow the below steps and get your lost data back.
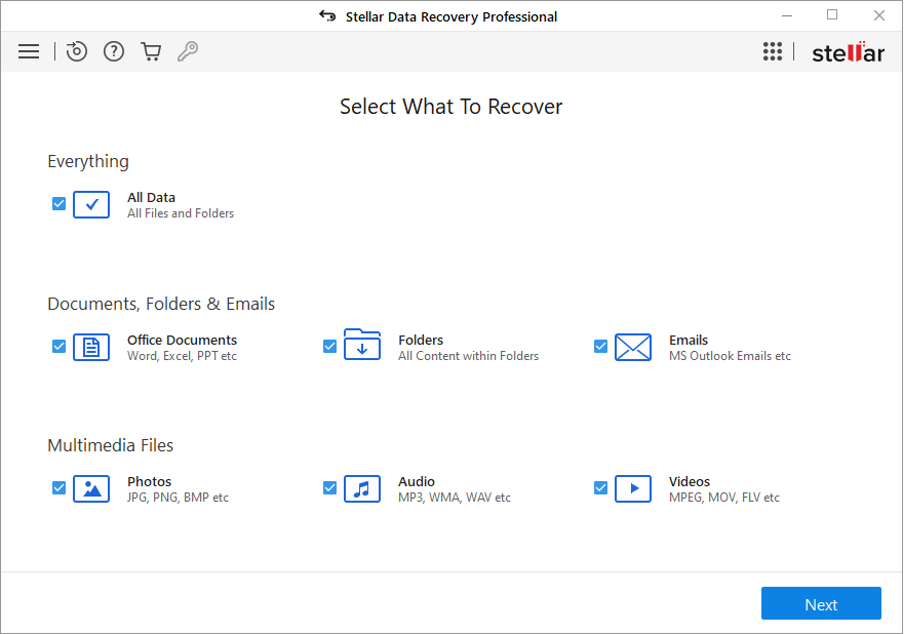
1. Select the type of data you want to recover on the first screen, whether multimedia files, documents, folders, or emails. Alternatively, you can select the Everything option to recover all the files.

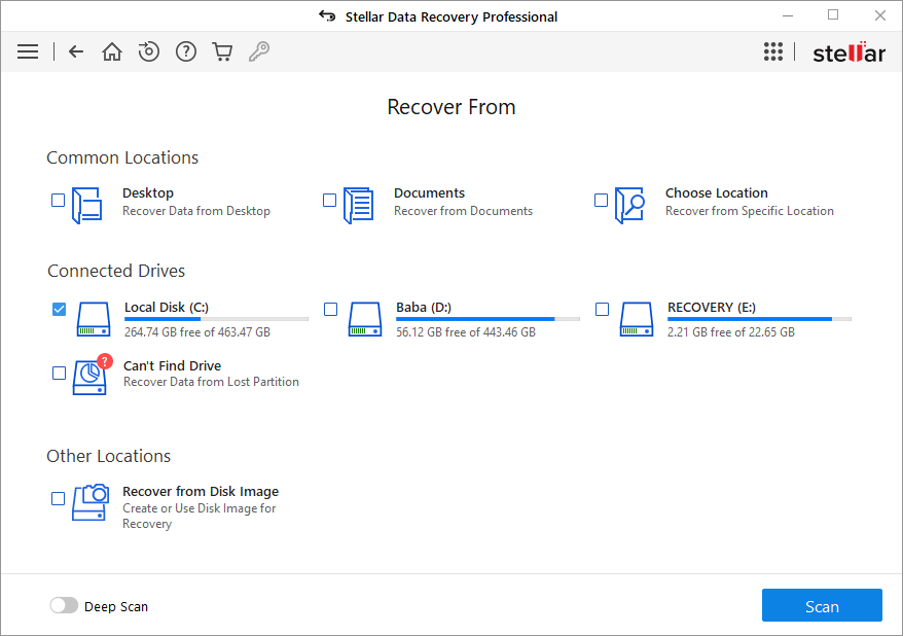
2. Select the drive from which you want to recover the data and click the Scan button. Depending on the lost data size, Stellar Data Recovery Professional software will take a few minutes to scan the recoverable files.

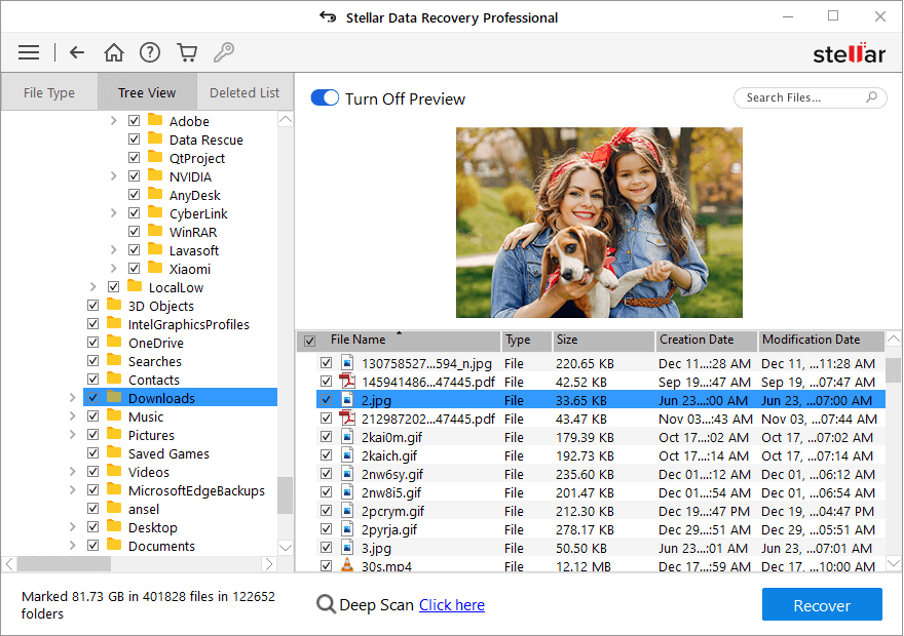
3. When you see the list of files, go through them and select the ones you want to recover and click the Recover button.
Following the above steps will restore the lost data in the desired location on your PC.
Final Words
In this article, we’ve explained what a minidump file is and how you can use it to fix a BSOD error. The Blue Screen of Death (BSOD) error is a dreaded experience for any Windows user. If you’re lucky, you might be able to restart your computer and continue working. However, in many cases, the BSOD error will reappear. In such a case, it would be helpful to look at the minidump log file to see what might have caused the crash.
Frequently Asked Questions
How do I get minidump file for a BSoD?
You can get a minidump file for a BSOD error from this directory %SystemRoot%\Minidump. Make sure you have enabled minidump on your PC.
How do I find the blue screen dump file?
You can find the blue screen dump file from %SystemRoot%\Minidump directory on your PC. If you don’t see the file, the minidump file may not be enabled on your system.

