
Contents
In Exchange Server, mail.que is a file which temporarily stores all the emails before they are delivered to the target. These are emails which are waiting to enter the next stage of processing. Each queue represents a logical set of messages that a transport server processes in the specified order.
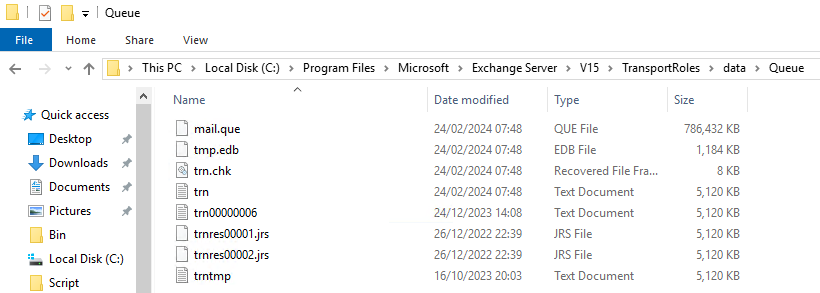
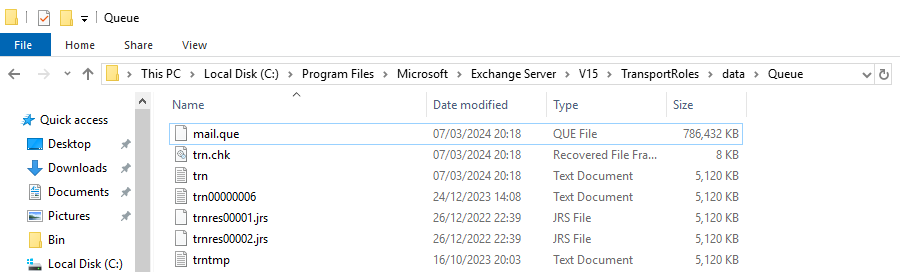
The mail.que file will only be found in servers hosting the Hub Transport Server Role and the Edge Transport Role. This file is located in the Exchange Server Transport service folder. The exact location depends on the version of Exchange Server. In Exchange Server 2019, the location of mail.que file is:
C:\Program Files\Microsoft\Exchange Server\V15\TransportRoles\data\Queue
Sometimes, the mail.que file size increases. This may consume a lot of storage space. There are cases where the queue file has reached several gigabytes. If you have ample storage space, this will not be a problem. But if you have limited storage or the disk gets full, this could cause issues with your Exchange Server. Apart from impacting the email flow, this could cause corruption in Exchange database and the transaction logs. Below, we will see how to check and manage the mail.que file size.
How to Manage mail.que File Size?
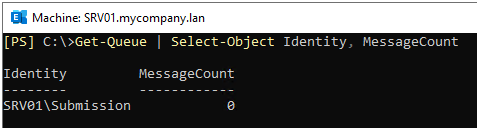
If the mail.que file becomes large, you can move the file to a different location, rename it, or completely remove it. However, before going ahead, you need to ensure that no data will go missing. The size of the mail queue file indicates that emails are not being processed or not being processed in time. So, you need to check the Exchange Server queues. For this, you can run the Get-Queue PowerShell command in the Exchange Management Shell (EMS).
Get-Queue

Next, you need to run the command to get the message count. If the message count is larger than 0, it means that there are messages in the queue which are not processed yet.
Get-Queue | Select-Object Identity, MessageCount
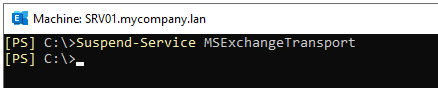
Now, you need to pause the Microsoft Exchange Transport service. To do so, open the PowerShell window and run the command as given below.
Suspend-Service MSExchangeTransport
This will suspend the service after processing the pending items. After this, re-run the Get-Queue command and verify that the item count in each queue is zero.
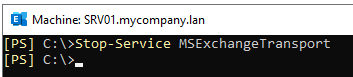
Once the item count is zero, you can go ahead and stop the Hub Transport service. For this, open the PowerShell window as Administrator and run the below command.
Stop-Service MSExchangeTransport
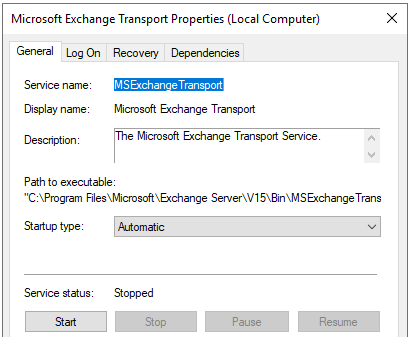
Alternatively, you can use the services control panel to stop the services.

Note: Until the operation is finished, users will not be able to send or receive any emails. However, they will be able to connect to the Exchange Server. So, perform this operation in a maintenance window.
After stopping the services, you can either move the mail.que file to another location or delete it.
Move the Mail Queue File to Another Location
You can move the mail queue file to another location. It’s recommended to move it to a separate data drive. To do so, from the Exchange Server scripts path (%ExchangeInstallPath%Scripts), you need to run the Move-TransportDatabase.ps1 script as given below.
Move-TransportDatabase.ps1 -queueDatabasePath '<queue location>' -queueDatabaseLoggingPath '<queue logging location>' -iPFilterDatabasePath '<ipfilter location>' -iPFilterDatabaseLoggingPath '<ipfilter logging location>' -temporaryStoragePath '<temporary location>

Once done, open the new location and confirm that the mail.que file, along with the trn.chk, trn.log, trntmp.log, jrs, and tmp.deb files are moved to the new location.
Delete the Mail Queue File
You can also delete the mail queue file. However, it is not recommended as you may lose everything which is in the queue. To delete the file, just go to the queue location and delete it. The location of queue file in Exchange Server 2019 is:
C:\Program Files\Microsoft\Exchange Server\V15\TransportRoles\data\Queue
After moving or deleting the file, you need to start the Transport services again. To do so, use the below PowerShell command.
Start-Service MSExchangeTransport

Alternatively, you can use the services control panel to start the services. Once it is complete, the files will be recreated.
Conclusion
Above, we have explained what the mail.que file is in Exchange Server and how to manage the file if it becomes large. If you end up with no disk space, this could cause issues with your Exchange Server or corrupt the databases. In such a case, you need to recover the services and databases as soon as possible and without any data loss.
For quick database recovery, you can use specialized applications, like Stellar Repair for Exchange. This application can open Exchange Server databases with no size limit and in any state, without the need of a running Exchange Server. It allows you to save the EDB file data to PST and other file formats. It can also export the data directly to a new Exchange Server database or Office 365 tenant. It can process user mailboxes, user archives, shared mailboxes, disabled mailboxes, and even public folders.