Summary: Summary: Despite continuous monitoring and patching, the RAID array fails? If it happens, the only solution is to rebuild the array. But rebuilding an array is not a small task. The process is lengthy and needs expertise. To rebuild RAID array securely without any data loss use Stellar Data Recovery Technician. Get the software now!
Contents


The most logical way to reassemble data on a failed Disk Array is ?copy the data to a spare drive? and replace the failed one, followed by using the RAID Algorithms and parity data to reassemble data to a new drive.
The only problem with rebuilding RAID is that during the ?Rebuild RAID Array? process, the performance is negatively affected due to latency. It is possible to avoid latency by monitoring the disks proactively with dedicated Disk monitors.
Monitoring the vital stats of the disk drive in a RAID Array can help Administrators or users to decide if any disk needs replacement, thus sidestepping irreversible data losses.
Sometimes, after rebuilding the entire RAID Array, it is discovered that the RAID is not perfectly built. This is a common case with higher configurations of the RAID. The higher the configuration of capacity drives, the higher the latency period and hence data-inaccessibility for an extended time that may stretch to for long hours. To avoid an incorrect rebuild of RAID Array, it is essential to know the exact causes which may lead to data loss. These are:
- Rebuild Error leading to Data loss
- RAID 5 Disordered Array
- RAID 5 NTFS Volume
- RAID 5 New Configuration
Note: Here we have taken RAID 5 as an example. Hence the above causes and the Recovery methods/ solutions are associated with RAID 5 Configurations and Rebuild.
Rebuild Errors That Can Cause Data Loss
Rebuilds are based upon two factors ? Parity and Array. When a RAID Administrator rebuilds RAID, then the most probable elements to reassemble it correctly are classified into Parity and Array configurations. If either of these is faulty, the Array will not work appropriately.
If there is misconfiguration related to Rebuild Parity, as in the following cases:
- With zeroed drive (overwritten Parity)
- Degraded drive (forced online with overwritten Parity)
- Drives out of order (both are overwritten ? Data and Parity)
If there is misconfiguration related to Rebuild RAID, as in the following cases:
- One of the Drives is missing – Parity and Data are overwritten
- Stripe sizes are not similar – Parity and Data are overwritten
- The original and rebuild differ in configurations – Parity and Data are overwritten
Let?s illustrate with examples:
In a RAID Rebuild configuration, the parity is updated with a zeroed disk instead of HDD rebuild. Here the Rebuild RAID has destroyed the original Parity. Further, the zeroed disk will prevent the Drive Rebuild. When the Parity is overwritten, it is difficult to recreate damaged or missing HDD.
Another example is ?disordered RAID Array? during RAID Rebuild. Here the drives are not in proper order, and Parity rebuild on these Drives may lead to overwriting the important user?s data.
RAID 5 Disordered Array
We can explain this with an example. An ideal RAID 5 Array is shown below for illustration:

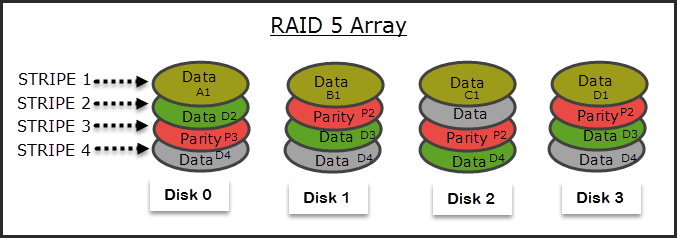
In Raid 5 Array, data was initially available on C1 of Disk 2 available on Stripe 1. During RAID Rebuild, if this data is overwritten with new Parity, then the Parity on Disk 3 in Stripe 1 is treated as Data Disk and not Parity, and that creates corruption in ?Logical Volume?. Moreover, the data in Data disk B1 is also affected, thus creating Logical volume corruption. All these disks as mentioned are affected and ultimately damaged.
Since there is logical volume corruption, and the parity build is also not possible, it is imperative to run volume repair tools like CHKDSK, FSCK and similar. Instead of repairing, these utilities may sometime cause even more damage leading to metadata deletion and irrecoverable RAID Array. If one of the disks used to rebuild RAID array is a degraded drive and the other is a new drive, then, after the rebuild, this combination overwrites the good parity with the bad one. The result is unusable data and ultimately unrecoverable system.
RAID 5 NTFS Volume
If the RAID Array loses its configuration and the user tries to rebuild it using an incorrect configuration, then it leads to data damage. For example, a new configuration is forced with 32K stripe size which was initially set up as 64K size. The data-size is practically split into half thus damaging RAID configuration.
New Configuration in RAID5
The Operating System in the rebuild may not be able to read the sections in the metadata, which leads to logical corruption thus making the data unusable. In this case, also, the corruption in logical volume triggers the Admin to use volume repair tool to run and repair logical drives. The volume repair tool can cause further damages in the logical volume and results in unrecoverable data loss.
Since the logical volume corruption is caused due to the new configuration in RAID 5, hence repairing the logical volume is not the right solution, as thought to be.
How to Rebuild RAID Array Without Data loss?
What should be the course of action when the Data Storage Administrator?s runs into such a situation? Here are some tips to prevent data loss after RAID rebuild:
1. Never create a new file on the disarrayed disk: As a precaution, take special care not to create any new files or run any important application, until the data is recovered. The new files may overwrite data available on the corrupt disk.
2. Image the RAID Structure before rebuild: Imaging the RAID before a rebuild will protect the data, even if the rebuild is not Ensure that the imaging program provides forensic or sector/block level disk-image.
3. Create Backup on a separate volume: Taking a backup ensures that the essential files on backup are good, and overwriting data on active volume does not result in unrecoverable damage.
4. Test backup with multiple restores: Restore the backup at different locations, preferably at different physical locations. Alternatively, image each drive separately for a useful restore, before initiating the rebuilding
5. Run CHKDSK or FSCK tool only after taking the backup: Take a secure backup and validate with proper restore before running the repair utilities. These repair tools assume that the backup is available, hence may overwrite file pointers to make the file system consistent.
6. Do not add, move or delete files: Adding, deleting or moving data from the affected RAID may complicate data recovery. Instead copy the files, if needed.
Conclusion
Secure the RAID data from the start. Keep a backup, monitor the vital stats of all the disks separately and in Array, maintain proper disk image, and protect the RAID configuration. If the RAID is still disarrayed, and there are no concrete measures to restore the data, then look for a reliable data recovery software like Stellar Data Recovery Technician.
The professional software enables data storage administrators to rebuild RAID Array without losing data. Also, the software offers Photo Repair, Video Repair software, and drive monitor software to monitor the drive performance status before the recovery process.


