Contents
Summary: This blog explains how to perform external hard drive recovery and get back files from an inaccessible, damaged, or corrupt external hard drive, which fails to format.


External hard drives are generally used as a portable storage media to backup data and transfer large files between systems. Since they are often connected to various systems, external hard drives are more vulnerable to corruption and other logical disk errors.
If a system is infected, it can infect the external hard drive, corrupt files, and damage the file system?making the drive inaccessible or RAW. Similarly, unsafe removal and improper handling can also lead to similar errors. When a hard drive turns to RAW on the Windows operating system, you may come across several error messages as shown below:
?Your hard disk drive is not formatted do you want to format it now.?
?You need to format disk drive before you can use it.?
?Windows was unable to complete the format or external hard drive cannot be formatted.?
In such cases, you need to perform external hard drive recovery as soon as possible to prevent permanent data loss. For this, use a DIY data recovery tool such as Stellar Data RecoveryProfessional. After getting back your lost and inaccessible data from damaged hard drive, you can follow the next steps to fix the format error.
Steps to External Hard Drive Recovery
To recover lost or inaccessible data from your external hard drive that refuses to format, follow the steps below:
Step 1: Download and Run Stellar Windows Data Recovery software.


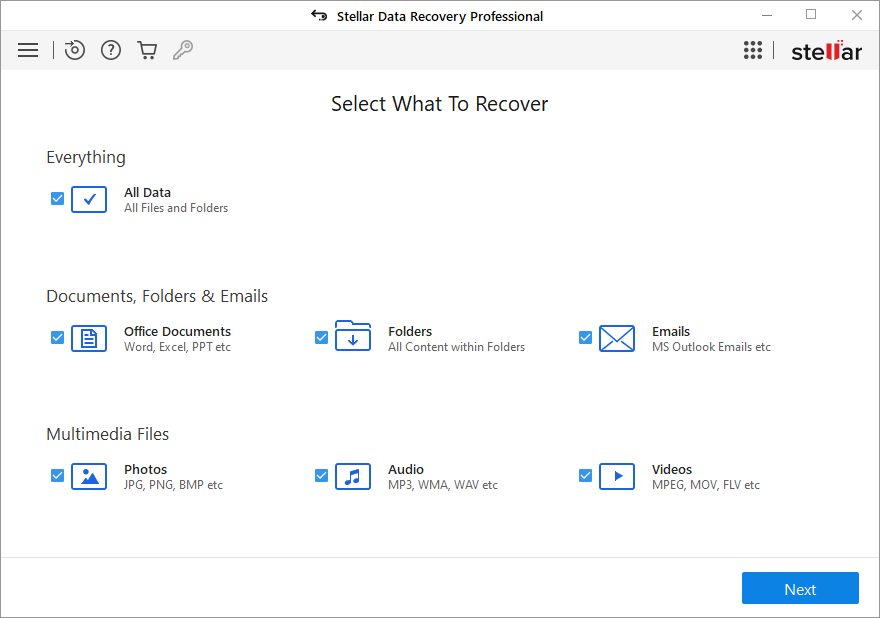
Step 2: Select the data you want to retrieve and click on ?Next?.

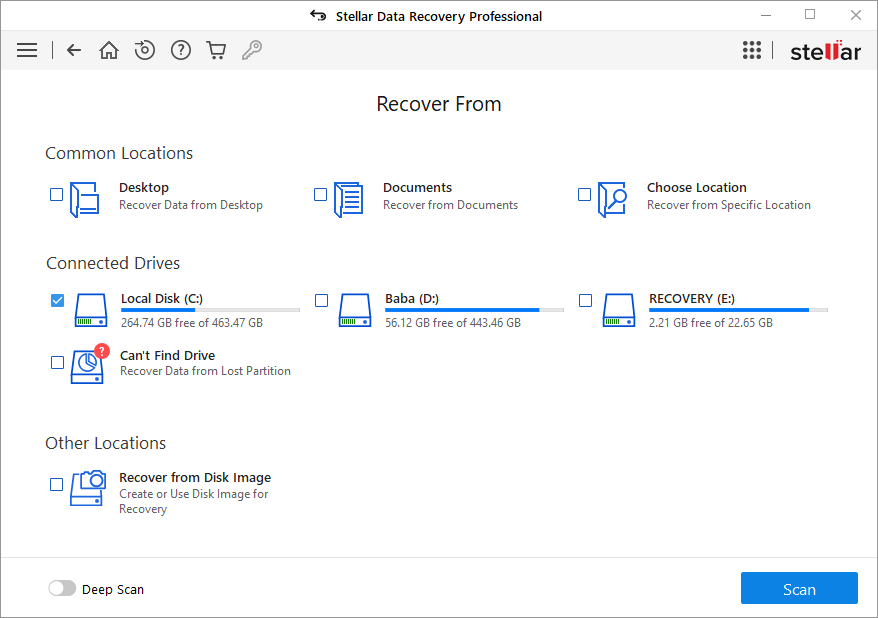
Step 3: Select the hard drive partition. The tool recognizes and lists RAW hard drive volume under ?Connected Drives?.
If hard drive volume or partition is not listed, use ?Can?t Find Drive? option under ?Other Locations? to search and recover data from lost hard drive volumes or partitions.

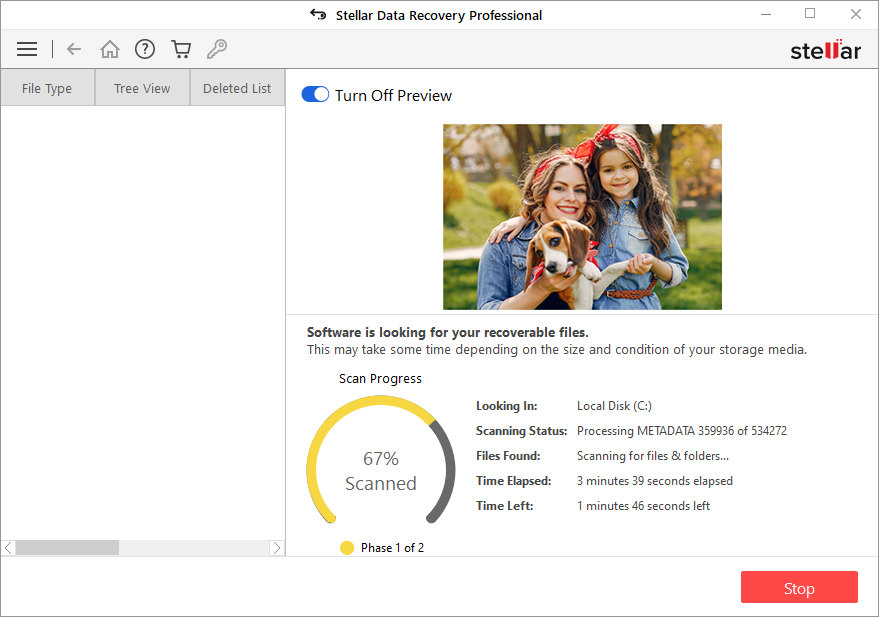
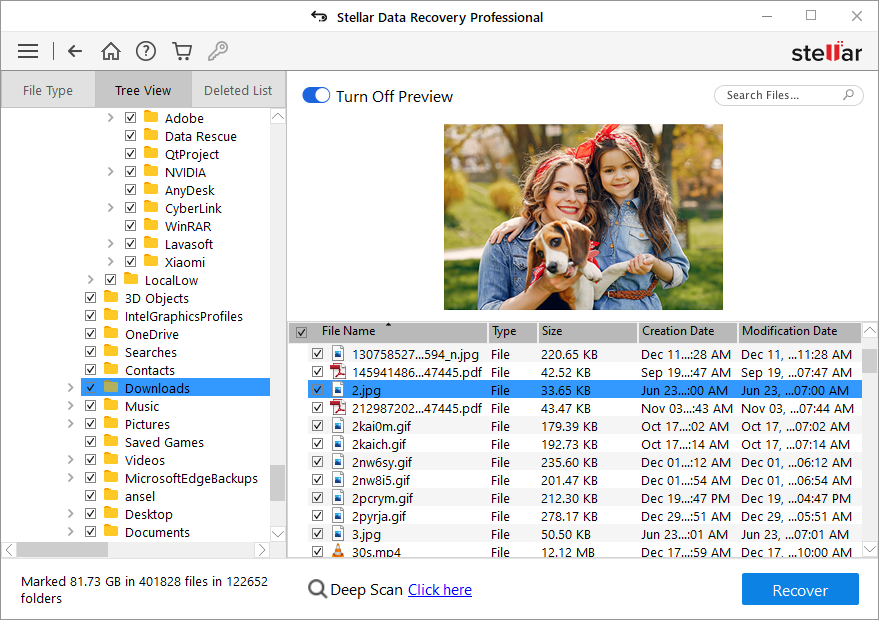
Step 4: After the scanning process, you can see file preview and sort scan results by clicking on the ?File Type? tab in the left pane.

Step 5: Choose the data that you want to recover and press ?Recover.?

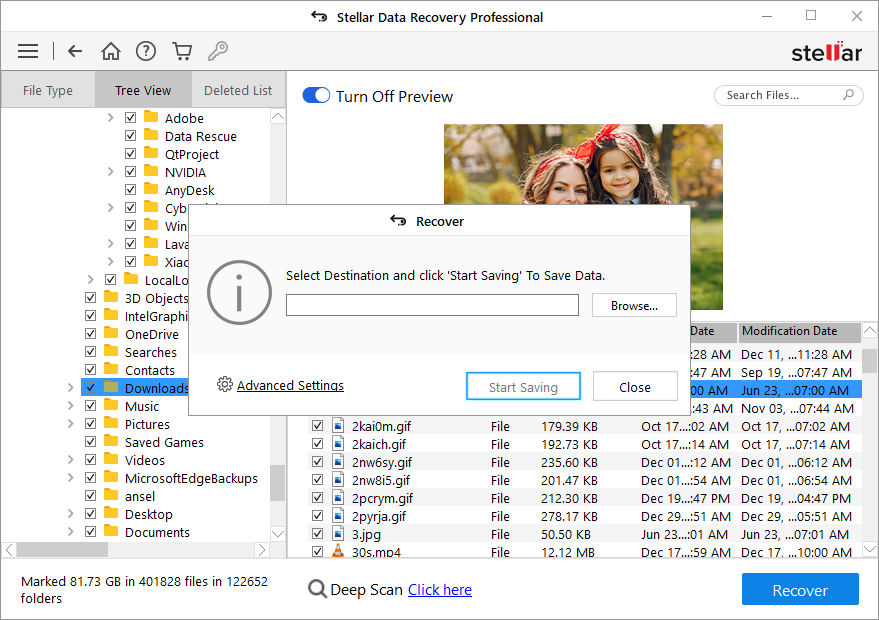
Step 6: Click ?Browse? to select a save location and press ?Start Saving? button to save your desired files.
Steps to Fix Format Error after External Hard Drive Recovery
Now that you have got back your lost and inaccessible data from your external hard drive that won?t format, follow the steps below to fix the error and repair the hard drive by formatting.
Step 1: Run CHKDSK Scan
CHKDSK can resolve errors such as drive corruption and repair a damaged file system. It also marks the bad sectors, which may be causing the formatting error.
To run a CHKDSK scan on your hard drive, follow these instructions:
a. Open Command Prompt in administrator mode.
b. Type chkdsk /f /r X: where X is the hard drive volume letter.

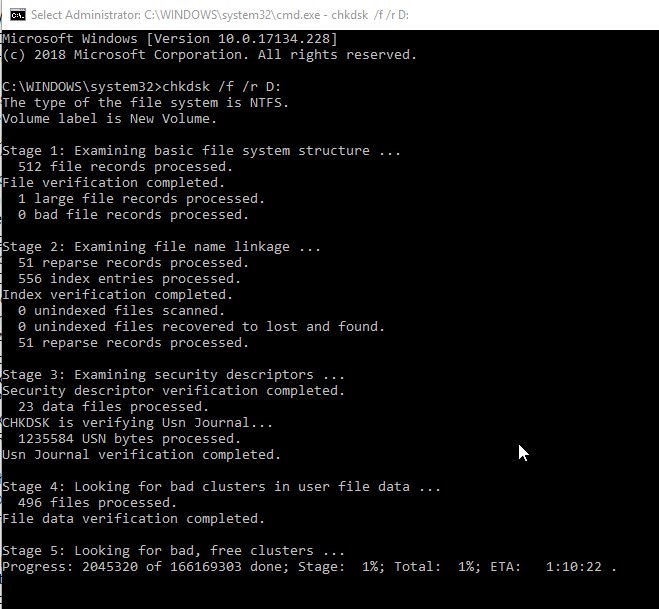
c. Press the ?Enter? key
After the scan is finished, try to format the drive.
NOTE: CHKDSK command will not work in some case of a RAW drive where the drive is severely corrupt. Also, it may won?t work when the partition is not assigned a drive letter.
Step 2: Run Antivirus Scan
Use Windows Defender or a reliable third-party antivirus or anti-malware scanner to scan your hard drive for any infected file and quarantine the infection.
After the scan, you can try to format the hard drive via File Explorer.
Step 3: Disable Write-Protection
To disable write-protection, open registry editor and edit the value.
a. Press Windows+R and type regedit
b. Press the ?Enter? key or ?OK? button
c. Grant admin permission, if prompted
d. Navigate to HKEY_LOCAL_MACHINE >SYSTEM >CurrentControlSet >Control

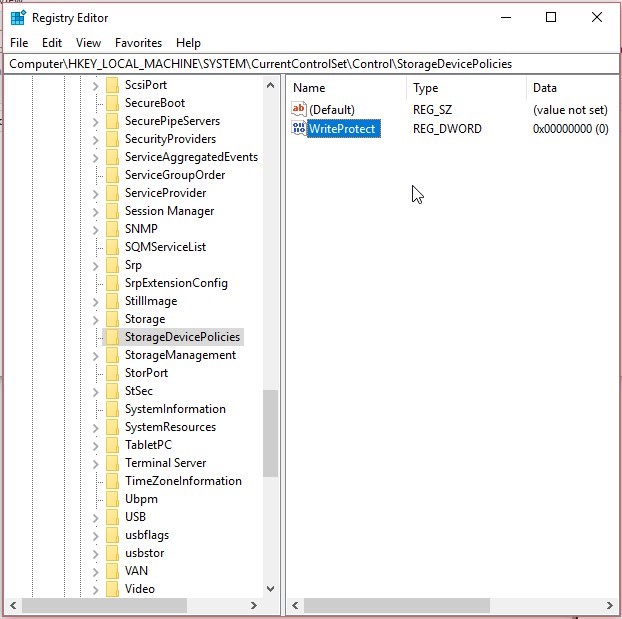
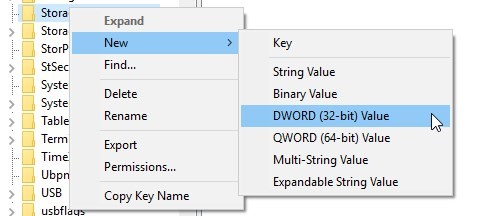
If StorageDevicePolicies is not visible, right-click on Control folder and choose New>Key and name the key as StorageDevicePolicies.
e. Double-click on WriteProtect and change Value data to 0.

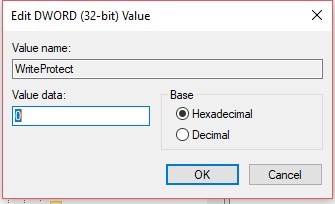
If WriteProtect is not visible, right-click on StorageDevicePolicies and choose New>Dword (32-bit) value and name it WriteProtect. Double-click on it and change value data to 0.

f. Close the Registry Editor window and disconnect your external hard drive.
g. Connect it to the system and try to format it.
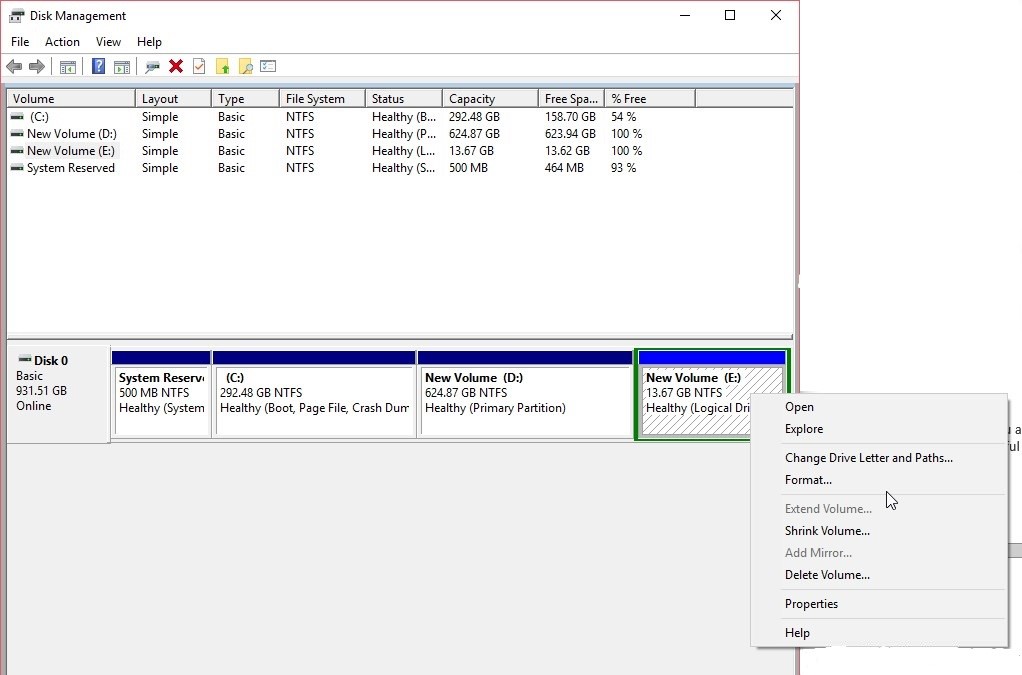
Step 4: Format via Disk Management Tool
Follow the instructions below to format your hard drive by using the Disk Management tool instead of File Explorer as it gives you more control over formatting options.
a. Press ?Windows+X? and then click ?Disk Management.?
b. Right click on the hard drive partition and choose ?Format?.
If the format option is not visible, click ?New Simple Volume.? Follow the formatting wizard.

c. Enter the ?Volume Label? and choose a ?File System.?
d. Click ?OK? and ?OK? again to confirm.
Step 5: Force Format using DiskPart Utility
DiskPart is a command line based disk management utility in Windows that gives you advanced access control over formatting and other disk management tasks. DiskPart is a powerful tool and can handle serious drive errors.
However, be careful while following the commands and instructions given below. A typo can cause lead to severe consequences.
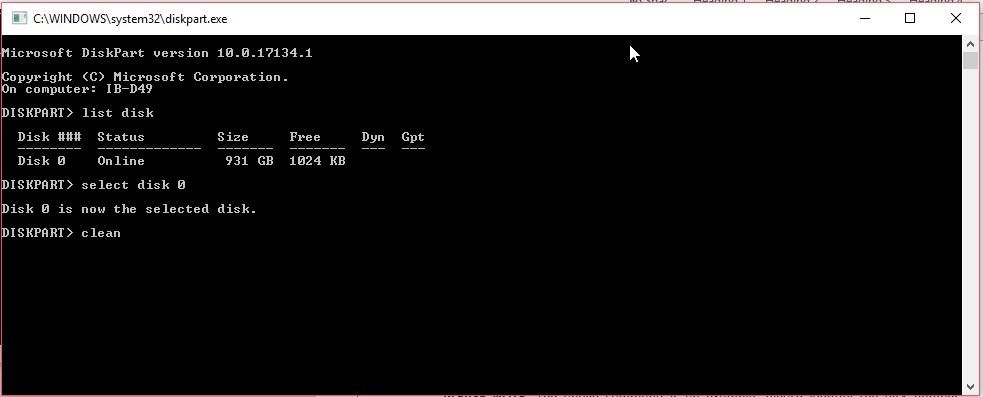
a. Open Command Prompt window.
b. Type diskpart and press ?Enter.?
c. Grant admin permission, if prompted. A new Command Prompt window will open.
d. Type list disk and press enter.
e. Now carefully check the listed disks and then identify the affected hard drive.
f. Let?s suppose the disk is disk 3 in the list, type following command and press ?Enter.?
Select disk 3
PLEASE NOTE: The above command is an example. Please identify the disk number correctly before entering the command.
g. Now type clean and press ?Enter?.

h. Then type list disk to ensure that the correct disk is selected.
i. Type create primary partition and press ?Enter.?
j. Type select partition 1 and press ?Enter.?
k. Type active and press ?Enter.?
l. Then type format FS=NTFS label=StellarDrive quick and press ?Enter.?
You can change StellarDrive in the above command with your desired disk name.
m. Then type assign letter=X.
You may change X to any empty/unassigned drive letter.
n. Finally, type exit and press ?Enter? to exit the DiskPart utility.
This should ideally format your external hard drive without any error. You must run defragmentation and check hard disk SMART status to ensure if your external hard drive is in good health. You may also run a CHKDSK scan now.
If it fails to format, comment down below for more help.
Conclusion
Never format an internal or external hard drive volume if it turns inaccessible or RAW. Formatting such damaged external hard drive can complicate the recovery process. Instead, use an external hard drive recovery software such as Stellar Data Recovery Professional immediately to get back your lost and inaccessible files from a corrupt, damaged, formatted or missing hard drive partition.
And remember to keep a regular backup of your important files on at least two different storage media such as external drive and cloud. But if backup is not available, use the Stellar Data Recovery tool to get back lost, deleted, and formatted files in a few clicks.


