Summary: The iTunes error 9 appears when iPhone update through iTunes gets failed. It's annoying as the error doesn’t let you use your device further. Learn 7 quick methods to fix iTunes error 9 and update the device without any issue.
Trying to get the new iOS on your iPhone but facing iTunes Error 9?
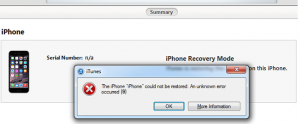

The iTunes error 9 usually occurs while updating your iPhone via iTunes. The error annoyingly neither lets you update the iPhone nor do any activity on your device. Thus, it urgently requires a fix so that you can work on your iPhone and also update the device.
In this post, we will share with you 7 best possible ways to fix iTunes Error 9. But before that let?s know what is causing the iTunes error on trying to update your iPhone.
Why does iTunes Error 9 occur?
It is difficult to determine the exact reason of your iTunes Error 9. But it may be due to any of the reasons given below :
- USB port or cable is damaged
- You have jailbroken your iPhone
- Corrupt network settings
- Security software prevents access to Apple server
How to fix iTunes error 9?
Since it is usually, regarded as a hardware issue, you should begin with hardware-related workarounds and later move to other software troubleshooting methods.
Going by the order, try below methods to fix iTunes Error 9:
- Check USB cable & port
- Restore iPhone with iTunes on another computer
- Force your device to restart
- Check Anti-Virus & Firewall on your computer
- Update iTunes to the latest version
- Use Recovery Mode to Fix iTunes Error 9
- Choose to update iPhone wirelessly
Solution 1: Check USB cable and port
Make sure your iPhone USB cable and port are properly connected and working fine. Do the below checks and fix:
- USB cable is not loosely connected to the computer
- You are using the USB cable that you got with your iPhone or another certified cable
- The USB port is not damaged. Try by shifting to another USB port
Solution 2: Restore iPhone with iTunes on another computer
iTunes error 9 is generally regarded as a hardware-related problem. Sometimes it is difficult to detect the issue. The easier way out is to restore iPhone using iTunes on another computer or laptop. If still the error persists, move on to the other workarounds.
Solution 3: Force restart your device
Apple suggests trying once force a restart of iPhone to fix iTunes error 9.
iPhone X, iPhone 8, & iPhone 8 Plus users: Press and quickly release the Volume Up button. Press and quickly release the Volume Down button. Then, press and hold the Side button until you see the Apple logo.
iPhone 7 & iPhone 7 Plus users: Press and hold both the Side and Volume Down buttons for at least 10 seconds, until you see the Apple logo.
Solution 4: Check Anti-Virus & Firewall on your computer
Antivirus or Firewalls in your computer may prevent iTunes to connect with Apple server. Check the security software settings, and tweak them if required to allow iTunes to access the network servers.
Solution 5: Update iTunes to the latest version
Updates usually bring in new features, fix existing bugs and make the application smarter. If the iTunes error 9 is due to outdated iTunes, installing the latest version may help to fix the error.
How to update iTunes to the latest version?
For Windows users: Launch iTunes on PC. On the menu bar, click Help > Check for Updates and follow the given instructions
For Mac users: Launch iTunes on Mac. On Menu bar go to iTunes > Check for Updates and follow the on-screen instructions.
After updating iTunes, reboot your computer and check if the iTunes error 9 is fixed.
Solution 6: Use Recovery Mode to fix iTunes Error 9


iPhone in Recovery Mode
All the above methods fail to fix iTunes error 9? As last resort choose Recovery Mode to restore iPhone in iTunes. Choosing this option means you will lose all your iPhone data. Thus, first take backup in iCloud or iTunes before applying this fix.
How to put your iPhone into Recovery Mode? (For iPhone 8, 8 Plus, & X users)
- Update your iTunes
- Press and release the Volume Up button and then the Volume Down button
- Press and hold the Side button till connect to iTunes screen appears
- Once the iPhone is in Recovery Mode, connect your computer with iPhone via USB cable. You will see the white Apple logo screen.
- When iTunes asks you to update or restore, click Update to reinstall iOS
Lost iPhone data after restoring iPhone in iTunes via Recovery Mode?
Losing iPhone data after update through Recovery mode is a panicky situation. It gets even more serious if you are unable to restore from iCloud or iTunes backup. In such situation, Stellar Data Recovery for iPhone comes as big relief. The software restores complete iPhone information from iPhone, iCloud and iTunes.
Stellar iPhone data recovery software quickly and safely restores all iPhone data including photos, videos, music, contacts, messages, Safari bookmarks, etc. It also recovers the lost WhatsApp, WeChat, Line, Viber, Tango, and Kik messages. The software is extremely easy to use. Simply launch it on your Mac or PC, connect your iPhone to the computer and follow the on-screen instructions.


Solution 7: Choose to update iPhone wirelessly
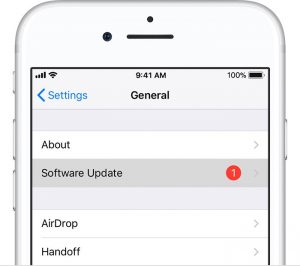

Select Software Update in Settings on iPhone
Alternatively update iPhone wirelessly, without using iTunes. Make sure you have a continuous Internet connection. Go to Settings > General > Software Update. If an update is available, tap on Download and Install.
Conclusion
Although iTunes Error 9 rarely occurs but is a frustrating situation as you are unable to do any other activity on your device.
You can sometimes easily fix the Error 9 by doing a simple check if your USB cable, port connection, and firewall settings are appropriate. Restarting the device and updating iTunes to the latest version can also resolve Error 9. As a last resort, update iOS in iTunes through Recovery Mode. Nevertheless, you can also choose to bypass iTunes and update your device wirelessly.
One of the above methods is surely going to help you out. Also do not forget to share with us in the comment box below, which of these methods helped you to fix iTunes Error 9.


