Summary: Though it is usually not required, but at times need arises to change Outlook data file location due to various reasons. In this post, we’ve mentioned some methods on how to change OST file location in Outlook 2010, 2013, 2016 and 2019. These methods are explained with step-wise instructions that can help you change Outlook file location easily.


Offline Storage Table or OST is an Outlook data file that is created locally when you set up Microsoft Outlook account. The OST file stores data, such as email messages, tasks, contacts, calendar, etc. and allows users to work offline in the Exchange environment. The OST file is saved at a default location on local storage. It is usually not required to change OST file location. However, at times, you need to change the default Outlook file location due to various reasons, such as lack of storage space where the file is saved, an Outlook account is deleted, or any other.
| Note: You can?t change Outlook data file location from one machine to another to access its contents. You can, however, recreate the OST on the new machine. If that?s not possible, you can use Stellar Converter for OST to convert OST to PST on same system, and then open the PST in Outlook on new system in few simple steps. Download the free software below. |
If, for any reason, you want to change Outlook data file location in Windows 10, read this post to know the methods and workarounds for changing the OST file location.
How to Change Outlook Data File Location?
Following are some manual methods that you can use to change OST file location in Outlook 2019, 2016, 2013, and 2010 on Windows 10.
Method 1: Set ForcePSTPath Registry Entry
You can use ForcePSTPath, which is a Windows Registry Key, to change the Outlook data file location. By using the Registry Key, you can change the OST file location on all Outlook versions, be it Outlook 2019, 2016, 2013, 2010, 2007, or 2003.
Note: All Outlook versions use a different location to store the OST files.
The steps to change OST file location are as follows:

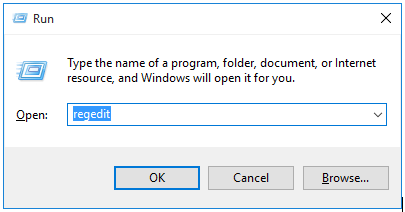
- Press both Windows and R keys simultaneously. When the Run dialog box appears, type Regedit and click OK or press Enter.
- The Registry Editor is launched. In it, use the appropriate keys, depending on the version of Outlook you?re using.
- For Outlook 2016, the key is:
HKEY_CURRENT_USER\Software\Microsoft\Office\16.0\Outlook- For Outlook 2013, the key is:
HKEY_CURRENT_USER\Software\Microsoft\Office\15.0\Outlook- For Outlook 2010, the key is:
HKEY_CURRENT_USER\Software\Microsoft\Office\14.0\Outlook- For Outlook 2007, the key is:
HKEY_CURRENT_USER\Software\Microsoft\Office\12.0\Outlook- In the right-hand-side pane of Registry Editor, right-click on an empty area. Then, select New > Expandable String Value.

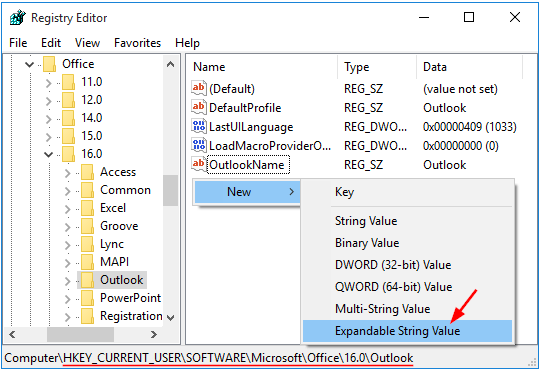
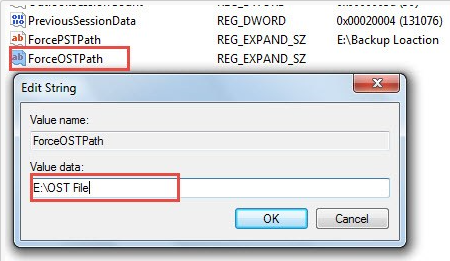
- A new Value is created. In the Edit String dialog box, assign ForceOSTPath name to the Value and enter the new default location, under the Value Data option, to save the OST. Then, click on OK.

- Close Registry Editor and restart MS Outlook.
Note: When a new Exchange email account is set up, a new OST file will be created automatically at the default location that you?ve chosen for OST file.
Method 2: Use Outlook Email Client
You can also use your Outlook account to change Outlook file location. However, you need to know the default location of the OST file, which depends on the Windows OS version installed on your system.
Note: This method works for Outlook 2013, 2010, 2007, and 2003 version.
In Windows 10, 8, 7, and Vista, the default location of the OST file is
C:\Users\%username%\AppData\Local\Microsoft\Outlook
In Windows XP, the default OST file location is:
C:\Documents and Settings\%username%\Local Settings\Application Data\Microsoft\Outlook
To change OST file location, follow the given steps:
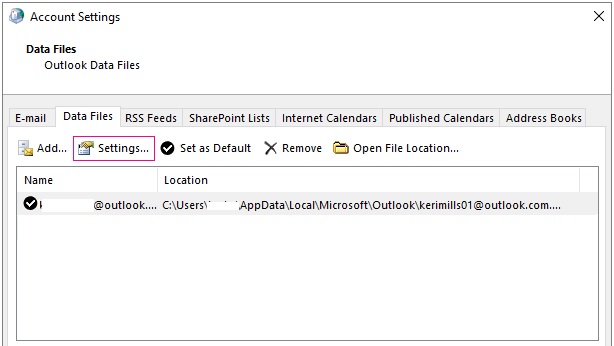
- Open the Account Settings dialog box and select the Data Files.
- Select Exchange Server account and click on Settings.

- In Microsoft Exchange account, go to the Advanced section, uncheck the Use Cached Exchange Mode checkbox and then click ?OK?.

- When it prompts, click on the OK tab.
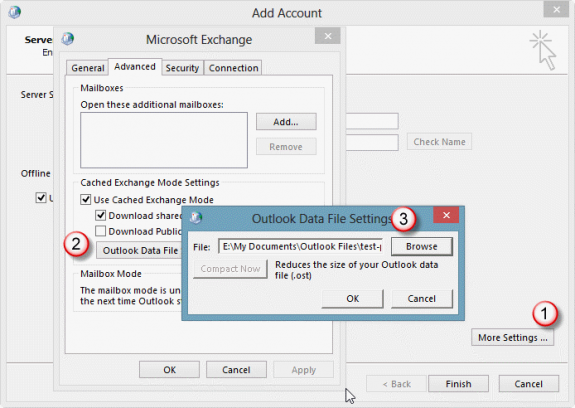
- In the Advanced tab, choose Outlook Data File Settings > Disable Offline Use > Yes.
Note: If the Disable Offline Use option is unavailable, return to Step 3 and uncheck the Use Cached Exchange Mode checkbox.
- Choose Outlook Data File Settings and then select ?I want to move the old file? option. Here, select the Browse tab, then the offline Outlook Data (OST) file that was moved to a new folder at any location, and then click Open. Outlook will create a new OST file.
- In the Advanced section of Microsoft Exchange account, place a checkmark on the Use Cached Exchange Mode checkbox and click OK. When it prompts to restart Outlook email client, click on the OK tab.


- Close the Account Settings and the Mail Setup dialog boxes.
Note: When a new OST file is created, the old OST file is not deleted automatically. You have to delete the file manually.
Method 3: Use Symbolic Links to Repoint OST Location
You can use Symbolic Links to repoint the OST file from the default location to another location. For this, you need to set up a symbolic link by using MKLINK command.
To create symbolic link, follow the given steps:
- Move the OST file from the default original location to a new location.
- Open the Command Prompt window by using administrator credentials.
- Execute the mklink command: mklink ?C:\old-path? ?D:\New path?. See the below example:
mklink %localappdata%\Microsoft\Outlook\<file name> "D:\Outlook Data Files\<file name>"

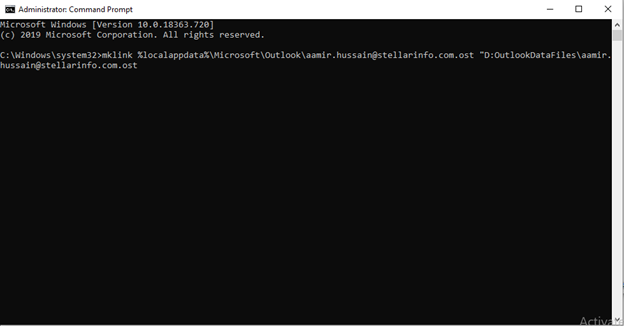
Figure 7: MKLINK Command to Create Symbolic Link
As soon as you hit the Enter key after correctly entering the command, the symbolic link is created.
Note: When you move a file by using a symbolic link, a shortcut is created at the default location of the folder. If the shortcut is deleted, it breaks the link and the file gets back to the original location.
Conclusion
Changing default location of OST file is not always recommended. You may face issues after changing Outlook data file location or the process may go wrong due to some error. In such a case, the OST file may become inaccessible or orphaned. You can?t access an orphaned OST with your Outlook. Such OST file needs to be converted to PST to access its data. The best way to convert an OST to PST is by using an advanced tool such as Stellar Converter for OST. The software can easily convert orphaned or inaccessible OST to PST file, which you can import OST into Outlook and access all its mail items.
Software Recommendations by Top Editors:
Above all, the OST to PST software can be used if the OST file is damaged or corrupt. It is compatible with Microsoft Outlook 2019, 2016, 2013, 2010, 2007, and lower versions.

