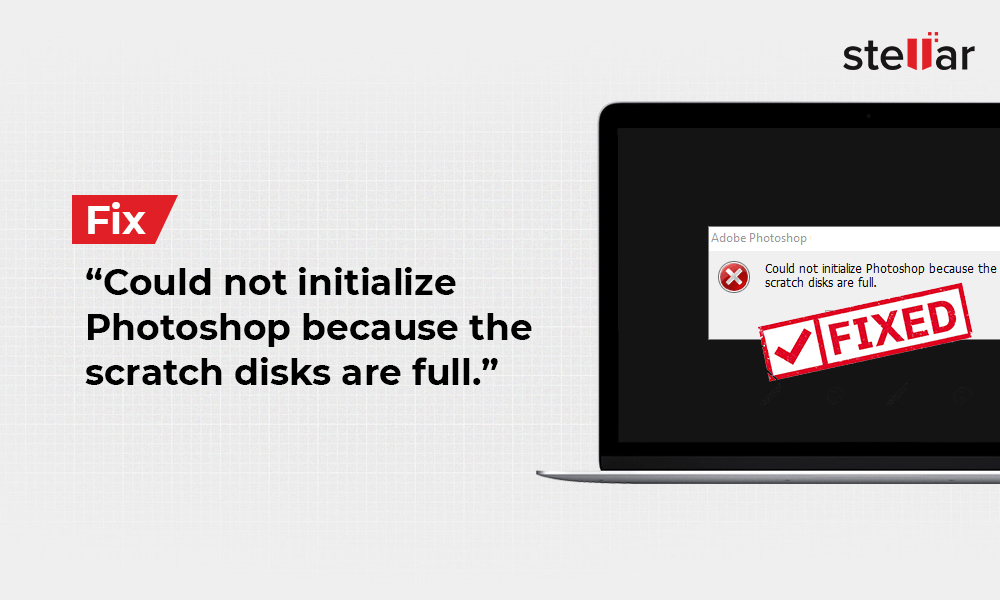
Summary: This post can help you fix the error 'Could not initialize Photoshop because the scratch disks are full.' Learn how you can fix the problem of scratch disks and how to manage the disk partition and optimize the hard drive.
Contents
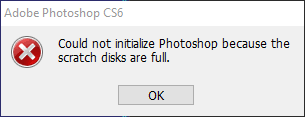
?While opening Adobe Photoshop CS6 on my Windows 10 PC, I?ve faced the error ?Could not initialize Photoshop because the scratch disks are full.? Somebody, please suggest a resolution? Thanks for your timely help.?
Photoshop is a versatile photo and video editing software developed by Adobe. It is used worldwide for its advanced graphics editing features. But, sometimes, you may encounter inadvertent errors and glitches that affect normal working of the software.
In this blog, we?ll focus on the error ?Could not initialize Photoshop because the scratch disks are full,? share the reasons behind its occurrence, and comprehensive solutions to solve the error.

What is ?scratch disks are full? error?
Photoshop uses the computer?s RAM to perform operations. When the RAM space turns low, the app temporarily swaps its data to a virtual memory?the PC?s inbuilt storage drive that is specified in the Photoshop Preferences as a scratch disk. For single partition on the storage drive, the scratch disk is the startup drive, i.e., C: drive.
But, when the allocated scratch disk space turns low to accommodate more data, the app throws the message ?Could not initialize Photoshop because the scratch disks are full.?

Reasons behind the scratch disks are full error-
The error could occur due to:
- Low space on the default scratch disk (i.e., C: drive) that swaps the Photoshop?s data.
- Unassigned multiple scratch disks in Photoshop preferences that tackle low space issue.
- Abrupt shutdown of PC that leaves temporary Photoshop files undeleted & clog up space.
- Noncontiguous or fragmented free space on a scratch disk that doesn?t initialize the app.
Methods to fix the scratch disks are full error-
Try out the following techniques to eliminate the error:
Remove temporary files
Open File Explorer to check whether your storage drive (C: Drive which is the default preference of scratch disk) is full. If it is complete, then free up some space by removing temporary files that are clogging up the drive.
To delete your temp files, perform the following steps:
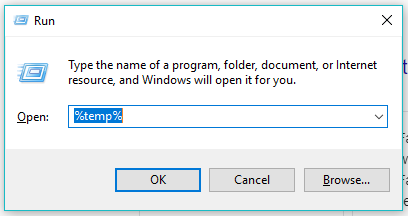
- Press Windows + R keys to open Run.
- Type %temp% and click OK.

- On the Temp folder, press Control + A to select all the temporary files.
- Press Shift + Delete key combination, then click Yes to confirm.
- In case some actions can?t be completed, then close all the opened apps.
- Select the ?Do this for all current items? checkbox and click ?Try Again.?
- If few files can?t be deleted due to some reason, you can click Skip.
Carry out the above steps one more time by typing temp on Run in place of %temp%. Your C: drive will now have more free space. Run the Photoshop app once again. If the app has gotten sufficient free space, it won?t throw the error. Else, proceed to the next troubleshooting method.
Start Photoshop by holding Control + Alt keys-
As your error-stricken Photoshop app can?t open in Windows 10 computer due to the scratch disks full error, you must do the following:
- Start your Photoshop app and immediately press and hold Control + Alt When the app starts, it opens up ?Scratch Disk Preferences? dialog box.
- Under the Scratch Disks section, specify the first scratch disk location that has sufficient free space (say D: Drive).
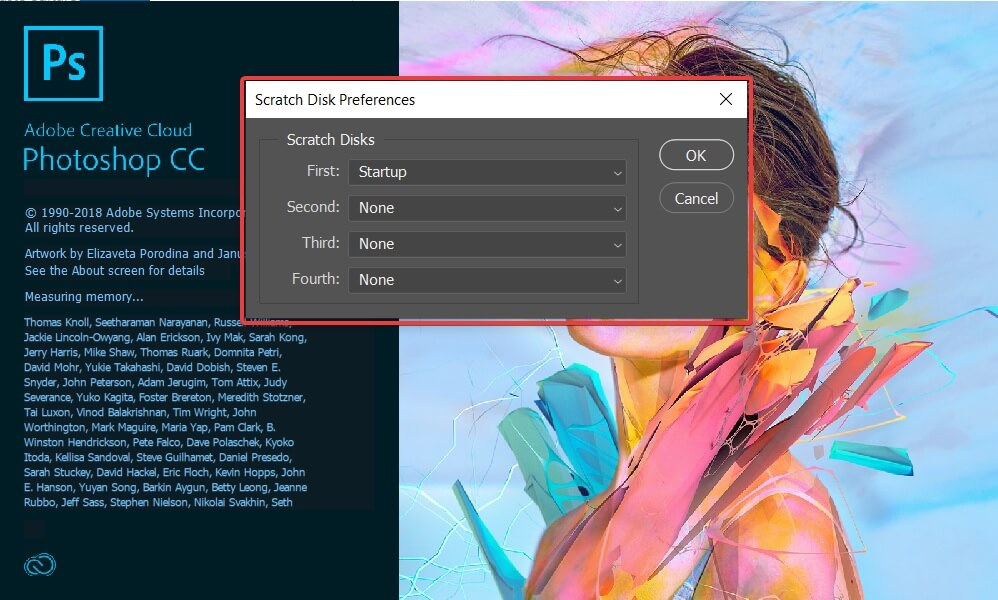

3.If you have multiple partitions on your internal storage drive, allocate more than one drive as scratch disks to tackle low disk space on the first scratch disk. Once done, click OK.
Now, run the Photoshop app without any error.
Create separate disk partition
In case your storage drive has only one partition, you can create separate disk partition for your Photoshop Scratch Disk. Steps are as follows:
- Right click the Windows logo on Taskbar and select ?Disk Management.?
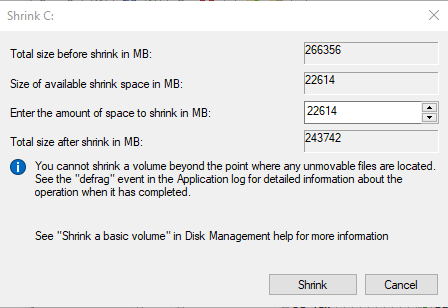
- On the Disk Management window, right click C: Drive and select ?Shrink Volume.?
- On the Shrink C: dialog box, click Shrink without bothering about the shrink space.

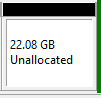
- Right click the unallocated space from the Disk Management window and select ?New Simple Volume.?

- On the New Simple Volume Wizard, click Next. Specify the ?Simple volume size in MB? and click Next. Click Next to assign the specified drive letter. Then, click Next to format the volume with specified settings?you may rename the ?Volume label? from New Volume. Finally, click Finish.
- Once the partition is created, start Photoshop while holding Control + Alt
- Select the newly created partition as your Scratch Disk from the menu.
Optimize your hard drive-
Photoshop requires contiguous or non-fragmented free space on scratch disk. To do that, you need to optimize your hard drive.
Note: This method is not applicable for Solid-State Drive (SSD), as it doesn?t need defragmentation.
To optimize your hard drive, perform the following steps:
- Press the Window key and type ?defragment? then select the ?Defragment and Optimize Drives? app.
- On the Optimize Drives window, select the drive (say C: Drive) then click Analyze.
- Once the analysis is over and the drive is fragmented, click Optimize to defragment your hard drive and make your computer run efficiently.
Increase the RAM limit –
Even increasing the limit of RAM could minimize swapping of Photoshop data to the virtual memory (or scratch disk). The increased RAM usage limit will preempt the error.
To increase the RAM limit on your Photoshop, do the following steps:
- Open Photoshop and go to Edit > Preferences > Performance. This step opens the Preferences window with Performance screen.
- Under Memory Usage, go to the ?Let Photoshop Use? option and either type or drag the cursor to adjust the desired RAM usage. Click OK.
Conclusion
We hope the shared methods will help you resolve the Photoshop error on Window 10 computer. You can begin the troubleshooting process by removing temporary files, allocating a different scratch drive location, and creating a separate disk partition for Photoshop (if you are a power user). If your PC has a hard drive, then you can optimize it to make it contiguous and non-fragmented. Even increase the RAM limit for Photoshop to solve the initialization error.
In case the edited Photoshop files turn corrupt, don?t lose hope. Use photo repair software to fix the corruption issue.
For more watch this video

To repair photo files, perform the following steps:
- Download and install Stellar Repair for Photo software on your Windows computer.
- Launch the software and click Add File from the main screen.
- Specify the corrupt Photoshop files then click Repair.
- Allow the software to repair the selected photos.
- When the repair process finishes, preview the files.
- For the Photoshop files that are not repaired, click the Advance repair link.
- Add Sample files created from Photoshop.
- Click ?Save Repaired Files.?
- Click the ?Click here? link to open the folder that contains the saved repaired files.
Simply download and launch the trial version of Stellar Repair for Photo on your PC or Mac and follow the three simple steps ? Add file, Repair and Preview & Save.


