Summary: : In Exchange Server 2010 SP1 and later versions, you can use PowerShell cmdlets to export mailboxes from an online database to PST format. In Exchange 2013 onwards, you can also use the Exchange Admin Center to export mailboxes as PST files. In this article, we have discussed both methods to create PST files from Exchange Server 2010 and later. We have also mentioned an EDB to PST converter tool that can help you export mailboxes from both online and offline Exchange database files to PST format.


When having a business running an Exchange Server or any other kind of mail server you will always need to create PST from Exchange Server for many reasons. Reasons include a leaver from the company and as a policy the data is saved in a vault, you need to export the data from individual mailboxes, your mail server has an issue and you need to move your mailboxes to another server or database, upgrading to a new server or migrating to another email service like Office 365.
Exporting data is important and crucial in some cases. With Exchange 2007 onwards to create PST from Exchange Server you would need to use the PowerShell cmdlet New-MailboxExportRequest. This command is not natively in your Exchange 2007 server and for this you would need to have a Windows 7 machine using a 32bit OS having a 32bit Office installation along with the Microsoft Exchange Server Management Tools installed. This with regards to the machine. Then you would need to check that the user you are using has the right permissions to do so. If you are not using the Domain Administrator which by default is part of the Exchange Administrators you should add it to the group.
For Exchange Server 2010 you must have Service Pack 1 or better installed. To be honest due to vulnerability and other issues and fixes, it would be wise to have your Exchange Server fully updated but for the purpose of export you must have Service Pack 1 installed. For newer versions there is no need to do anything as this is natively setup in the software.
From Exchange Server 2010 SP1 onwards you would need to add the permissions differently to be able to export. This can be done by running the below command in PowerShell from the Exchange Management Shell.


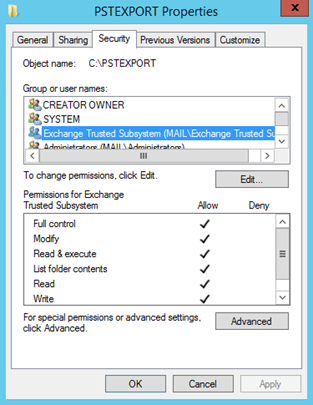
After the command is complete we need to prepare the folder where your PST files will be exported to. This must be a network path \\fileserver\pstexport due to the fact that the command will not work if you specify a path like c:\pstexport. You need to create a destination folder and share it. On the security of the share you must add Exchange Trusted SubSystem as full access on the folder as below.

With Exchange Server 2007 with the secondary machine configured or Exchange Server 2010 with Service Pack 1 or higher with the required permissions and the network share created, we can now go ahead and start using the New-MailboxExportRequest.
The below is an example of a basic export to create PST from Exchange Server
New-MailboxExportRequest ?Mailbox "Karen.Jones" ?FilePath "\\FileServer\PSTExport\Karen.Jones.PST"This will export the mailbox to the location specified in the file path parameter. To see the status of the export you can run the following command.
New-MailboxExportRequest ?Mailbox "Karen.Jones" ?FilePath "\\FileServer\PSTExport\Karen.Jones.PST" -IsArchiveWith regards to criteria you have some filtering features in the export command which can be used with a mailbox or archive export, so let?s explore them.
Including/ excluding folders
To export a specific folder from a mailbox we can we need to use the IncludeFolder parameter to the export command as below which shows off the inclusion of two folders. Single or multiple folder can be added to the export by separating them with a comma and the folders need to be start and end with the hash symbol.
New-MailboxExportRequest ?Mailbox "Karen.Jones" ?FilePath "\\FileServer\PSTExport\Karen.Jones.PST" ?IncludeFolder "#Inbox#", "#Sent#"In the example above, only the Inbox and Sent folder will be exported. Folder exclusion works differently where it will export all the folders except the ones you specify, these can be single or multiple folders all there is to change the IncludeFolder parameter with an ExcludeFolder parameter, the rest is the same concept.
In the example above, only the Inbox and Sent folder will be exported. Folder exclusion works differently where it will export all the folders except the ones you specify, these can be single or multiple folders all there is to change the IncludeFolder parameter with an ExcludeFolder parameter, the rest is the same concept.
Date Filter
With the New-MailboxExportRequest command, one can filter by date, between dates, before dates or from dates onwards. Let?s see the examples below.
Export any emails from a particular date onwards
New-MailboxExportRequest ?Mailbox "Karen.Jones" ?FilePath "\\FileServer\PSTExport\Karen.Jones.PST" -Content Filter {(Received ?gt ?01/01/2018)}Export any emails until a particular date
New-MailboxExportRequest ?Mailbox "Karen.Jones" ?FilePath "\\FileServer\PSTExport\Karen.Jones.PST" -Content Filter {(Received ?lt ?01/01/2019)}Export any email between a date and the other
New-MailboxExportRequest ?Mailbox "Karen.Jones" ?FilePath "\\FileServer\PSTExport\Karen.Jones.PST" -Content Filter {(Received ?lt ?01/01/2019) ?and (Received ?gt ?01/01/2018)}You can mix and max with the date filter and the folder include or exclude as the below example which will export the Inbox and Sent folder between 1st January 2018 and 1st January 2019.
New-MailboxExportRequest ?Mailbox "Karen.Jones" ?FilePath "\\FileServer\PSTExport\Karen.Jones.PST" -Content Filter {(Received ?lt ?01/01/2019) ?and (Received ?gt ?01/01/2018)} ?IncludeFolder "#Inbox#", "#Sent#"Exporting from Exchange Server is a one-by-one process, thou although it can be automated by using a script ForEach user in the AD if you are exporting all the mailboxes, it can cripple down the server?s performance so use it well and consider the server and storage performance.
Stellar Converter for EDB can convert EDB to PST, explore and export any data to other formats such as EML, HTML, and PDF with several filtering options. With this application, you can also export directly into a live Exchange Server database or to an Office 365 tenant in case of an upgrade, migration or moving data from one database to a new database or even retrieving data from a retired Exchange Server.