Summary: This is an instructional guide on creating Exchange 2016 or Exchange 2013 server backup using the PowerShell cmdlets in Exchange Management Shell (EMS). It also discusses the benefits & drawbacks of the entire process and suggests an alternative backup solution for Exchange 2016 and 2013 mailbox databases.


Contents
Taking a backup can curb data loss to a considerable extent. However, database administrators (DBAs) must follow a strict backup strategy to safeguard data against adverse conditions.
For instance, the backup files must be stored carefully, preferably at least two copies ? one onsite and another at an offsite location- so they can be restored in the instance of server failure or downtime.
All Exchange Server editions come with backup capabilities. You can create a backup of the entire server, single or multiple Exchange databases, and individual or multiple mailboxes based on the organization?s needs.
When it comes to backing up Exchange 2016 or Exchange 2013 mailbox, you can do it via,
- Exchange Admin Center (EAC)
- Exchange Management Shell (EMS) Cmdlets
These allow you to back up individual or multiple Exchange 2013 or Exchange 2016 mailboxes at once in PST file format.
This guide will discuss methods and steps to create an Exchange server mailbox backup using the PowerShell cmdlets in EMS.
Steps To Backup of Exchange 2016/2013 Mailbox via PowerShell Commands
Admins can export single or multiple Exchange mailboxes to PST files using the New-MailboxExportRequest PowerShell command in the EMS.
Step 1: Assign Mailbox Import Export Role
The user should be a member of a role group with the Mailbox Import Export role added. Admin can use the following command to assign the Mailbox Import Export role to a specific user.
New-ManagementRoleAssignment -Role ?Mailbox Import Export? -User DomainName/UserName or alias
Step 2: Create a Shared folder Location
Also, create a shared folder location to save exported PST backup files from the mailbox. The steps are as follows:
- Create a new folder on the server storage. Name it anything.
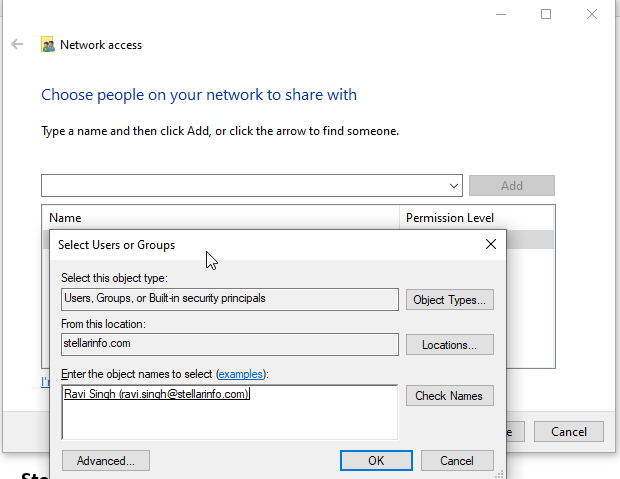
- Right-click on the folder and choose to Give access to > Specific people?
- Choose Find People and then search and add the username to who has Mailbox Import Export role assigned. You may also choose Everyone (not recommended).
- Click OK and then click Share.

- Copy the shared folder path location displayed on the next screen.
Step 3: Backup Individual Exchange 2013/2016 Mailboxes to PST
Before you can export or backup an Exchange 2016 or Exchange 2013 mailbox to PST, you need to know the name of the mailbox.
Execute the following command in Exchange Management Shell (EMS) to list all the mailboxes in your organization.
Get-MailboxStatistics -Server YourExchangeServerName

Once you have the mailbox or mailboxes names, enter the following command to create mailbox backup at the shared folder location in PST format,
New-MailboxExportRequest -Mailbox ?MailBoxName? -FilePath \\Servername\SharedFolderPathName\FileName.pst


You can modify or limit the scope of exported contents by utilizing additional parameters. Below we have discussed a few useful parameters you can use while creating Exchange 2013 or Exchange 2016 mailbox backup in PST format.
-ContentFilter Parameter
For instance, the following command lets you export items received before 01-01-2020 with a subject beginning with ?RE?,
New-MailboxExportRequest -Mailbox ?MailBoxName? -ContentFilter {(Received -lt ?01/01/2020?) -and (Subject ?like ?Re*?)} -FilePath \\Servername\SharedFolderPathName\FileName.pst
-ExcludeFolders and -IncludeFolders Parameters
For instance, the following command uses -IncludeFolder parameters to export only Inbox and Sent Items folders to PST for Exchange mailbox backup.
New-MailboxExportRequest -IncludeFolders ?#Inbox#/*?,?#SentItems#? -Mailbox ?MailBoxName? -FilePath \\Servername\SharedFolderPathName\FileName.pst
IsArchive Parameter
It is a switch parameter that describes the archive as the only export medium.
New-MailboxExportRequest -Mailbox ?MailBoxName? -IsArchive -FilePath \\Servername\SharedFolderPathName\FileName.pst
-Name Parameter
The parameter is used to set a name for an export request. In addition, it is used for tracking individual requests when multiple export requests are executed.
By default, Exchange assigns ten consecutive names to the export requests per mailbox. When all ten export requests are taken, the user is required to either remove the export requests or assign customized names using the –Name parameter to proceed further with Exchange 2016/2013 mailbox backup process.
A single New-MailboxExportRequest command can contain more than one parameter to accomplish any particular operation.
Step 4: Backup Multiple Exchange 2016/2013 Mailboxes to PST using PowerShell
You can also back up multiple Exchange mailboxes by using the Foreach command. In addition, you may create and use a PowerShell script to back up selected users? mailboxes at once or combine Foreach and Get-Mailboxes commands to back up all mailboxes in your organization.
Create a variable to store all the mailboxes in your organization for backup.
$ExchangeMailboxes = Get-Mailboxes
Then enter the following command to export these user mailboxes to PST.
$ExchangeMailbox|%{$_|New-MailboxExportRequest -FilePath \\Servername\SharedFolderPathName\$($_.Alias).pst}
Alternatively, you can create a script with name “ExchangeMailboxes? containing usernames of specific mailboxes that you want to export or backup in Exchange 2016 or 2013 to PST format.
$ExchangeMailboxes = ?username1?,?username2?,??.,?usernameN?
($User in ($ExchangeMailboxes)) { New-MailboxExportRequest -Mailbox $User -FilePath \\Servername\SharedFolderPathName\$($User).pst" }
The command starts creating backup of all or specific mailboxes in your Exchange 2016/2013 server at the Shared Folder location based on the command you use.
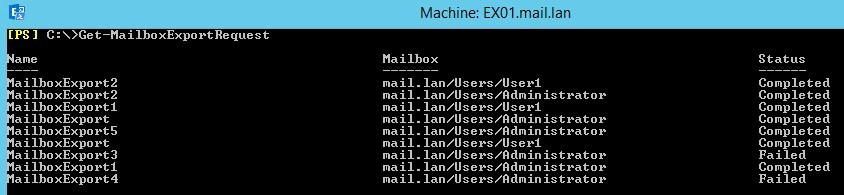
How to Know It Worked?
You can do so by using the following commands,
Get-MailboxExportRequest -Mailbox ?MailboxName? | Format-List
Get-MailboxExportRequest -Status completed -Database RDB01
The latter command displays completed request of backup in RDB01 database.
To check the export progress, type the following command
Get-MailboxExportRequestStatistics
You may also go to the Shared Folder location to check the backup PST file.
Pros and Cons of Creating Exchange 2016 or 2013 Backup Using PowerShell Cmdlets
Although PowerShell commands help you back up Exchange mailboxes and give you more control over the Exchange server, it may not always work. There are a few drawbacks and advantages of this method that you should know.
Pros
? Converts EDB mailboxes to PST with mailbox filtering capabilities
? Supports bulk conversion of EDB mailboxes to PST altogether
? Modify PST export requests during the backup
Cons
? The backup process via PowerShell commands is lengthy and time-consuming
? Demands expertise and permissions for the execution of the export task
? Requires a huge amount of space in server storage media
? Involves the risk of PST corruption
? No preview is available for incorporated EDB contents
? Lack of centralized management of backup strategies and tasks
? Risk of huge data loss is involved due to typos
As an administrator, if you want to avoid these complexities involved in manual EDB to PST conversion via PowerShell commands, you can use an EDB to PST Converter tool such as Stellar Converter for EDB. The software allows you to export single or multiple mailboxes to PST file format and help you back up Exchange 2016/2013 mailbox with a few clicks.
Conclusion
EMS or Exchange Management Shell is a command-line shell built on top of PowerShell to perform various Exchange administrator tasks and operations, such as backup. Exchange Admin Center (EAC) features a GUI interface, which makes it easy to back up and export mailboxes from the Exchange database to PST format. However, EAC offers only limited options for backup. Plus, if you want to run other procedures, they can only be performed via Exchange Management Shell. In a nutshell, PowerShell cmdlets give you better control over Exchange backup.
However, it requires additional permissions to execute certain commands and works only when the database is offline. Thus, it can lead to downtimes.
Fortunately, you can create an Exchange backup and avoid downtime using an EDB to PST converter software, such as Stellar Converter for EDB. The software can create a backup from online and offline Exchange databases without hindering the Exchange services.
After creating a backup of Exchange mailboxes in PST format, create at least two copies of each mailbox backup, one onsite and one offsite at another location. For maximum resilience against data loss, you may also follow the 3-2-1 backup strategy.
In case you find any issue or problem with the PowerShell-based backup method or software, please leave a comment.

