Summary: Any owner of an external hard drive may see “uninitialized disk” on a Mac one day. This message usually makes your dive unavailable, so you won’t be able to unmount the disk, access the files on it, or perform any other actions with it. An uninitialized external hard drive on Mac becomes entirely unavailable for the user.
In this article, we will discuss the reasons why you get this message and ways to fix it. It also covers steps to download and install Stellar Data Recovery Software to restore any lost files that are stored on such drives.


Contents
Reasons Why The Disk Is Not Initialized on Mac
The reason why the disk is not initialized on Mac depends on usage conditions. It is normal to see this message if this is a new disk that was never used before. Once you connect it for the first time, the system will need to activate it and assign a variable in its own special language. After this, the drive should work as expected.
On the contrary, it is not normal to see the uninitialized disk on Mac when you connect the hard drive you have used before. Because of this error, the system won?t be able to access and read the drive and any data that is stored on it. Reasons, why a disk is not initialized on Mac, can be grouped into the following categories:
- Improper disconnection
- Viruses or malware infection
- Faulty partition
- Physical damage
- File system errors
- Bad/damaged sectors
Recover Data from Uninitialized Disk on your Mac
As mentioned before, you won?t be able to access the files that are stored on an uninitialized disk on Mac. The good news is, that those files are still located on the drive, and with the right tools like Stellar Data Recovery Software can easily be recovered. Overwriting the files could make them unretrievable. So we recommend following this step before fixing the issue to prevent any possible data loss during the disk repair process.
Stellar Data Recovery Professional for Mac is an all-in-one solution that can be used to restore multiple different file formats in one go. It supports various device types, so you can recover data from an uninitialized disk on Mac, whether SSD or HDD. The software also shows a preview so you can choose precisely the files you need and speed up the recovery process.
To recover data from an uninitialized disk with Stellar Data Recovery Software:
1. Download and open Stellar Data Recovery Software.
2. Choose Recover Everything on the main screen and click on Next.


3. Select the uninitialized disk.
4. Click on Scan at the bottom left.


5. Check the files in the Preview window and choose Recover.


Fixes to Uninitialized Disk Issue on Mac
Once you have all your files recovered and stored in a secure location, you can move forward with fixing the uninitialized disk on Mac. Performing data recovery before troubleshooting steps is a safe way to protect your files from possible data loss. Make sure to follow the steps one-by-one to fix a disk that is not initialized.
1. Reconnect the Disk
It is always a good idea to check the connection of the external hard drive before moving forward to more complicated steps. Disconnect the device and plug it back into Mac to initialize the disk correctly. You can also try connecting it to a different USB port and using a different USB cable.
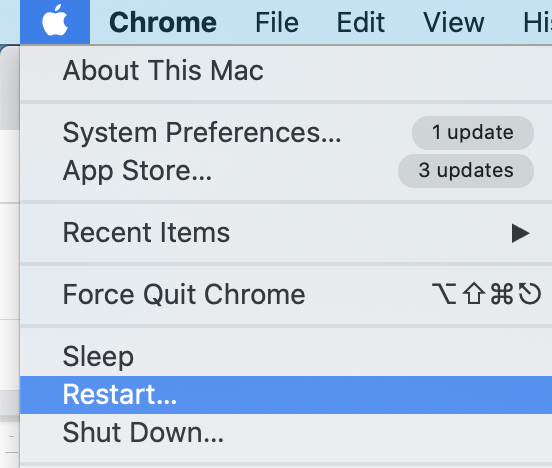
2. Reboot your Mac
Restarting a device is a working way to fix many issues caused by temporary system errors and glitches. Disk not initialized on Mac is not an exception in this case. Make sure to disconnect the external hard drive and all other peripherals before rebooting. Click on the Apple logo and choose Restart (you can also Shut it down and manually start it back up). Connect the disk once the Mac is booted to check if that fixed the issue.

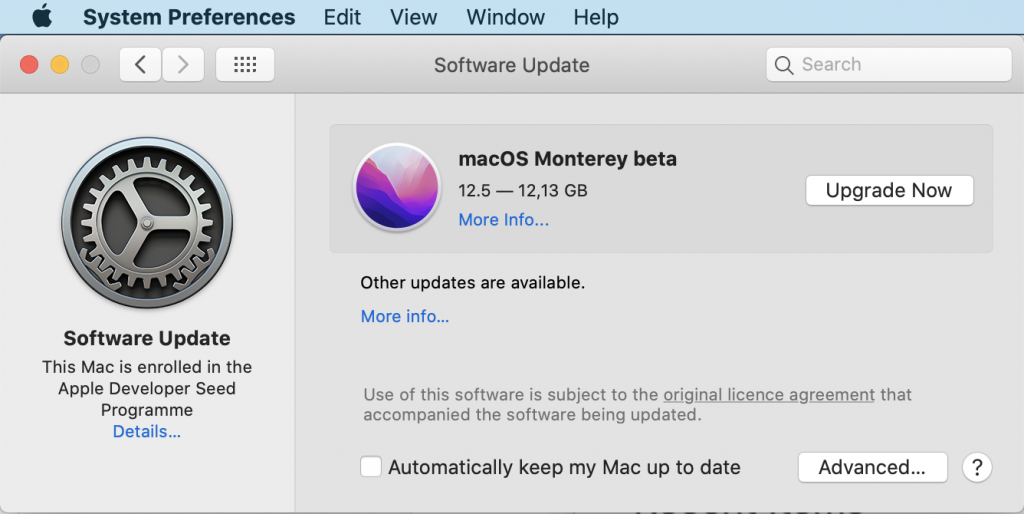
3. Install Software Updates
Software updates include many improvements, new features, software, and driver updates, as well as security patches needed for your Mac. Using an outdated system could lead to some unexpected errors, including ?disk not initialized?. To install software updates and update your drivers open System Preferences > Software Update.

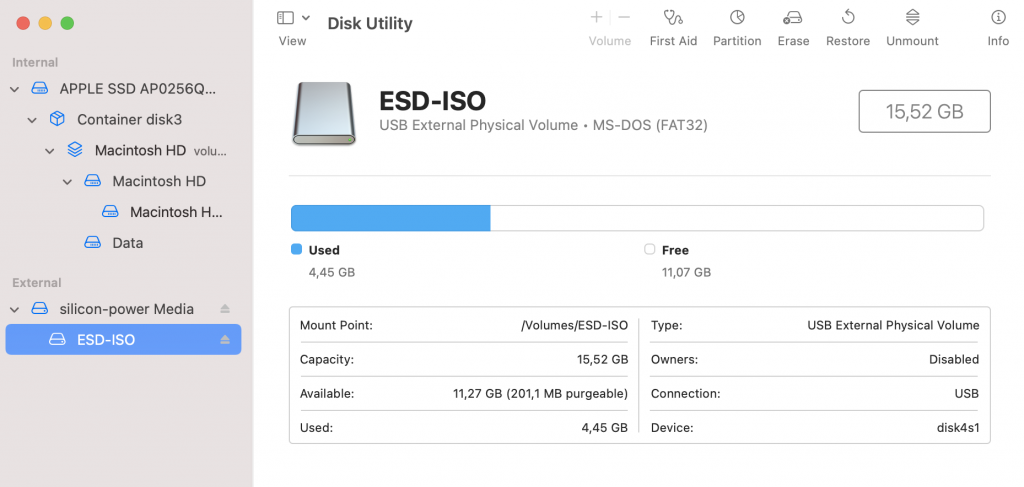
4. Use First Aid in Disk Utility
First Aid is a troubleshooting feature built into the Disk Utility that scans a drive to identify and repair disk errors. This is one of the first things you should try when you have any problems with a drive or disk.
To run First Aid to fix the disk not initialized:
- Open Disk Utility from Applications > Utilities.
- Choose an uninitialized disk.
- Click on First Aid and choose Run in the pop-up window.
- Wait until the process is done.
- Once the scan is completed, you will see the status of the disk and can also click to see Details.
- Reconnect the disk to check if the issue is fixed.

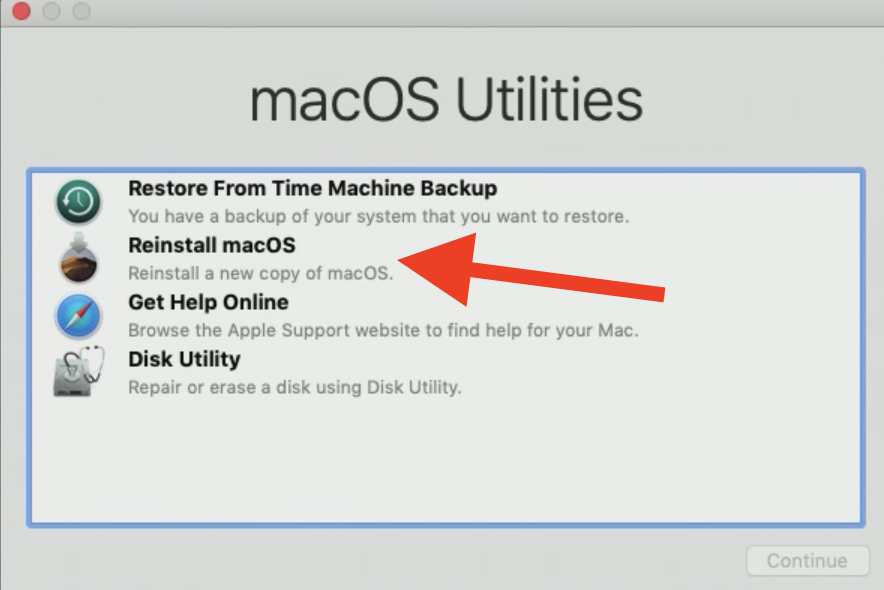
5. Perform macOS Reinstall
If you have faced the issue of a disk not being initialized right after the macOS upgrade or downgrading, it is worth reinstalling the operating system. Make sure to backup your Mac before performing any further steps.
To reinstall macOS:
- Shut down your Mac.
- Boot into Recovery Mode by pressing and holding Command+R while starting your Mac.
- Choose Reinstall macOS in the macOS Utilities window.
- Click on your hard drive and choose Install to start the process.

6. Erase the Uninitialized Disk
When you format a drive, it makes it brand new, and all the data stored on it gets removed. This step is one of the last resorts if the disk is not initialized even after all the previous steps. To format a drive in Disk Utility:
- Go to Applications > Utilities > Disk Utility.
- Choose the drive from the left sidebar.
- Click on Erase at the top and specify Name and Format.
- Choose Erase in the window.
- Reconnect the drive to check if the issue is fixed.
7. Check for Physical Damage
Following all the previous steps should help you fix ?disk not initialized? if some software errors cause it. In this case, the next step should be checking for possible physical damage. This can be confirmed only by using specialized professional tools, so consider visiting the nearest repair office or contact a vendor if your warranty is still active.
8. Replace the Disk
Unfortunately, if none of the previous steps worked to fix the uninitialized disk on Mac, the drive might have unretrievable damaged. In this case, the safest bet is to restore all the data from it with professional software like Stellar Data Recovery and replace the disk with a new one.
FAQ
How to Initialize a Hard Drive Mac?
When you first connect a new hard drive, macOS tries to initialize it automatically. You might be prompted to click on Initialize to start this process. If this is not happening, you need to create a partition on this drive in Disk Utility.
How to Open an Uninitialized Disk?
An Uninitialized disk can?t be accessed or read by macOS, so it is impossible to open it. You need to initialize the disk before seeing and managing the content. If this is not possible, use data recovery software like Stellar Data Recovery to restore the files stored on an uninitialized disk.


