Summary: The screenshot not working on Mac can catch you off guard. The issue is common, and there are various ways to fix it. Check our 7-step guide on resolving the screenshot not working on the Mac issue.
No matter what purpose your computer serves, there is almost a 100% chance you will need to take a screenshot at some point in your user experience. The screenshot feature on Macs is well-known for its simplicity and convenience. However, some Mac users occasionally report the problem with either inability to track the screenshot?s location or take a screenshot altogether.
Many Mac users prefer to take screenshots of application windows or the whole screen to save important data. The Stellar Data Recovery tool can assist you if you accidentally remove such screenshots. It provides advanced data recovery options with a user-friendly interface and allows you to recover lost files from external and internal devices.
Ways to fix the Screenshot not working on Mac
1. Restart Your Mac
Sometimes, the inability to take screenshots on a Mac occurs due to a random software glitch in your system. That is why you should start with a system restart.
To execute Restart on your Mac properly:
- Click on the Apple Logo in the top left corner of the screen.
- Select the Restart option.
- Confirm the system restart by clicking on the Restart button.

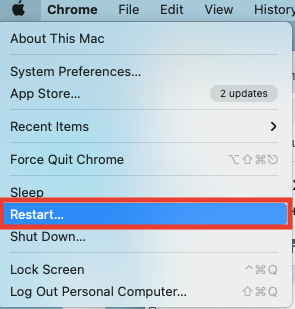
When the restart process is over, try retaking a screenshot.
2. Update Your Mac
Keeping your Mac up-to-date ensures its smooth performance. So, if you face minor bugs, such as the screenshot not working on the Mac problem, try updating your Mac. First, check if any updates are available:
- Click on the Apple Logo in the top left corner of the screen.
- Go to About This Mac.
- Hit the Software Update button.

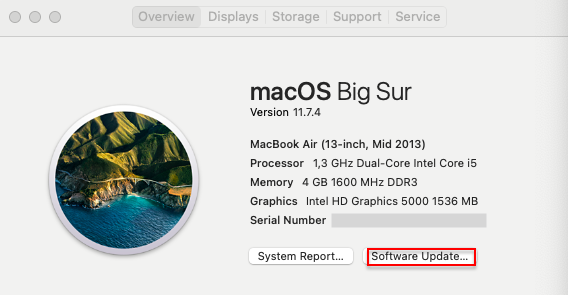
Your Mac will launch an automatic scan for the newest system updates. If it identifies the updates, install them by hitting the Update Now button in a newly appeared window.

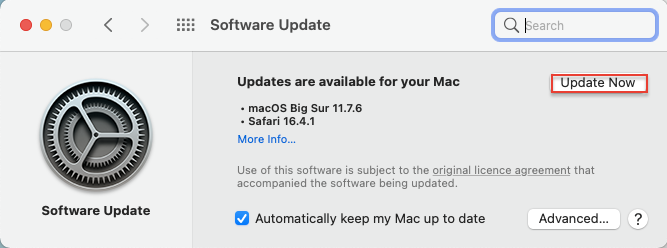
If, after updating your Mac, the problem persists, move to more complex solutions.
3. Perform NVRAM Reset
NVRAM stands for non-volatile random access memory. It stores the basic data needed to boot your system properly. Though NVRAM issues are uncommon, the NVRAM reset may be helpful if you experience weird performance issues. The NVRAM reset can be performed on Macs with Intel processors.
To perform the NVRAM reset:
- Go to the Apple Menu to Shut Down your computer.
- Turn it back on by pressing the Power button.
- Hit the Command, Option, P, and R combinations on your keyboard.
- Hold the combination for around 20 seconds.
- Release the keys after you hear the startup sound or see the Apple logo for the second time.
When it comes to newer Mac models with M1 chips, there is no specific command you can use to lauch NVRAM reset. Instead, the processor checks NVRAM when you boot your computer from a complete shutdown:


If your Mac detects any NVRAM issues when you turn it on, it resets NVRAM automatically.
4. Use Mac Built-In Tools
The most popular way of taking screenshots on Mac computers is using key combinations. However, it is also possible to make screenshots with the help of pre-installed apps for macOS. One such app is Screenshot, formerly known as Grab.
To open the Screenshot app on your Mac:
- Go to Finder.
- Choose Applications from the left-side menu.
- Select Utilities and double-click Screenshot.

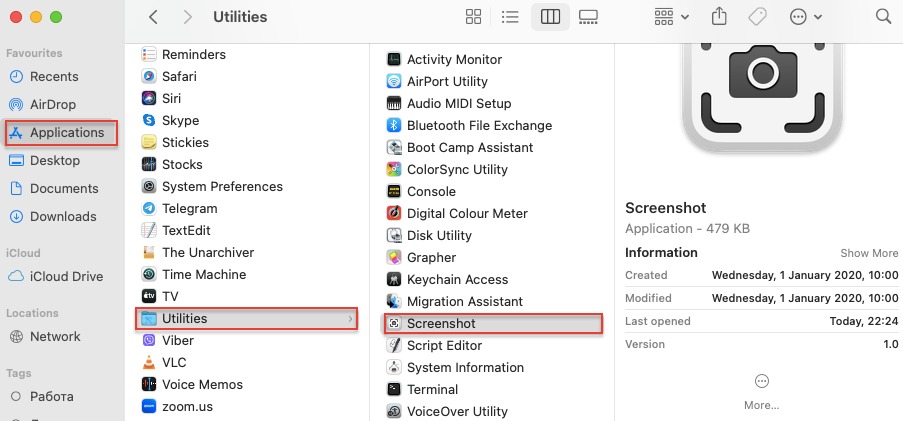
Use the automatically opened tool to highlight the area you want to screenshot and hit Enter on your keyboard. The screenshot will appear in the bottom right corner of the screen and will be later saved to your Desktop.
Pro Tip: Alternatively, you can open Screenshots with a key combination: Command, Shift, and 5.
5. Check Shortcuts Settings
Another possible reason for the screenshot not working on your Mac is that your shortcuts settings are not set correctly. To modify shortcut settings:
- Open System Preferences.
- Go to the Keyboard section.
- Under the Keyboard, switch to the Shortcuts tab.
- Click the Restore Defaults button.

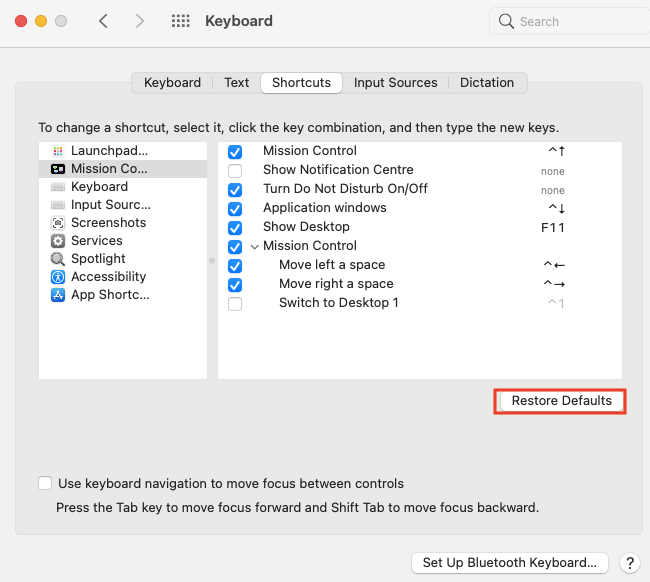
After restoring the default shortcuts settings, try retaking a screenshot.
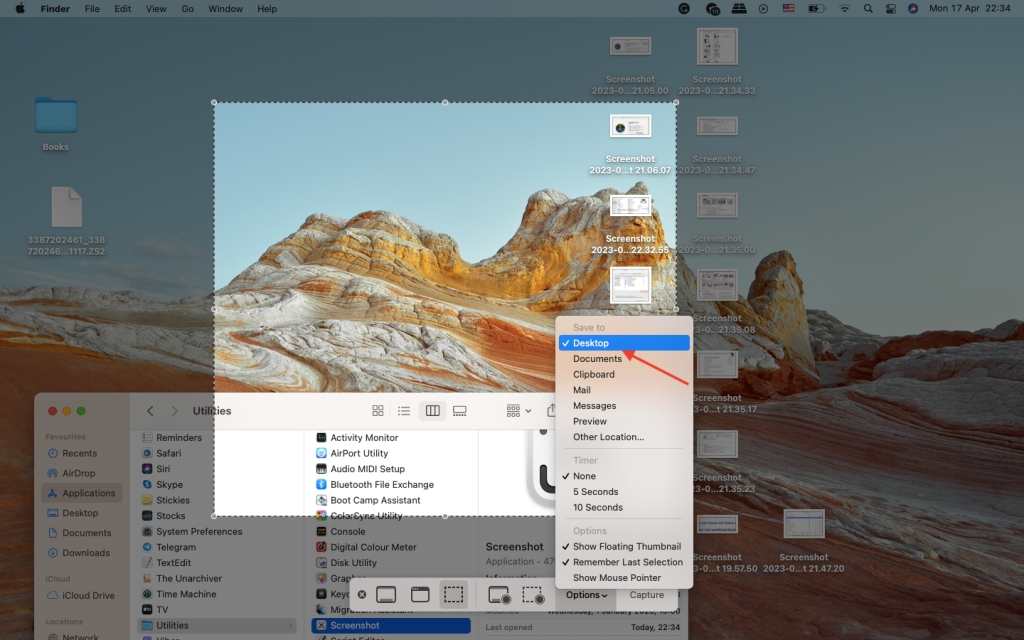
6. Adjust the Location of Saving Mac Screenshots
Some Mac users report needing help making screenshots. Sometimes, they have difficulty finding the screenshot image on their computer. By default, all screenshots are saved to the desktop. However, their screenshot-saving location can be changed.
To verify the folder your screenshots are stored in and modify it follow these steps:
- Open Launchpad and go to Screenshot.
- Select Options at the bottom of the Screenshot menu.
- Choose the saving location you prefer.

7. Load in Safe Mode
If the solutions mentioned above don?t help, consider loading in Safe Mode. This can help you check whether any malware on your computer prevents you from taking screenshots on your Mac as intended.
First, you need to check what Mac type you use. The instructions on how to load in Safe Mode vary for Apple silicon Macs and Intel-based Macs.
To startup Apple silicon Macs in Safe Mode:
- Shut Down your Mac.
- Press and hold the Power button until you see the Loading startup options menu.
- Choose a volume.
- Press and hold the Shift key.
- Select Continue in Safe Mode.
To startup Intel-based Macs in Safe Mode:
- Restart your Mac and immediately press the Shift key.
- Hold the key until the login window appears.
- Log in to your Mac (you may be asked to do it twice)
- If you load in Safe Mode successfully, you will be able to see Safe Mode in the menu bar.
After loading in Safe Mode, try making a screenshot one more time. If you still deal with screenshots not working on Mac in Safe Mode, it may indicate a malware infection. In such a case, you need to tackle the malware issue first.
It?s a Wrap
In most cases, the screenshot not working on the Mac issue appears to be a minor bug in the system. They can be easily fixed by a simple restart or system settings modification. However, sometimes you may be unable to take screenshots because of malware. Consider using third-party tools or addressing local support for further assistance in such cases.
Read more:


