Summary: When enabled, Time Machine feature on Mac automatically backs up the data on an external drive. In case of data loss, you can easily recover the data using the Time Machine backup. But, sometimes, Time Machine backup fails due to various reasons. This blog discusses the solutions to fix the Time Machine backup failed issue.


Time Machine is a very useful feature on Mac that allows the users to take backup of the Mac data on an external drive. This comes in handy when you lost data due to deletion, formatting, or any other reason.
If your Mac data is lost, you can get it back using the Time Machine backup on external drive. But what if the Time Machine backup failed? This blog will walk you through the most suitable solutions to fix the issue.
Try Some Quick Fixes


To resolve the Time Machine backup failure issue, let us first try some quick fixes:
1. Confirm compatibility of external drive?s file system
If the file system of your external hard drive is incompatible with Time Machine, you might encounter the backup failure issue. To check the file system of the external hard drive, follow the guidelines below:
- Connect the external drive to your Mac and open Finder.
- In the left pane, locate the external drive. Click the drive and select Get Info from the options. Alternatively, select the drive and press Command + I on the keyboard.

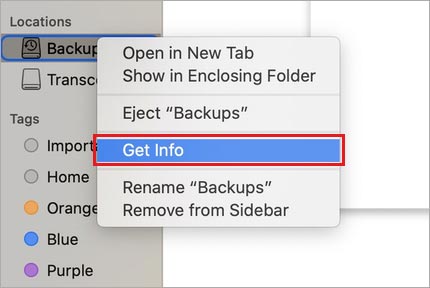
- You can find the file system format of your external drive indicated in front of the Format section.

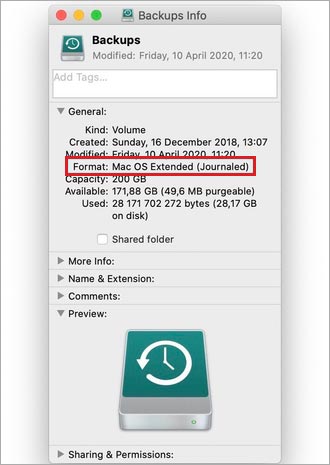
The file format system compatible with Time Machine is Mac OS Extended (Journaled) with GUID Partition Table.
If your external drive?s file format is other than the aforementioned one, you need to change it.
Here?s how to change the file format of the external drive:
Note: Before proceeding further, copy any useful data present on your external drive to some other device.
- Connect the external storage drive to your Mac.
- Launch Finder and go to Application > Utilities > Disk Utility.
- Select the external drive in the left pane of Disk Utility and select Erase from the top.

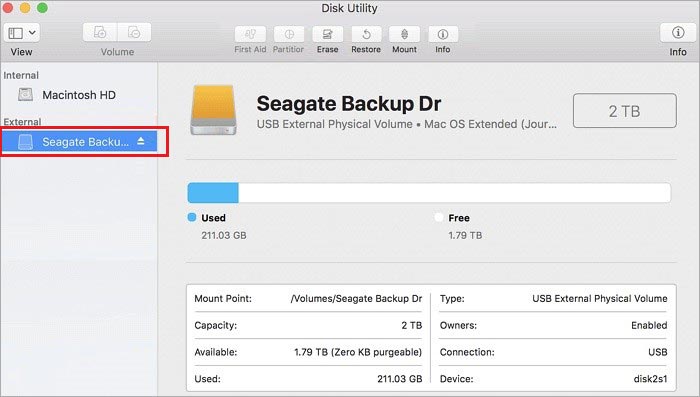
- Change the file format to Mac OS Extended (Journaled) and click Erase.
Now check if you can back up your data using the Time Machine feature on the external drive you have just formatted.
2. Check for free space on external drive
If you cannot take backup on external hard drive using Time Machine, then there might not be enough space on your drive. To check the space on your external drive, click on the Spotlight icon in the Dock and search Disk Utility. Alternatively, open Finder > Applications > Utilities.
Now open Disk Utility and select the external drive from the left pane. The space availability will be shown in the right pane of the Disk Utility window. If there is enough space, click First Aid on the top ribbon. This will repair the software issues, if any, on the drive.
However, if there is lesser space available than your Mac?s internal storage, you need to free up space by deleting the unnecessary files. Alternatively, you can use a different external disk to take back up using Time Machine.
Solutions to Fix the Time Machine Backup Failed Issue
If the Time Machine backup process fails repeatedly, you can opt for the solutions provided below to resolve the issue.
1. Try cleaning up Time Machine and take back up
There are some files created in Time Machine that help it operate better. However, when Time Machine backup fails repeatedly, it indicates that some redundant files are accumulated in the form of temporary files. You need to clean up these extra files to fix any issues with the backup function. Here is how to do it:
- Open Finder and select the external drive from the left pane.
- Locate the Backups.backupdb in the list adjacent to the left pane and open it.

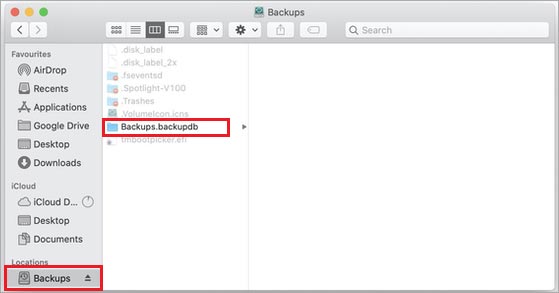
- Select all the files with .inProgress suffixed to their name and move them to Trash.
- Empty the Trash and restart your Mac with the external drive connected to it.
Now, turn on the Time Machine and try to take back up of your data.
2. Identify and remove Apps causing Time Machine failure issue
Often, some applications might not be functioning properly and need an update. Similarly, there may be broken programs or applications. The malfunctioning of other programs can affect the functioning of the Time Machine.
If you are unable to identify the problematic program, you can use the Activity Monitor feature. To find the Activity Monitor,
- Open Applications >Utilities.
- When you see the Activity Monitor app, double-click and open it.
- Click the CPU tab among the five tabs on the top-right corner.
- Sort the list using the %CPU option on the top list adjacent to Process Name.

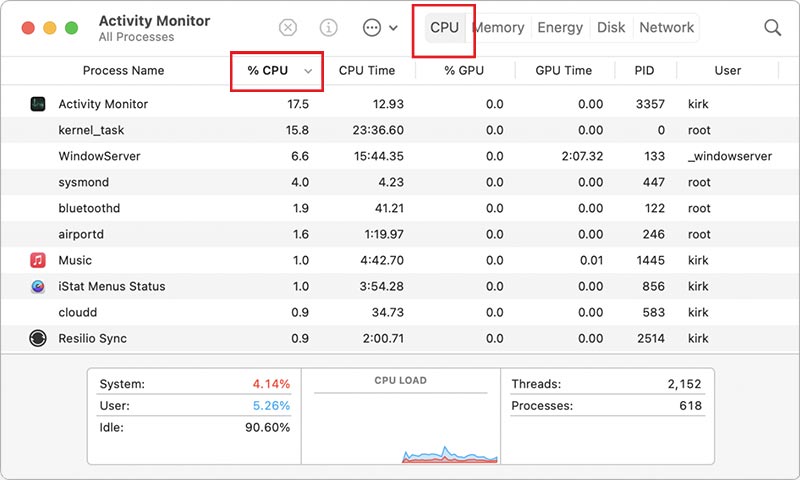
- Identify the apps not running correctly or shown in red or with the words Not Responding written against them.
- Click the Apps process name and click the X button in the toolbar.
Activity Monitor will ask you to confirm the quit process. Once you click Quit, the app will be closed. If this doesn?t work, click the Force Quit button.
Now that you have identified the faulty app, go to Disk Utility and run First Aid on the system drive. Further, check if any updates are pending in the Software Update section. Open Finder and click Applications > Software Update to access the Software Update.If you find any pending update, install it.
3. Repair unresponsive Time Machine drive
If your Time Machine external drive stops responding, it means there is some issue with the drive. In such a case, you need to repair the drive using Command Prompt.
However, before performing the repair process, first you need to stop the Time Machine by clicking Apple Menu > System Preferences > Time Machine > Options > Toggle Time Machine OFF. Now, follow the steps below:
Step 1: Open Terminal, insert $ sudo su ? command, and press Return.
Step 2: Type $ sudo chflags nouchg “/Volumes/<TM Name>/image.sparsebundle/token? and press Return.(Replace the TM Name with the name of your Time Machine external hard drive.)
Step 3: Again type $ hdiutil attach -nomount -readwrite -noverify -noautofsck ?/Volumes/<TM backup name>/<mybackupname>.sparsebundle? and press Return. You will see the command lines appear in the Terminal.
/dev/disk2 GUID_partition_scheme
/dev/disk2s1 EFI
/dev/disk2s2 Apple_HFS <Your Volume name>
Step 4: Insert the command $ fsck_hfs -drfy /dev/diskXs2 to rebuild the catalog btree in the sparsebundle.
Step 5: The above command will take some time to complete, depending on the backup size. It may appear to have hanged but be patient and let it complete. After completion, you will see the message ‘The Volume was repaired successfully’ in the Terminal window.
Your Time Machine drive is repaired and ready to be used. However, if you see the message ‘The volume could not be repaired’, then you need to use a different external drive.
4. Recover the Backup Image
If you are able to access the Time Machine external drive but find nothing on it, it may be because you have lost the backup image created by Time Machine. You may lose data due to reasons, like corruption in drive, accidental formatting of drive, etc. In addition, if you have no option but to use a new drive for backup, you can download Stellar Data Recovery Professional for Mac and use it to get back your data from the current external drive.
This data recovery software can recover data even from an inaccessible hard drive, non-bootable Mac system, and much more. If you can?t access the data on external hard drive by any means, you can use Stellar Data Recovery Professional for Mac to recover your data. It can recover data lost due to drive corruption, partition loss, or unrecognized drive.


Stellar Data Recovery Professional not only supports macOS Big Sur and previous versions, but also updated to support the latest macOS Ventura (macOS 13), the M1 chip-enabled Macs, and the T2 chip-enabled Mac systems. You can rest assured that this amazing software will recover all types of data, like documents, photos, videos, etc. from your external drive.
Conclusion
Issues with the Time Machine back up on Mac is a real setback for all who are cautious about the value of data. Thus, you will not like that the most important option to ensure data security on Mac, i.e., the Time Machine backup fails at any cost. If it does fail, you will need a rescue plan. We hope that the above methods have worked for you. If not, then at least you would have recovered your data.
FAQ
1. How do I repair Time Machine disk?
You can use the Disk Utility on your Mac to repair the corrupted drive. Connect the Time Machine drive to your Mac and open Disk Utility. Select the TM drive and run First Aid on it. Although if you believe that the corruption is due to some virus or malware, scan the drive using a good antivirus program. If you are unable to repair the drive and wish to retrieve the data, use Stellar Data Recovery Professional for Mac.
2. How do I know if my Time Machine backup is corrupted?
You can easily verify whether your Time Machine external drive is corrupted. Select the Time Machine icon in the menu bar of Mac. Now press and hold the Option key on your Mac?s keyboard. From the dropdown menu, select Verify Backups. Time Machine will run the checksum test and display any discrepancies in a dialog box.
3. How do I configure Time Machine on my Mac?
To configure Time Machine on Mac, click Apple Menu > System Preferences > Time Machine icon > Backup Disk. Now select the external drive you wish to use for Time Machine backup and check the Back Up Automatically box.


