
Contents
The Volsnap.sys blue screen error occurs on Windows computers when the VSS or Volume Shadow Service runs into an error or an issue with the storage drive. The Volsnap.sys is a critical system file associated with VSS.

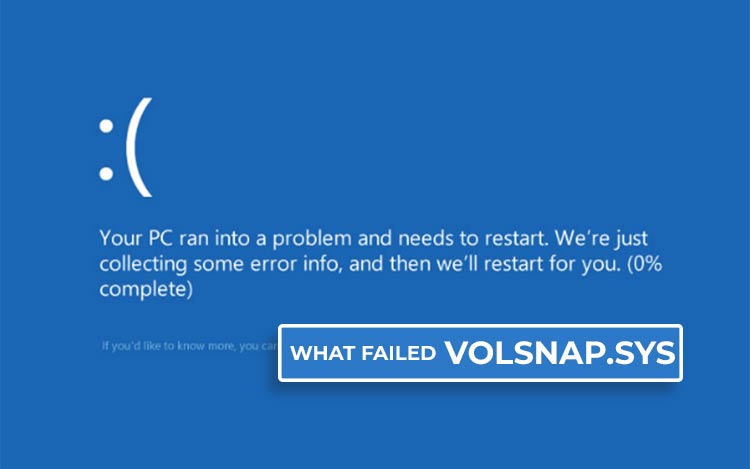
This BSoD gets randomly generated after a system crash. The BSoD shows ‘Volsnap.sys failed’ with a stop code, such as PAGE_FAULT_IN_NONPAGED_AREA. In some cases, the Volsnap.sys failed BSoD creates events within the event viewer where users can find more details, such as Volsnap.sys event ID errors, etc.
Let’s dig deeper to understand what triggers this annoying blue screen error and how it can be fixed.
What is Volsnap.sys?
As evident from its name, Volsnap stands for Volume Snapshot, a subordinate function of the VSS or Volume Shadow Copy Service. Volsnap.sys is an important system file that helps the built-in backup and restore feature or third-party data backup tools leverage VSS to create backups.
This file also helps the backup tools access core files, aids in creating disk-to-disk backups, mine data, and facilitates communication between Windows and the related hardware.
Reasons Behind Volsnap.sys Failed BSoD Error
There are various reasons that can cause the Volsnap.sys blue screen error to appear on your system –
- Junk files
- Problem with the VSS
- Corrupt/broken Volsnap.sys file
- Virus attack
- Faulty RAM modules
- Corrupt system files
- Conflicting device drivers
- Issues with the BIOS
Methods to Fix Volsnap.sys Blue Screen Error on Windows 10/11
As the Volsnap.sys BSoD generally occurs right after booting a Windows 10/11 computer or unexpectedly while creating data backup. It can not only make our data inaccessible but also hinder the task at hand.
If you are facing this scenario, do not worry and use the methods circled out below to fix the issue in no time. Let’s discuss them one by one.
Pre activity –
Before jumping on solutions, perform a malware check using a reliable antivirus tool. This will help you eliminate any viruses causing problems with Volsnap.sys.
Once done, boot your Windows 10/11 PC in safe mode and then use the methods below.
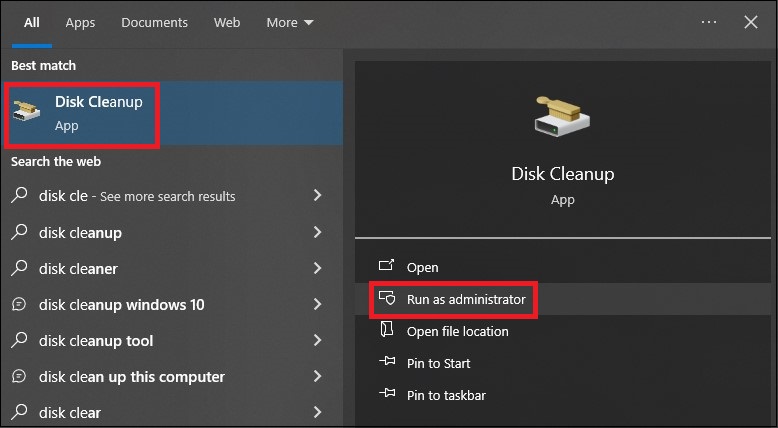
Method 1: Clean Junk Files
Cleaning the junk files is the first step in fixing the Volsnap.sys blue screen error. Junk system files, temporary files, etc. accumulate over time. While these look harmless, in some rare cases, they create a conflict with applications, system processes, and even the OS. This can result in problems leading to issues, such as the Volsnap.exe BSoD.
You can avoid unwanted errors like this on your Windows 10/11 PC by cleaning them regularly. Here’s what to do –
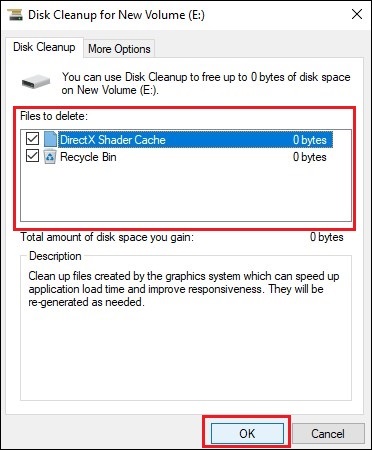
- Press WINDOWS + Q and type disk cleanup.
- Click on Run as administrator.

- A small dialog box will appear. Select the drive that you want to clean. Press OK.

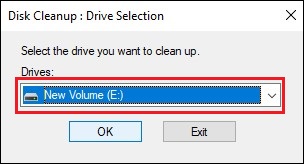
- It will show you all the files that you can remove from the selected drive. Select them and click OK.
- It will ask for your confirmation. Press Delete Files.

Method 2: Stop Volume Shadow Copy Service
Volume Shadow Copy Service, or Volume Snapshot Service, or simply Shadow Copy, is a built-in Windows feature that helps create consistent, uncorrupted, or clean point-in-time copies of data known as ‘shadow copies’.
If this service malfunctions, it can cause its subordinate and related functions like the Volsnap.sys to fail. In such a situation, you can stop it to fix the occurrence of BSoD. Here’s what to do –
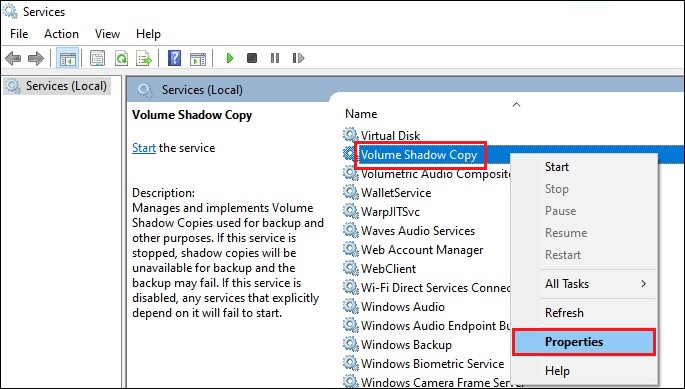
- Press WINDOWS + R and type services.msc. Press Enter.
- Scroll down to locate the Volume Shadow Copy service.
- Right-click on it and click on Properties.

- Use the pull-down menu against the Startup type and select Disabled.
- Change the Service status to Stop.
- Click on Apply and OK.

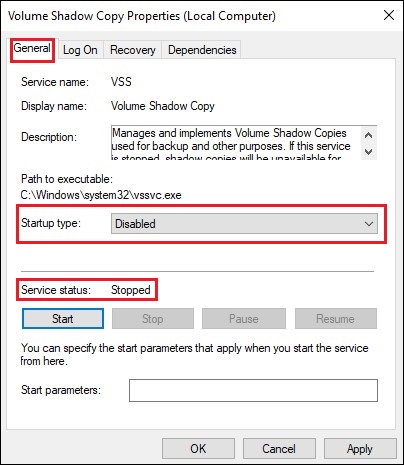
- Close everything and Restart your computer.
Method 3: Perform SFC Scan
If there are damaged, missing, or corrupt system files, it can make your Windows computer show Volsnap.sys failed blue screen error. To eliminate any chances of system files generating this error screen, you can deploy SFC or System File Checker. This will fix any broken or damaged system files. To run the SFC scan on your PC –
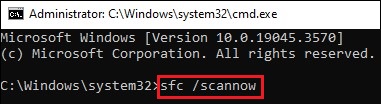
- While in Safe mode, launch the Command prompt as administrator.
- Type SFC/scannow and press Enter.

- Let the scan complete.
- Restart your PC once the scan is over.
Method 4: Run CHKDSK
A problem with the hard drive might be the root cause behind the Volsnap.sys blue screen error on your screen upon system boot. You can try and eliminate this error by fixing drive errors by using the CHKDSK command. You can also fix drive issues using the Error Checking option via File Explorer. Here are the steps to use CHKDSK –
- Launch CMD as administrator.
- Type CHKDSK Y: /f /r and press Enter. Replace Y with the letter of your drive.

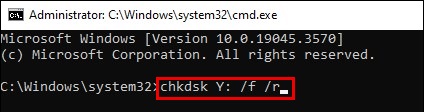
- Let the process finish.
- Once the process is finished, close everything and restart the computer.
Note – You can also refer to this guide to fix Hard Drives using CHKDSK.
Method 5: Run Memory Diagnostics
Faulty, improperly seated, or malfunctioning RAM modules can cause your computer to display the Volsnap.sys BSoD error upon startup. You can fix this issue by diagnosing the memory modules using a built-in memory diagnostic utility. Here are the steps for doing this –
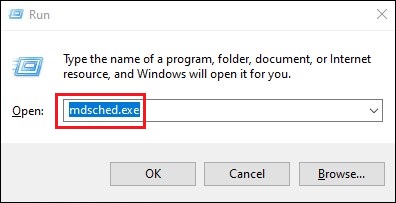
- Press WINDOWS + R and type mdsched. Press Enter.

- Click on the Restart now option.

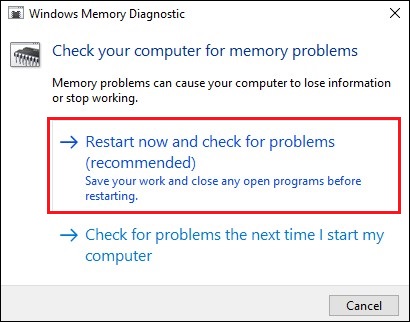
- Wait for the checking process to end.
Once the memory diagnostics is complete, close everything and restart your computer. The Volsnap.exe should be fixed after this.
Recover Data from an Unbootable Computer
Even after employing the above methods, if you encounter a Volsnap.sys blue screen error unexpectedly crashing your computer, it could be a severe issue. In such a scenario, you can perform a clean installation of Windows on your PC.
However, before doing that, you will need to recover important files and data from an unbootable computer. For this, you can take the help of a professional data recovery software like Stellar Data Recovery Professional. This software allows you to create a bootable media drive for recovering files from a crashed and unbootable system.
Once you have recovered all your data and files safely, you can perform a clean installation of Windows 10 or Windows 11.
Put an End to All Your Woes
We understand how irksome blue screen errors can be. They stall the work while making our precious data inaccessible. The Volsnap.exe failed BSoD error is a blue screen error that unexpectedly crashes the computer. However, using the abovementioned methods, you can easily resolve this error and get your PC back on track.
Which method worked for you? Let us know in the comments.
FAQs
Q. What is Volsnap error 25?
A. Small paging file size can lead to your system showing the Volsnap error 25. You can fix this by increasing the paging file size.
Q. How do I fix VSS Writer errors?
A. You can fix VSS writer errors by restarting the corresponding Windows service using the vssadmin list command.
Q. How do I check for VSS errors?
A. You can check for VSS errors by –
- Reviewing the logs at C:\PCBP\Catalog
- Checking Event Viewer logs
- Determining VSS writer failures
- Review the jobs in task scheduler