-712.jpg&url=https://www.stellarinfo.com/article/windows-11-safe-mode.php)


Safe Mode is a secure functioning feature of all Windows OS. In this mode, the OS restricts certain unnecessary functions and operations to channel all its capacity into running your PC normally. However, a user can define restrictions for the Safe Mode as per need.
This article will discuss five DIY methods to boot into Windows 11 Safe Mode without any expert help.
What’s the need to boot into Windows 11 Safe Mode?
The most important question to be asked here is, ‘What’s the use of booting your Windows 11 PC in Safe Mode?’ Safe Mode helps you identify the root cause behind your system malfunction, issues related to OS and its components, or issues with an app installed on your PC.
The old method of using F8 or Shift + F8 fails to boot Windows 11 PC into Safe Mode. This is because a Windows 11 PC's firmware communicates with the OS using UEFI instead of the traditional BIOS.
In Safe Mode, Windows 11 starts with the most rudimentary and essential features and supporting drivers. This helps the OS narrow down the actual cause behind the problem faced by the user and easily troubleshoot it.
It is noteworthy that there are three different categories of Safe Mode depending on the user’s restrictions. These are:
- Standard Safe Mode without network access
- Safe Mode with network access
- Safe Mode navigated using the Command Prompt
Out of the three, the last two are not very suitable for a Windows rookie as they require certain skill sets and capability to work with command lines. The first category is the best for users with basic technical know-how.
However, we will eventually learn how to start Windows 11 in Safe Mode using the best and easiest DIY methods.
How to start Windows 11 into Safe Mode?
To start Windows 11 in Safe Mode, you first need to access the Recovery Mode. Therefore, we will first access Recovery Mode on Windows 11 and then move on to enter Safe Mode through it.
1. Use the Start menu to boot Windows into Safe Mode
It is the easiest way to enter Safe Mode on a Windows 11 PC. You can use the Start menu on your desktop to reboot your PC into Safe Mode by following the steps below.
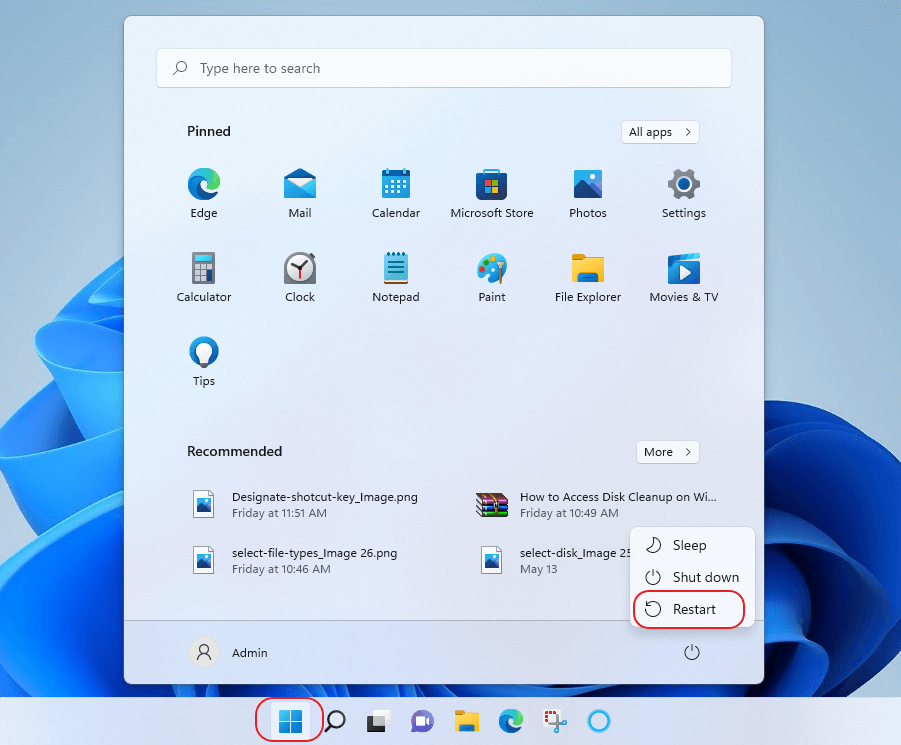
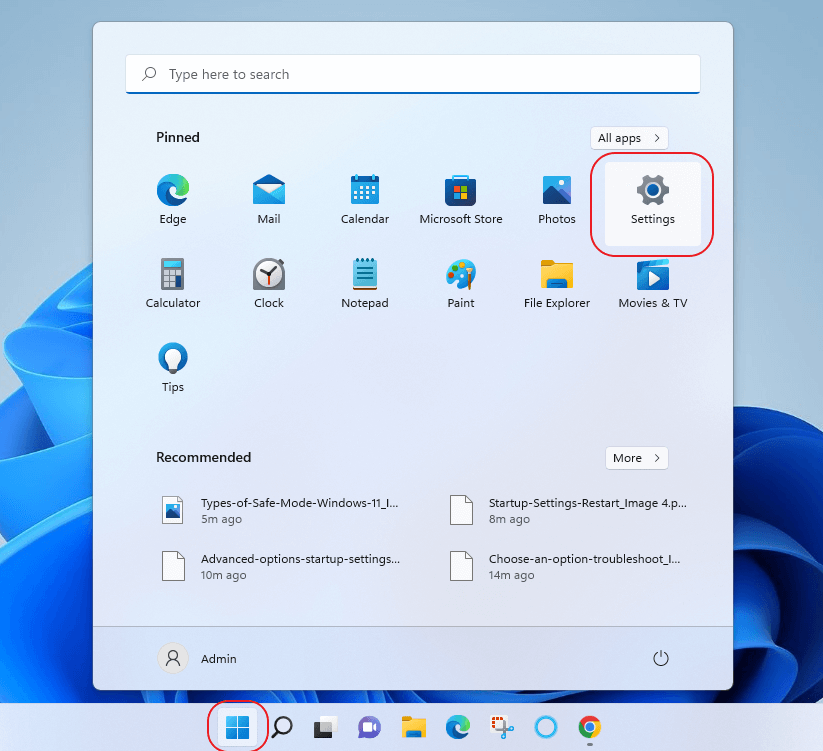
Step 1: Click the Start menu button on the taskbar.
Step 2: Click the Power button. Now press and hold the Shift key.
Step 3: Click Restart while keeping the Shift key pressed.
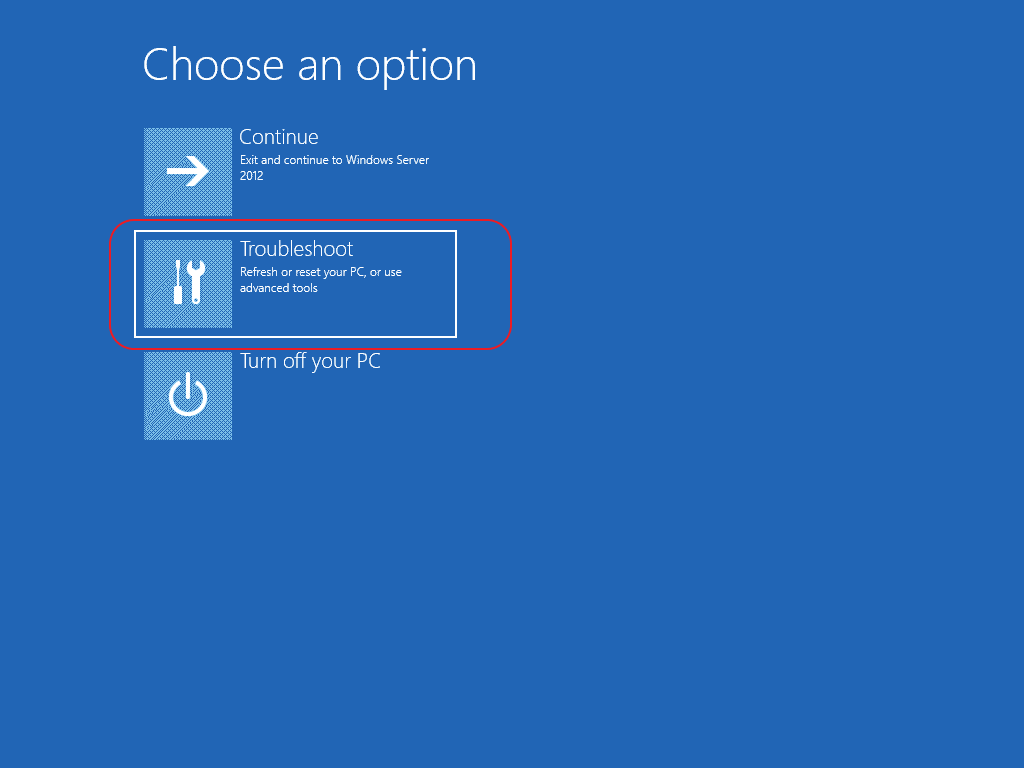
Step 4: Once the PC reboots, click Troubleshoot in the Choose an option screen.
Step 5: Click Advanced Options > Startup Settings.
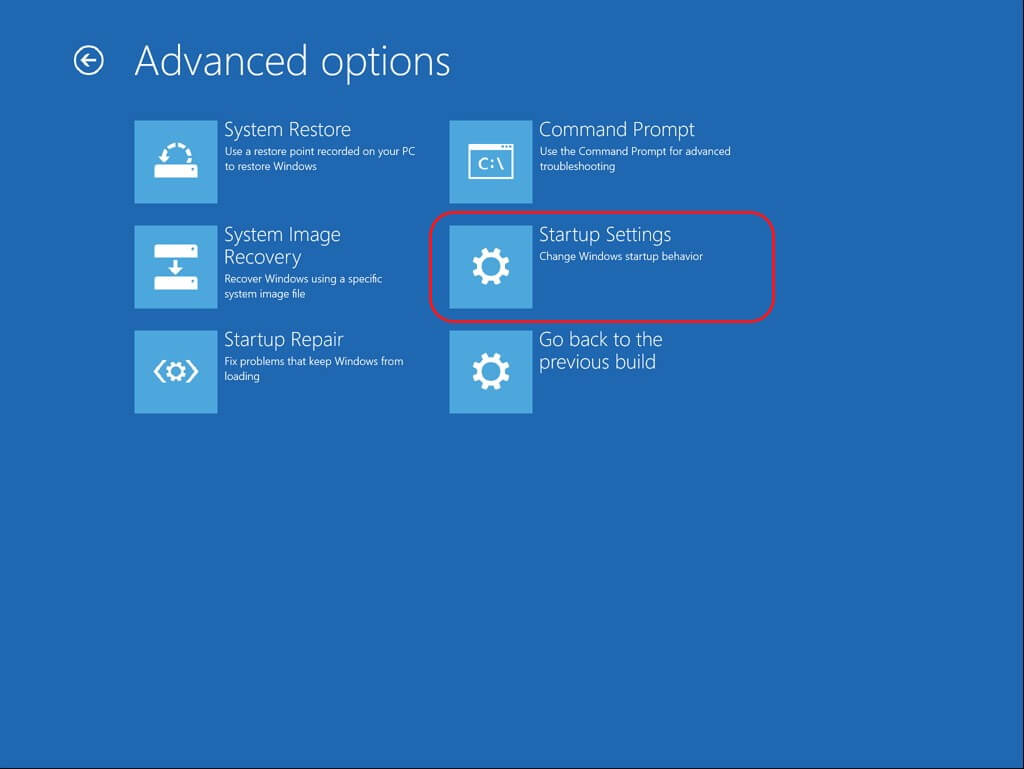
Note: If you can’t find the Startup Settings option in the Advanced Options window, click See more recovery options at the bottom of the Advanced Options window.
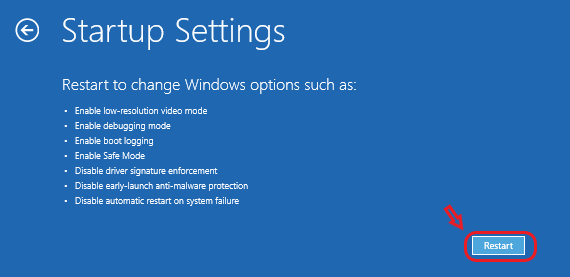
Step 6: Click Restart.
Step 7: Now,choose the type of Safe Mode you want to work with after the computer has restarted.

2. Enter Safe Mode using Advanced Startup on Windows 11
Advanced Startup is a feature to troubleshoot problems or configure a setting that can’t be done with running OS. You can also use this feature to boot into Windows 11 Safe Mode.
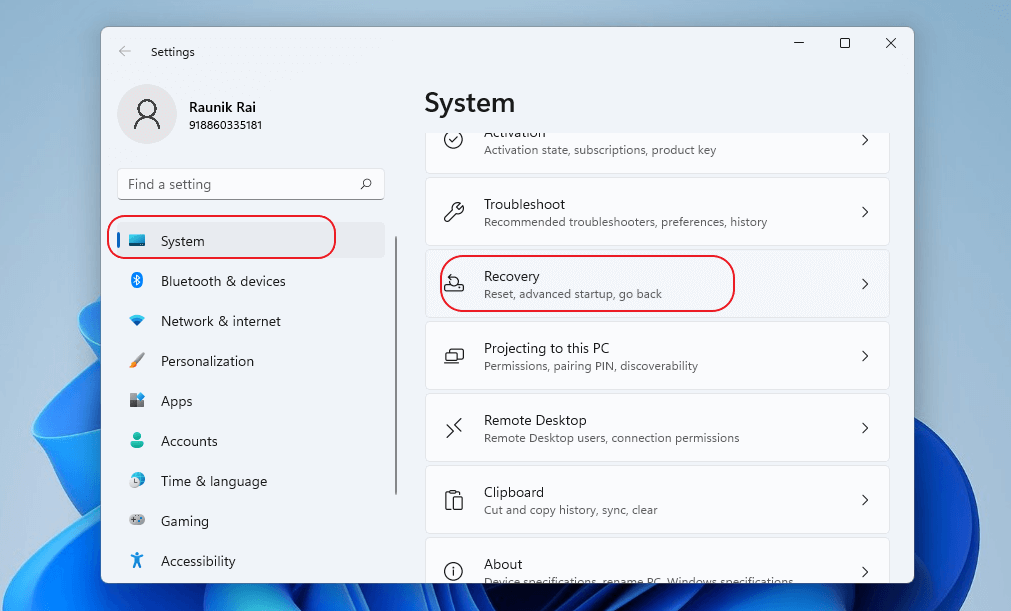
Step 1: Press Windows + I. Alternatively, click Start menu > Settings.
Step 2: Click System in the left pane. Locate Recovery in the right pane and click to open it.
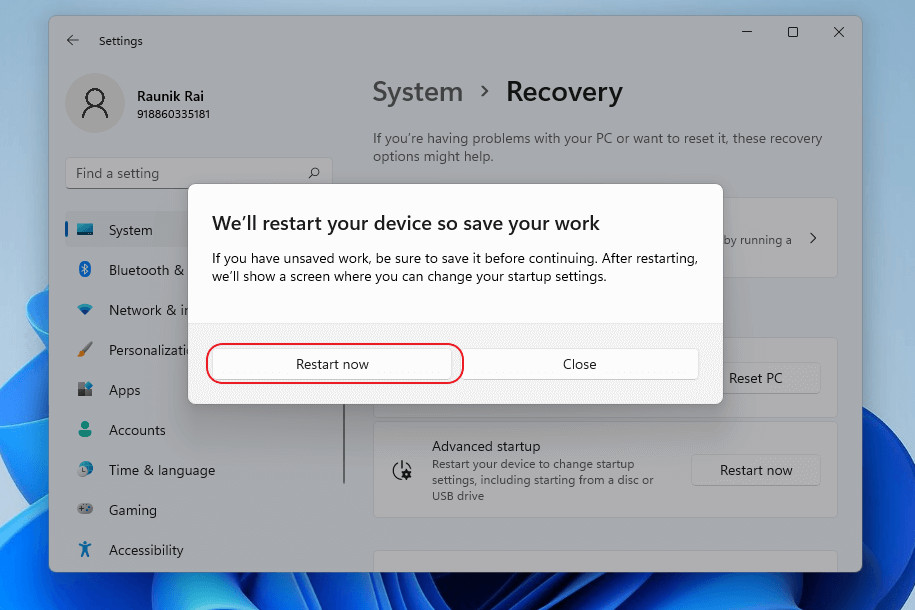
Step 3: In the new window, click Advanced Startup.
Step 4: You’ll see a warning We will restart your device so save your work. Click Restart Now.
Step 5: When your PC reboots, select Troubleshoot > Advanced Options > Startup Settings.
Step 6: Click the Restart button and wait for the restart process to complete.
Step 7: From the list, select how you want to use Safe Mode on your PC.
3. Interrupt normal booting of Windows 11 to enter Safe Mode
Windows 11 counters any potential harm to the OS or critical components using a failsafe mechanism. It automatically switches to repair mode after failed boot attempts three times.
Therefore, to boot your Windows 11 Safe Mode, you need to interrupt the normal booting of your PC three consecutive times. Here is how to do it.
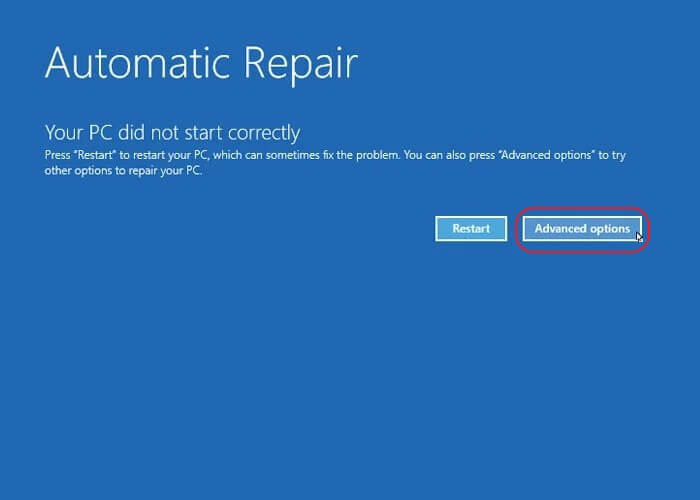
Step 1: When your PC starts to boot up, press the Power button for about 4-5 seconds to switch it off.
Step 2: Repeat the process two more times, and your OS will switch to its automatic repair mode.
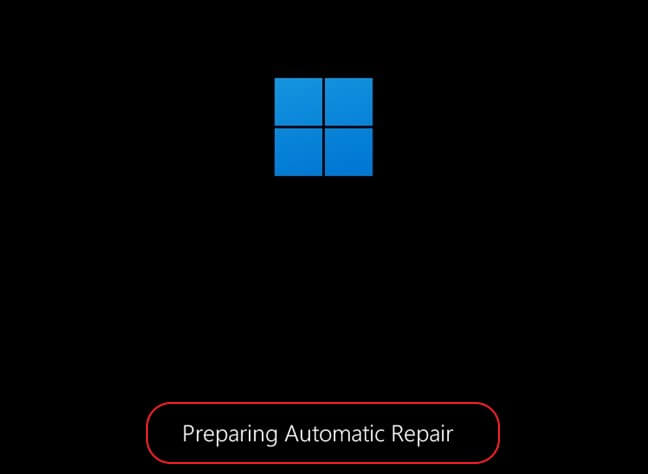
Step 3: Wait until your OS diagnoses your PC.

Step 4: You’ll see the Automatic Repair screen. Click the Advanced Options button.
Step 5: Now, click Troubleshoot > Advanced Options > Startup Settings.
Step 6: Click Restart in the Startup Settings window.
Step 7: Once the PC restarts,you’ll see options for Safe Mode in the list, viz. Enable Safe Mode, Enable Safe Mode with Networking, and Enable Safe Mode with Command Prompt.
Choose the suitable option to proceed with the desired Safe Mode.
4. Use Command Prompt to boot into Safe Mode
Even if all the options are exhausted, there’s always an option with Command Prompt on a Windows PC. You can also boot your Windows 11 PC into Safe Mode with CMD using the steps below.
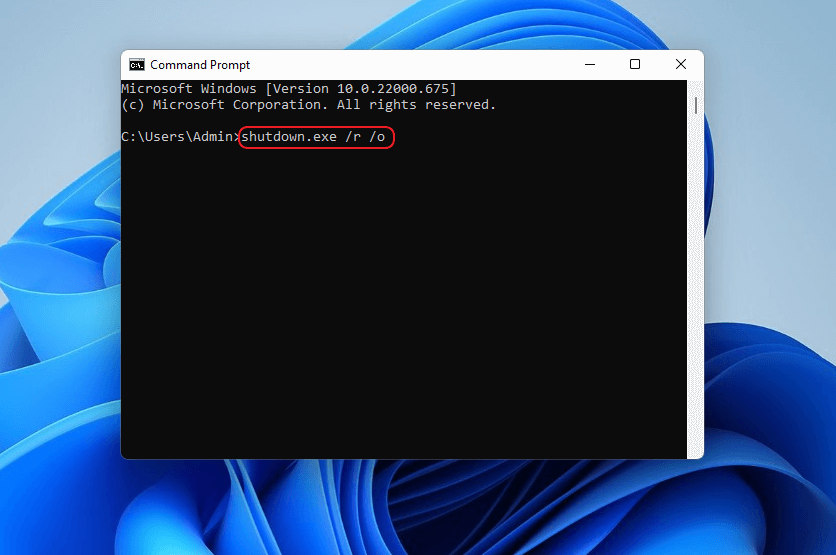
Step 1: Type cmd in the search bar and open Command Prompt.
Step 2: Insert the command shutdown.exe /r /o in the command line and press Enter.
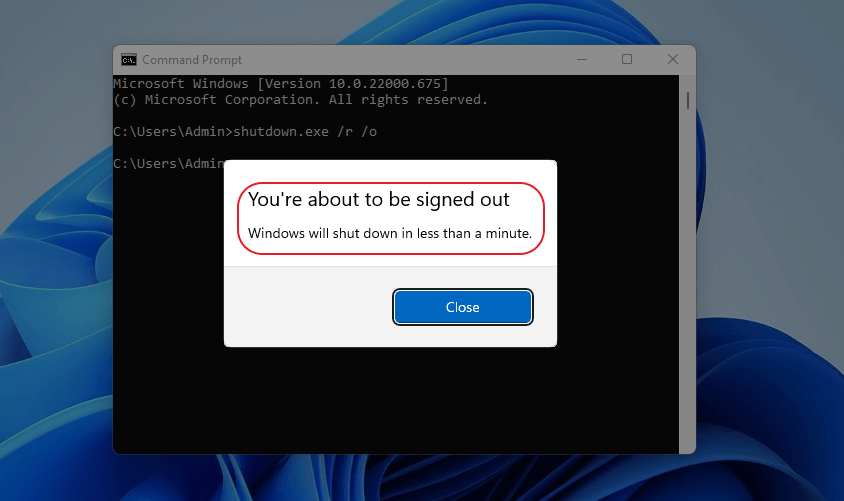
Step 3: A pop-up appears with the message ‘You’re about to be signed out.’ Close it and let the Windows reboot into Recovery Mode.
Step 4: You’ll see the same Choose an option screen.
Step 5: Proceed further in the same manner described in Step 5 to Step 7 of the method above.
Your Windows 11 system will boot into Safe Mode.
5. Boot Windows 11 to Safe Mode using a Recovery drive
You can use a previously created USB recovery drive to boot your PC into Safe Mode or create a bootable USB recovery drive on a separate Windows 11 PC. Connect the USB drive to your system and follow the steps below to boot it into Safe Mode.
Step 1: Let your PC boot up from the bootable USB drive.
Step 2: Select an option in the Choose your keyboard layout window.

Step 3: Select Troubleshoot in the Choose an option window.
Now follow the steps described in the methods above, i.e., click Advanced Options > Startup Settings > Restart and select the type of Safe Mode.
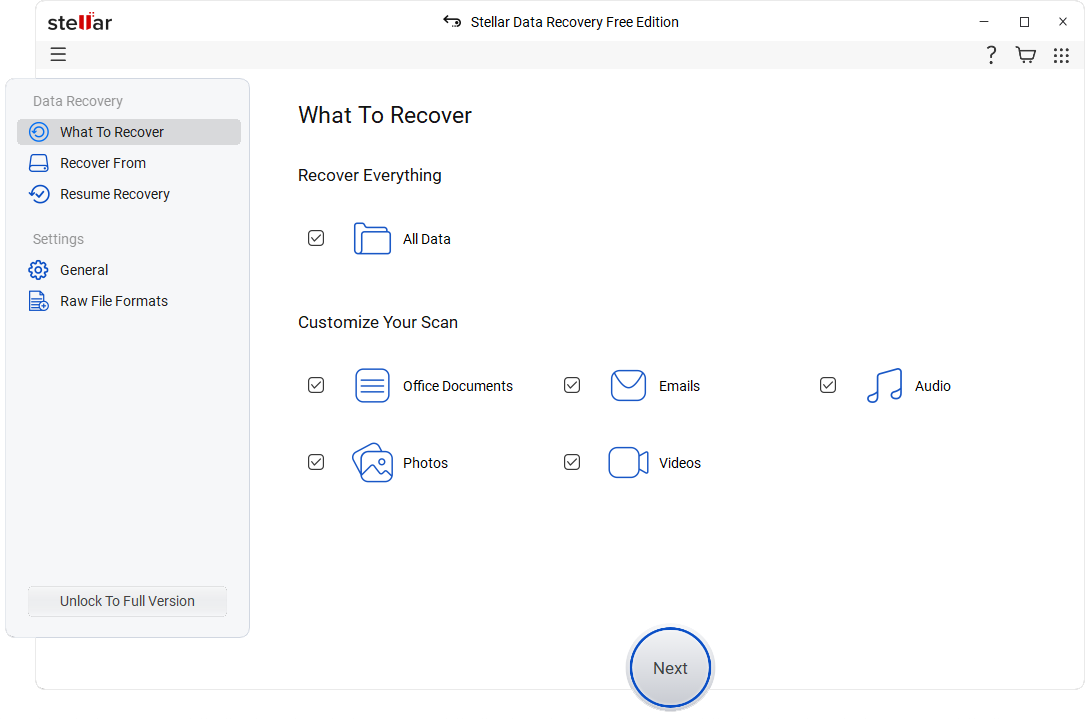
Note: If you have lost data due to your Windows 11 PC malfunction, you can get it back using the Stellar Data Recovery Free Edition for Windows. It recovers up to 1 GB of data free of cost.
How to exit Safe Mode?
You don’t need to put in any extra effort to boot your PC out of Safe Mode. Restart your Windows 11 PC, and it will boot up in a normal mode.
You can easily find the option to restart your system while working in Safe Mode. The restart option remains the same in the Safe Mode and normal mode. Click Start menu > Power and select Restart.
How to Start Windows in Safe Mode: The Conclusion
Windows 11 is an advanced OS and is capable of repairing minor glitches if need be. However, not every problem can be resolved by the OS on its own. To aid the OS in resolving serious issues, a user can enable the Safe Mode.
You can easily boot your PC into Safe Mode using the methods elaborated in this article. Moreover, the free data recovery software will help you get back any lost data on your Windows PC.
We hope you were successfully able to learn how to start Windows 11 in Safe Mode. Share your experience with us in the comments below.


Tech Enthusiast and Senior Writer at Stellar®

 17 min read
-1918.jpg)