Summary: Lack of storage space post-upgrade to Windows 11 is utterly frustrating. Moreover, it affects the productivity and performance of your PC. This blog mentions 10 simple ways to free up storage space on your Windows 11 PC.
Contents
- 10 Ways to Free up Storage Space on Windows 11 PC
- Method 1: Delete Temporary Files to free up space on Windows 11 PC
- Method 2: Use Storage Sense
- Method 3: Use Disk Cleanup to free up space on Windows 11 PC
- Method 4: Use OneDrive Files On-Demand Feature
- Method 5: Use Cleanup Recommendations
- Method 6: Disable Hibernation
- Method 7: Use Compact OS Command-line Tool
- Method 8: Move Files to External Storage Drive
- Method 9: Use File Eraser Tool to Permanently Erase Useless Data
- Method 10: Use NTFS Compression
The disk space on your Windows 11 PC gets full primarily due to piling up of temporary files, caches, cookies, redundant files, etc. If you regularly download large files from internet or attachments from emails, then such files may accumulate over time and lead to space crunch. In addition, after upgrading to the Windows 11 version if you?ve kept the backup files of old OS, then this is also one of the contributing factors for lack of storage on your PC. If the storage capacity of your PC reaches its threshold, you may face performance issues and other problems.
If there is a lack of storage on your PC, follow the different methods mentioned in this post to free up the storage space on Windows 11 PC.
10 Ways to Free up Storage Space on Windows 11 PC
Here are some easy ways to clear unnecessary data and free up space on your Windows 11 system.
Method 1: Delete Temporary Files to free up space on Windows 11 PC
Windows 11 OS and other apps on your PC create temporary files for various momentary purposes. Once that purpose is served, these files lose their worth and should be deleted. You can delete these files manually by following these steps:
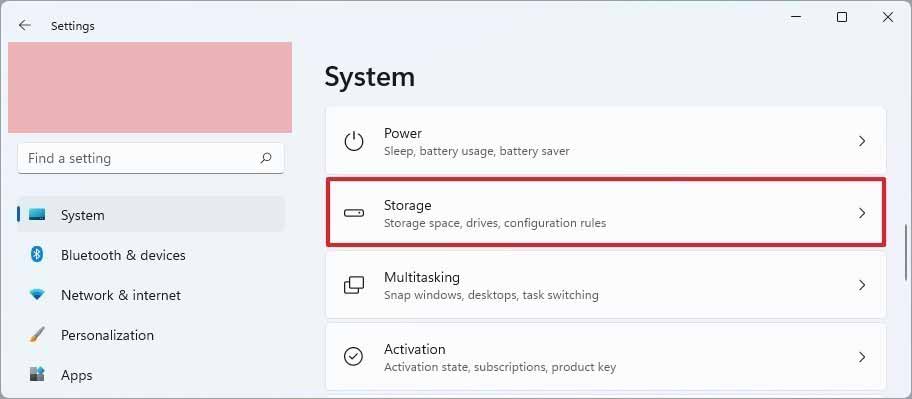
Step 1: Click Settings from the Start menu and select System > Storage.

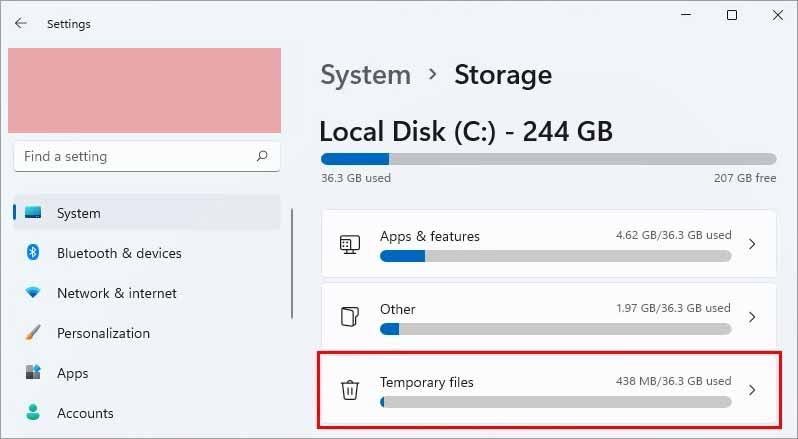
Step 2: Open Temporary Files from the right pane.

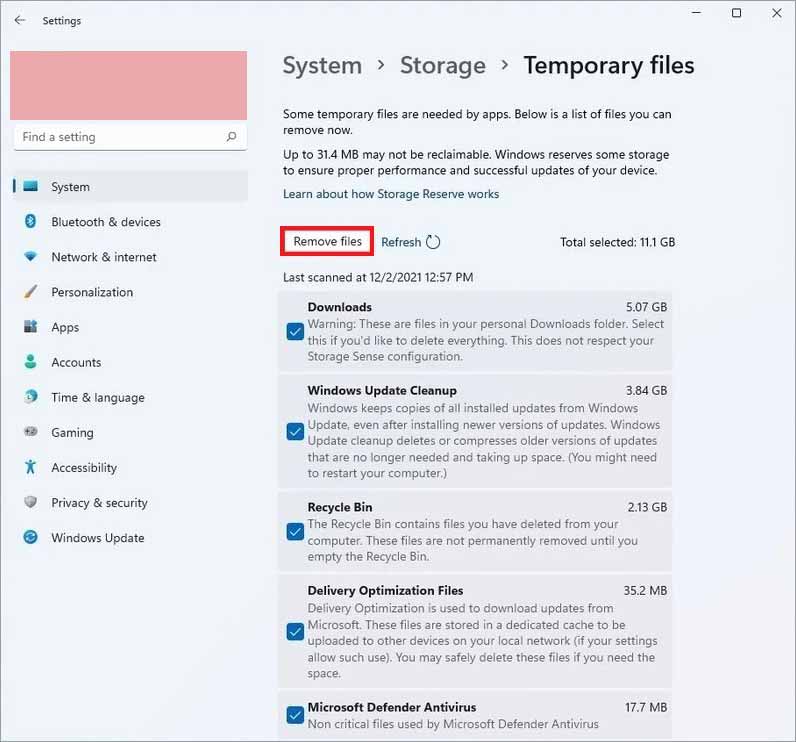
Step 3: Select the category of temp files by clicking the checkbox against each type, like Downloads, Windows Update Cleaner, Recycle Bin, etc.
Note: Before deleting the temp files, ensure that all your current data, like doc, media files, etc., are saved.
Step 4: Click the Remove files button to delete the selected files.

This will remove the selected files and free up disk space on your Windows 11 PC.
Method 2: Use Storage Sense
Storage Sense is a native feature of Windows that allows quick deletion of multiple file types, like junk files, installation files, temporary app data, etc. If you want to use Storage Sense, you need to first enable it on your Windows 11 PC. Here is how to do it.
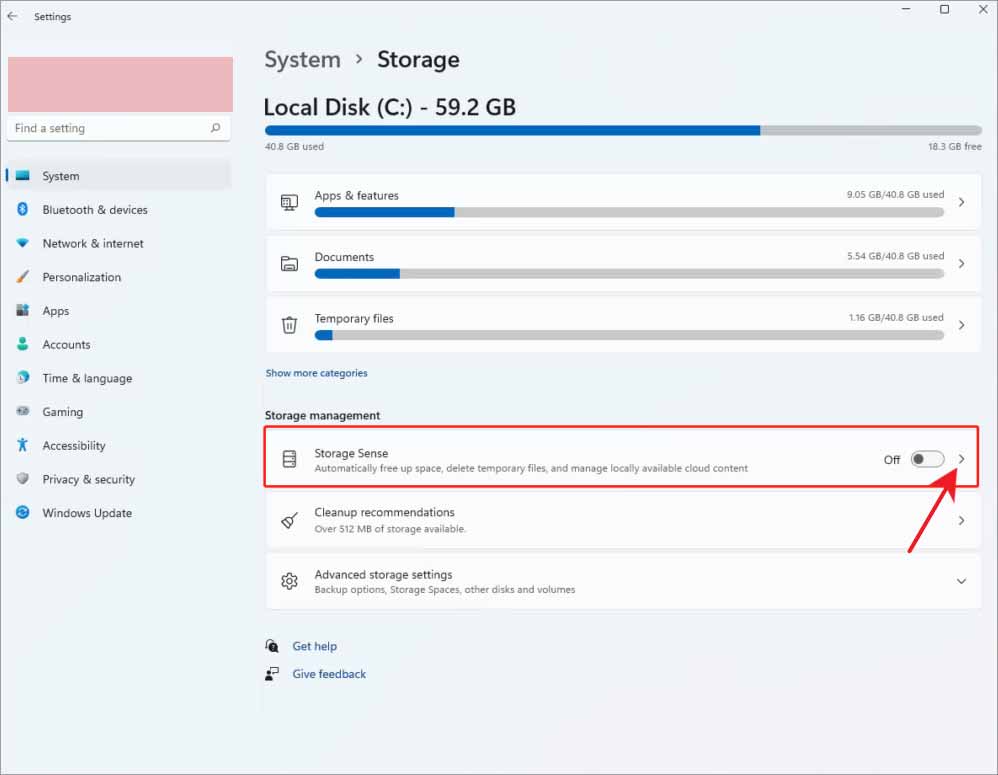
Step 1: Click Settings > System > Storage.
Step 2: Under the Storage Management in the right pane, turn on the toggle switch against Storage Sense.

Step 3: Click the ?>? sign at the extreme right of the Storage Sense option to open settings.
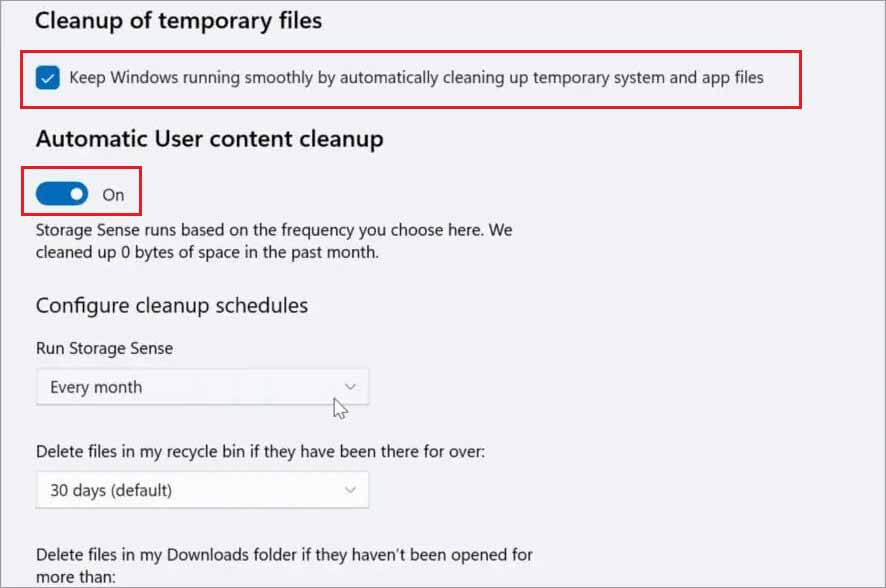
Step 4: Tick the Keep Windows running smoothly by automatically cleaning up the temporary system and app files option. This allows Windows to delete junk files as and when needed.
Step 5: Switch on the toggle under the Automatic User content cleanup section.

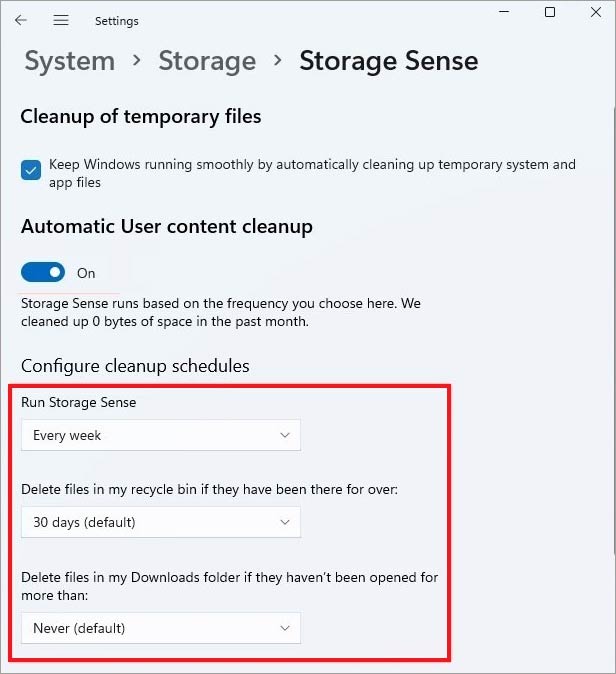
Step 6: Click the Run Storage Sense under the Configure cleanup schedule and select the option from the dropdown menu as per your need.
Step 7: Specify the period of deletion of files under the Recycle Bin and Downloads section.

Step 8: Specify the period after which the content becomes online-only under the OneDrive ? Personal section.
Note: If you wish to free up disk space on Windows 11 PC immediately, click the Run Storage Sense now option at the bottom of the Storage Sense window.
Method 3: Use Disk Cleanup to free up space on Windows 11 PC
Disk Cleanup is a native tool of Windows, available since Windows 98. Here is how to free up space on Windows 11 PC using Disk Cleanup.
Step 1: Type Disk Cleanup in the search box on the taskbar.
Step 2: In the Disk Cleanup window, tick the checkboxes in front of different sections, like Downloaded Program Files, Temporary Internet files, Thumbnails, etc. Remember to check only those boxes that you want to clean up.

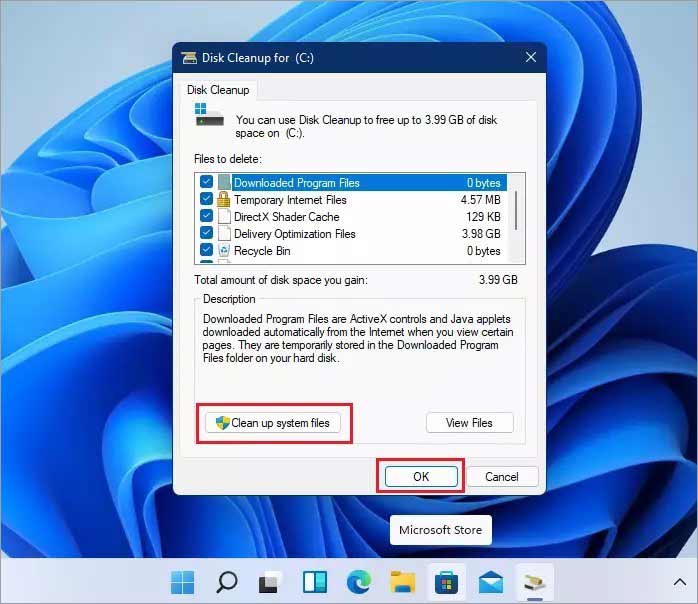
Step 3: You can free up more space by clicking the Clean up system files option at the bottom left and selecting the system files you want to delete.
Step 4: After selecting the files, click OK and then click Delete Files in the confirmation dialog box.
Caution: If you have upgraded to Windows 11 recently (within the last 10-15 days), the old Windows 10 system files will be listed as the system files in Disk Cleanup. If you choose to delete them, you won?t be able to revert to Windows 10 in the future. You have to clean install it.
Note: If you don?t want to delete the system files, you can compress the OS drive using Disk Cleanup. Under the Files to delete section, tick the checkbox against the Compress your OS drive option and click OK.
Method 4: Use OneDrive Files On-Demand Feature
OneDrive Files On-Demand allows you to access the files stored on OneDrive without downloading them and using storage space on your Windows PC. This feature helps you to save space by storing a smaller placeholder file on your PC’s hard drive instead of the complete high-volume files. With an internet connection on your PC, you can access these files from file explorer like any other file stored on your PC. Here is how to use the OneDrive Files On-Demand feature.
Step 1: Launch OneDrive from the bottom-right of the taskbar and click Help & Settings > Settings.

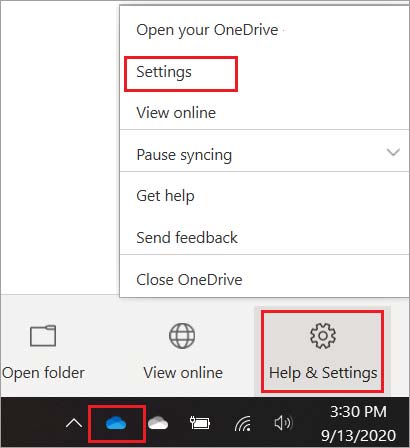
Step 2: In the Microsoft OneDrive window, select the Settings tab and check the Save space and download files as you use them checkbox.


Step 3: Click OK and open File Explorer.
Step 4: Click the OneDrive folder in the left pane and select the required files and folders.
Step 5: Right-click and choose the Free up space option.

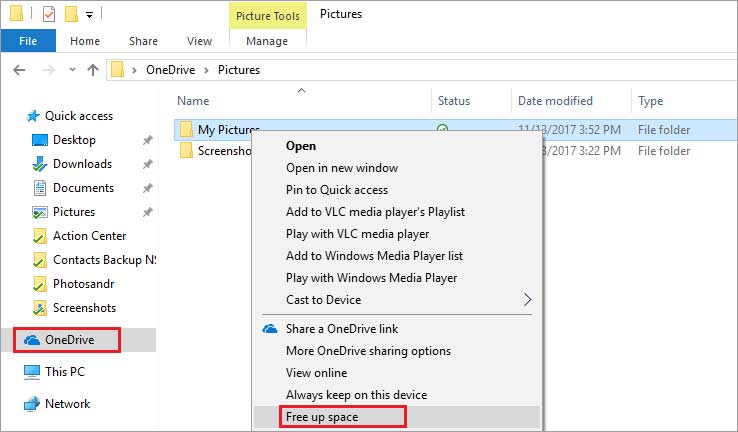
Once you are done, you can access the chosen files through File Explorer supported by an active internet connection. Moreover, you can only store up to 5 GB on the free OneDrive version. You can upgrade to Microsoft 365 Family to increase the storage capacity to 1 TB.
Method 5: Use Cleanup Recommendations
Cleanup recommendations is a Windows 11 exclusive feature that recommends removable content to free up disk space on your Windows PC. It identifies large redundant files, inactive apps, files synced to OneDrive, etc., and recommends to remove them based on usage and activity. Use these steps to free up space on your PC.
Step 1: Open Settings > System > Storage.
Step 2: Select the Cleanup Recommendations under the Storage Management section.

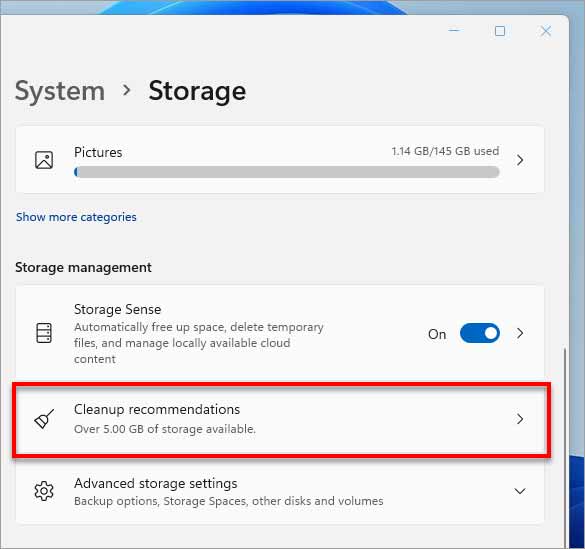
Step 3: Click Temporary Files, select the files to delete to free up space on the PC, and hit the Clean up button at the bottom.
Step 4: Click Large or unused files, select the files, and click the Clean up button.
Step 5: Click Files synced to the cloud, select the files, and click Clean up.
Step 6: Lastly, click the Unused apps, select from the recommended apps, and hit Clean up.
The selected files, folders, apps, etc., will be removed.
Method 6: Disable Hibernation
When you leave your PC idle for a certain period of time, Windows puts your PC into Hibernation to save power. However, to keep your unsaved data from getting distorted or deleted, Windows saves a temporary copy of all the unsaved work. You can disable the Hibernation feature to save space. Follow the steps below:
Step 1: Type cmd in the search box and select Run as Administrator.
Step 2: Insert the command powercfg /hibernate off in the Command Prompt and hit Enter.

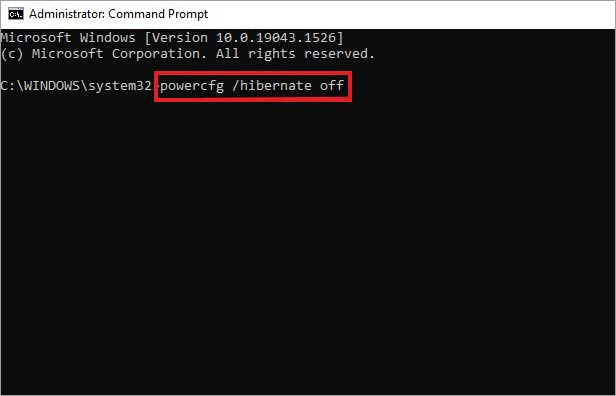
This will turn off Hibernation and Windows will remove the hiberfil.sys file, thus freeing up some space. You can always enable Hibernation by replacing the command in Step 2 with the powercfg /hibernate on command.
Method 7: Use Compact OS Command-line Tool
You can use the Compact OS tool to minimize the installation footprint of Windows 11 and other apps. If you are in immediate need of some storage space, you can use Compact OS tool to reclaim space consumed by installation files and other apps. Follow these steps:
Step 1: Search Command Prompt and select Run as Administrator.
Step 2: Insert the command compact.exe /compactOS:always and hit Enter.

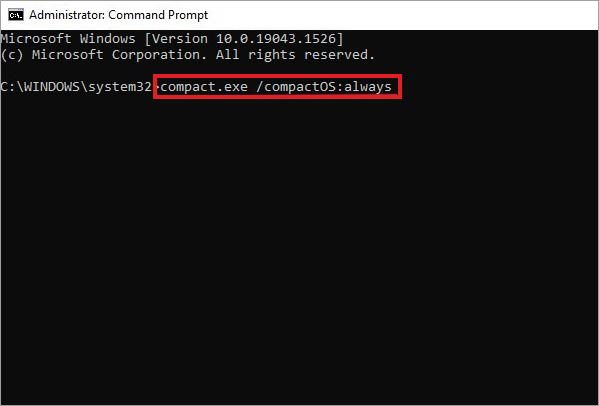
This process will help you reclaim at least 2 GB of disk space.
Caution: This is a bit risky process as it modifies the system files and may cause data loss. You must take a temporary backup of your data to deal with any such situation.
Method 8: Move Files to External Storage Drive
If you have a spare external storage drive, like an external HDD or SSD, you can transfer some data to it. This will allow you to free up storage space on the hard disk. To transfer the data, connect the external drive to your PC and follow the steps below.
Step 1: Open File Explorer and browse for files and folders taking up large space.

Step 2: Select the files and folders you want to move, right-click and select Cut. Alternatively, select the data and press Ctrl + X.
Step 3: Open the external drive and choose a destination to save the data.
Step 4: Right-click and choose Paste or press Ctrl + V.
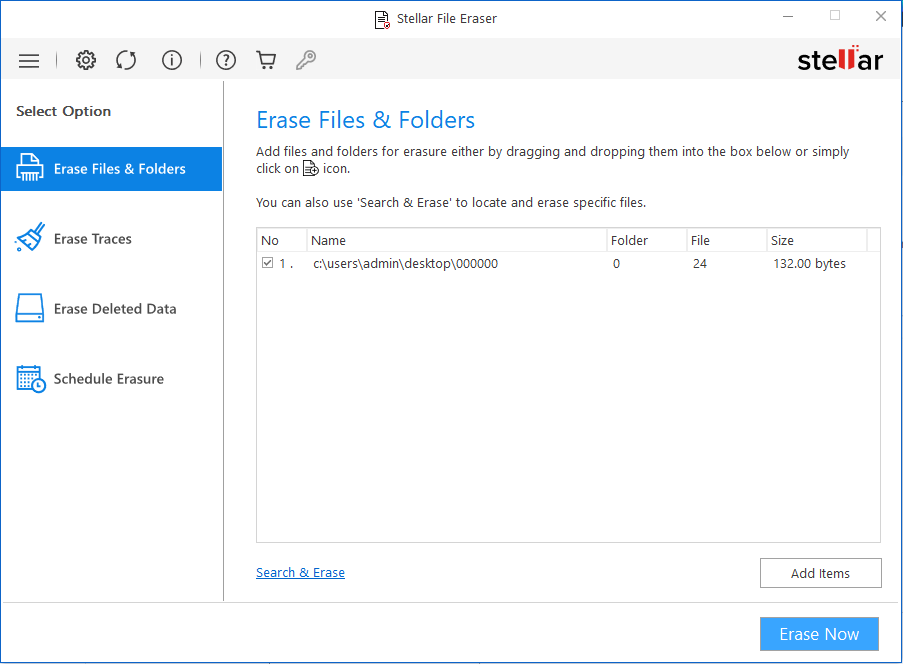
Method 9: Use File Eraser Tool to Permanently Erase Useless Data
To free up space on your Windows 11 PC and permanently erase redundant data, you can use a secure file eraser tool, such as Stellar File Eraser. It works as a personal cleaning assistant that helps you manage data on your Windows PC.
This DIY software permanently erases the files using some of the world?s most secure erasure algorithms, like US DoD – 5220.22-M (3 passes) without affecting the other valuable data. The data is overwritten multiple times with useless binary values, thus making the data impossible to recover. You can permanently delete files using Stellar File Eraser without any need for expertise or professional assistance. All you need to do is scan your PC with this software, select the files and folders, and click erase.

Method 10: Use NTFS Compression
Windows 11 comes with yet another distinguished feature called New Technology File System (NTFS) Compression. It compresses data while giving normal access. It can even compress an entire drive. Although it might affect the PC’s performance, you should use this method only if you don?t have any other option left. Here is how to enable NTFS compression for a folder on your Windows system.
Step 1: Open File Explorer and locate the folder you want to compress. Right-click on the folder and select Properties.
Step 2: Click the Advanced tab.
Step 3: In the Advanced Attributes window, check the Compress contents to save the disk space option. Click OK > Apply.

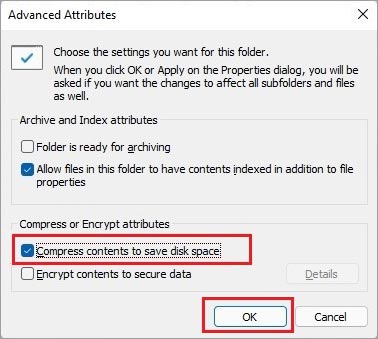
Step 4: Select the Apply changes to this folder, subfolders, and files option and click OK.
Note: The time taken for compression depends upon the size and number of files and sub-folders contained in the selected folder.
You can use the same process to reduce the size of individual files. Further, if you wish to decompress the folder or file, follow the above process and uncheck the Compress contents to save disk space option.
Conclusion
Lack of storage space on your Windows PC may affect its performance and lead to various issues. To avoid any major setback, it is recommended to keep a check on disk space and regularly clean up unnecessary files and other data. These include clearing the temporary files, removing the cache and cookies, uninstalling useless apps, erasing residual files, etc.
You can follow the methods mentioned in this post to free up space on Windows 11 PC. Which method worked for you? Share in the comments section below.

