Summary: In photography, noise is considered a digital flaw that hampers the quality and monetary worth of a picturesque shot. If you want to learn how to reduce noise in a photo, this blog can give rest to your quest. Apart from the DIY solutions, you can try Stellar Repair for Photo to fix digital noise in your photos.


Contents
Noise is an unfriendly element that reduces the quality of any form of content. Whether it is sound, sight, or taste, experiencing noise can cause utter disturbance to our senses. Thankfully, the digital noise observed in photography does not have such a powerful impact. However, it can surely affect the subject to the same degree and completely ruin a wonderful shot that could have won thousands of dollars and millions of hearts. That’s the reason Photographers tend to remove noise from images.
So, How to Reduce Noise in Photos?
Before going into this quest for noise reduction techniques, be mindful of what is noise in photography, its different kinds, causes, and best fixes.
Defining Photo Noise
Photo Noise can be defined as the presence of unwanted traces and grains affecting the color or brightness of a digital shot. These are some random imperfections affecting the picture quality.
Types of Noise that affect a photo
Primarily, two kinds of noise affect a perfect photo?digital and shot noise. Shot noise occurs when a random element destroys your idea of capturing a perfect shot. For example, garbage dumped in a scenic beauty or people photo bombing a perfect shot. On the other hand, digital noise happens due to your camera sensors, low-light situations, and a high ISO. It?s a flaw that you can overcome using new-age tools and techniques.
So, what are the primary causes of digital noise?
Let?s unravel the mystery behind digital noise while understanding what causes it in a photo and how to fix it:
Unreasonably High ISO
Apparently, at a high ISO, the camera sensors turn more responsive to light, and more noise is added to the final images. Therefore, stay mindful and understand that ISO settings have no creative impact on your photos, unlike aperture and shutter speed. Despite this fact, increasing the shutter speed or widening the aperture won?t always work. As an alternative, try keeping low ISO values as a defense mechanism to counter noises. In some situations where a quick shutter speed is vital, widening the aperture or using a faster lens may prove idyllic. You can also use artificial light if widening the aperture leads to too narrow a depth of field.
Small Sensors
Persistent noise in photographs indicates your camera has a small sensor that cannot capture a shot in relatively low light conditions. It may happen at some point-and-shoot cameras, low-end DSLRs, or smartphones.
What are the Best Cures for Digital Noise?
If you aim to capture a perfect shot, you must equip yourself with the right set of devices and software. Here are some must-have image noise reduction options to get rid of noise in a photo:
Built-in Noise Reduction Feature in Digital Cameras
Nowadays, most DSLR or digital cameras have built-in noise reduction mechanisms. You can keep them on, off, or at a high or low setting. If you are certain of taking that perfect shot without noise, keep the noise reduction off and take the shot in RAW mode.
Try Noise-Reduction Plugins to remove noise from Image
If you are using an old or a digital camera without a built-in option to enable or disable noise or shooting in RAW, then you must try a noise reduction plugin like Nik Dfine. The tool is based on advanced algorithms that can denoise any picture in a second. Some other plugins like Noise Reducer Pro, Noise Ninja, Neat Image, NoiseWare, Photo Ninja, and Topaz DeNoise, are capable of repairing severely noisy images. Moreover, they give you the liberty to denoise a selective portion of the image without affecting the subject.
Use Photo Editing Software to remove noise from the Image
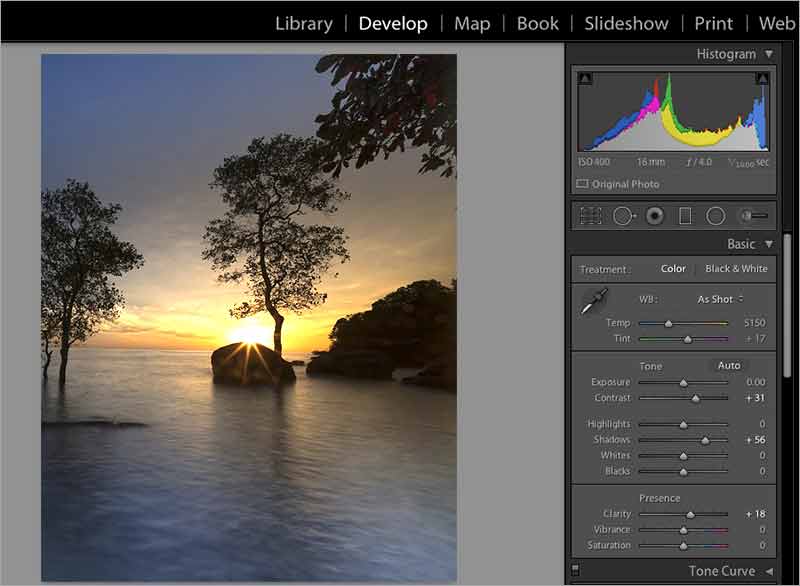
Adobe Lightroom is one of the most sought-after photo editing tools that help reduce photo noise. The tool is proficient in fixing noisy, grainy, or sandy images. If you upload a RAW file on Lightroom, it’s default setting will add a tiny hint of color noise reduction to the RAW file and inevitably adjust the Color Noise slider to 25.
Additionally, Lightroom also offers Detail and Smoothness sliders to trim down the Color Noise. Neither of them has a noticeable impact on the image quality. Further, use other upbeat techniques of the Blacks slider in the Basic panel and the new Dehaze slider in the Effects panel for noise reduction with Lightroom. Both methods do not exactly complement varied photo types but leave a noticeable impact on eliminating the luminance noise while preserving concrete details of photos captured in night.

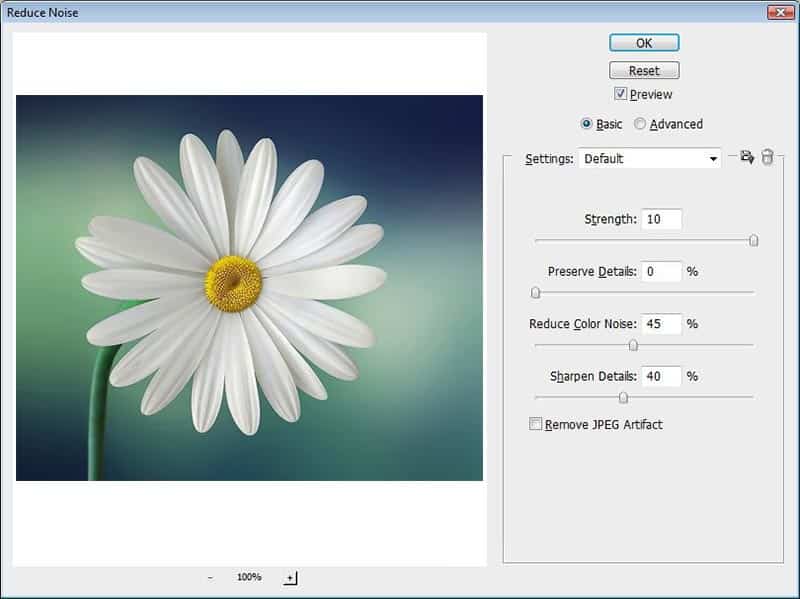
Similarly, Adobe Photoshop can address noise in a photograph but may not completely denoise your digital image. Speaking of Noise Reduction Photoshop has a built-in filter feature that can trim down the noise from your perfect shot.

Read more about the 10 most common photo editing mistakes.
Pay Attention to AI Photo Noise Fixes
By implementing some cutting-edge advanced technologies based on artificial intelligence (AI), you can fix post-processing issues like noise reduction and sharpen digital photos. Be it Topaz DeNoise AI, DxO PureRAW 2, ON1 NoNoise AI, and Luminar NEO; each has its own unique feature that can eliminate the noise and other disturbing elements from a picture. All you need to do is initiate some experiments and make minor adjustments to your photo editing software.


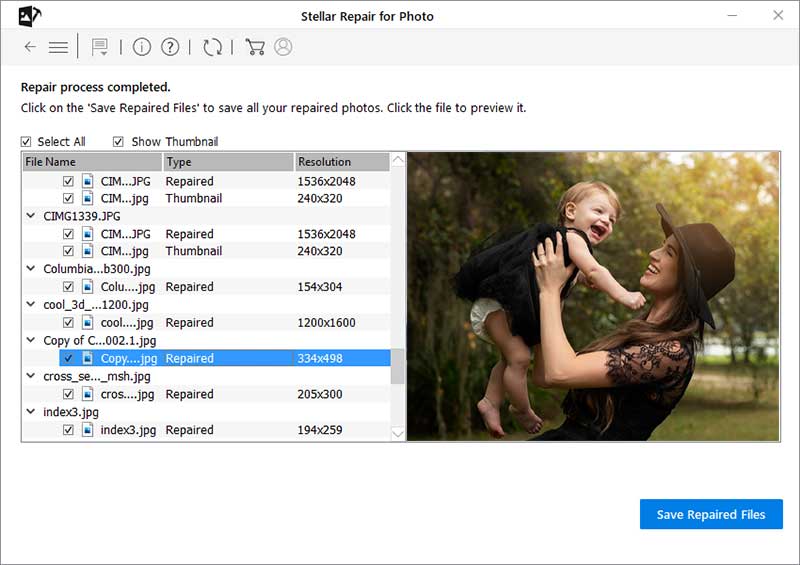
Remove noise from photo using Photo Repair Software
It?s a fantastic idea to fix unwanted noise in multiple photographs simultaneously using a third-party photo repair software such as Stellar Repair for Photo. Based on stacking technology, the software can fine-tune a noisy photo without affecting its core elements. You can easily restore unreadable files with a corrupt header, data, and invalid file structure. Without further ado, download the free version of the software that gives you a guaranteed cure for a noisy, distorted, split, blurred, or pixelated image.


If satisfied with the result, buy the other versions of the software online to save the corrected photos.

In a Nutshell
When everything else fails, post-processing options can save the day for your creative shots. Commonly known as Denoise, noise reduction is a significant post-processing technique in photography. The photo editing tools pacify disturbing noises in a picture by evaluating the inconsistencies between adjacent pixels using the intensity of the pixel colors as a reference. On the other hand, photo filter plugins make the noises subtle and even. Similarly, AI noise reduction tools with AI algorithms help detect noise in photos. However, most AI tools focus on random noises which might affect picture quality. To maintain the core elements of a photograph intact, try Stellar Repair for Photo now and tune into other photography tips like, how to repair or fix grainy photos?
FAQs:
Why are my photos so noisy?
One of the primary reasons why a photograph you have taken turns out to be noisy is capturing it in dim or little light. Noise creeps in the shadow, and if you increase the exposure to take the desired shot, you may make the digital noise more visible in the photograph.
Can you remove noise from image?
Most certainly, you can! Using photo filters, you can remove noise from images while keeping other details intact.
What impacts noise in photography?
Long exposures produce some of the most dramatic digital noises in an image. If the exposure is longer than required, the camera sensor may heat up and cause unwanted noise.
How can I reduce noise from images for free?
You can try free plugins like Vance AI, Phixr, and IMGonline.com.ua.
How do you remove noise from a photo in Lightroom?
Select the noisy picture and click on the edit icon. After that, open the noise reduction Luminance slider within the Detail panel to fix the noise that occurred while capturing the shot at a high ISO.

