Summary: In this blog, we’ll share a variety of methods on how to clear your browsing history on Mac temporarily as well as permanently. Also, you can buy file erasure software to erase all traces of your Internet activity.
Contents
As a Mac user, you must be comfortable with your Safari web browser due to its ease-of-use, user-friendly interface, and advanced security features. But for a change, you might have tried your hands on Chrome as well as Firefox. All these popular web browsers store data about your visited websites, bookmarks, favorites, etc. on your Mac storage drive.
The browsing data, though useful for your reference and for augmenting your browsing experience, is not secure and can be misused by anybody who has access to your Mac. For instance, one could check your browsing history to know what all websites you visited in the past and access your sensitive data. Data misuse by a Mac user or any malicious program may result in a breach of privacy, identity theft, and financial loss.
The next sections describe different DIY methods to clear browsing history on macOS.
Clear Your Browsing History in Apple Safari on Mac
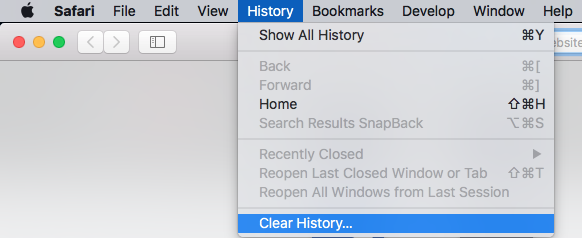
To clear Safari history on Mac, perform the following steps:
1. Launch Safari application on your Mac.
2. On the Menu Bar, go to History > Clear History.

3. On the pop-up window, select ?all history? or any other timeframe from the Clear spin box then click Clear History.

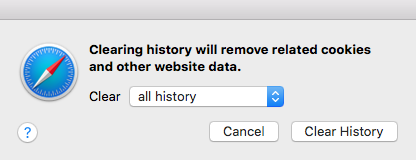
Your browsing history for the selected timeframe is removed from Safari.
Clear Your Browsing Data in Google Chrome on Mac
To clear Chrome browsing data on Mac, perform the following steps:
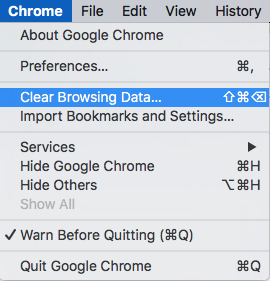
1. Launch Chrome application on your Mac.
2. On the Menu Bar, go to Chrome > Clear Browsing Data.

3. In the Clear browsing data window, click the Advanced tab, select a Time range from the drop-down list, select all browsing data that you wish to clear, and click Clear Data.

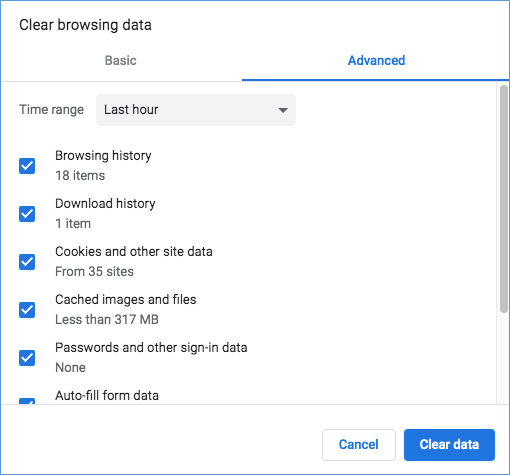
Your browsing data from the selected time range is removed from Chrome.
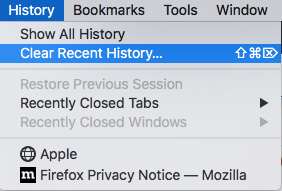
Clear Your History Data in Mozilla Firefox on Mac
To clear Firefox history on Mac, perform the following steps:
1. Launch Firefox application on your Mac.
2. From the Menu Bar, go to History > Clear Recent History.

3. On the Clear All History window, select Everything or any specific time range from the Time range to clear spin box. Select the required checkbox then click Clear Now.

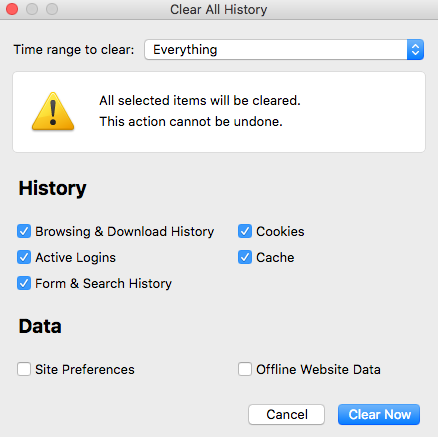
Your history data from the selected time range is cleared from Firefox.
Secure Erase All Internet Activities on Mac
To erase all Internet activities on Mac securely, perform the following steps:
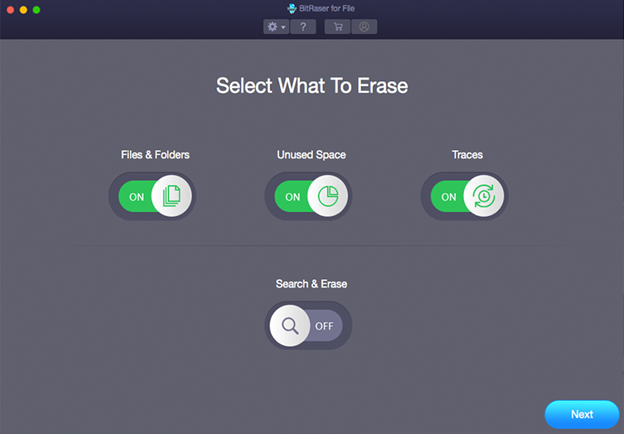
1. Install Stellar File Eraser software on your Mac.
2. Launch the software. From the ?Select What To Erase? screen, toggle on the required items to erase, then click Next.

3. Select the files to erase, then click the Erase button.

4. Click the Confirm Erase button to complete the file erasing process.

Apart from erasing Internet activities for good, the software erases files or folders, system traces, application traces, unused spaces, etc. on MacBook Air, iMac, Mac mini, or their Pro models, as well as an external hard drive. The software protects against data theft and safeguards your privacy. You can also use the tool to generate an erasure report for audit trail.
Conclusion
We hope now you?re aware of the methods to clear your browsing history on the three popular Mac web browsers (Safari, Chrome, and Firefox) without any cost. But these methods don?t remove the browsing data permanently, as any Mac data recovery software can recover it easily. This leaves you vulnerable to data leakage and misuse.
If you wish to perform the erase task securely in a way that no data recovery software could recover your erased data, then use Stellar File Eraser for Mac software. The software wipes all Internet activities from various web browsers installed on your Mac with a click of a button. Also, you don?t need to manually perform the erasure as the tool allows you to schedule the erasure task automatically. Plus, the tool is compatible with macOS Big Sur 11 and earlier macOS versions.

