Summary: Do you want to make Windows Photo Viewer the default photo viewing app in Windows 10? In this post, you will learn different ways to restore Windows Photo Viewer in Windows 10 computers. Whether you have clean installed Windows 10 or upgraded from Windows 7 or 8, you will find solutions for both cases.
Users who were used to the Windows Photo Viewer app were quite annoyed to find it missing from the latest Windows 10. Despite having many useful features, the new built-in Photos app of Windows 10 was not welcomed by many. Compared with the classic Windows Photo Viewer in Windows 7 and 8, users find the Photos app a bit slow and complicated.
Several queries keep pouring in various forums regarding restoration of the old Windows Photo Viewer.


?Is it possible to restore Windows Photo Viewer app??
?Can I make Windows Photo Viewer default app in Windows 10??
?Is it safe to uninstall Photos app in Windows 10??
There are many such questions users ask.
To answer the questions ? Yes, you can restore Windows Photo Viewer in Windows 10. And it is entirely safe to remove Photos app as default app in Windows 10, as long as you are doing it right.
This post shares safe methods to restore Windows Photo Viewer on Windows 10. Whether you have upgraded to Windows 10 from Windows 7/8 or clean installed Windows 10, the solutions here address all situations.
How to Restore Missing Windows Photo Viewer in Windows 10?
Microsoft didn?t altogether remove Windows Photo Viewer but has hidden it from the Default apps list in Windows 10. That?s the reason all your images open by default in the new Photos app on Windows 10. The Photo Viewer app doesn?t appear in the ?Open with? list when you right-click on any image file.
However, you can activate Windows Photo Viewer on Windows 10 using registry hack and make it your default app. Creating the app?s shortcut on your computer also helps to open photos in Windows Photo Viewer on Windows 10.
Go through the below sections to know how to get back Windows Photo Viewer in Windows 10:
Method 1: Set Windows Photo Viewer as default app in Windows 10
- Steps to follow in case preinstalled Windows 10 on a new system or clean installed on an old PC/ laptop
-
Steps to follow in case upgraded to Windows 10 from Windows 7/8
Method 2: Add Windows Photo Viewer option to ?Open with?
Method 3: Create a new Shortcut for Windows Photo Viewer
Method 1: Set Windows Photo Viewer as default app in Windows 10
You can set Windows Photo Viewer as the default app to open all images in Window 10.
The steps to make Windows Photo Viewer your default app will vary with your Windows 10 installation method:
Case 1: Preinstalled Windows 10 on a new system or clean installed on an old PC/ laptop.
Case 2: Upgraded to Windows 10 from Windows 7/8.
Case 1: Steps to follow in case you have preinstalled Windows 10 new system or clean installed:
- Download the correct Registration key file from a secure and trusted source. Save it on your desktop.
- Now double-click on this file to merge it with Windows Registry.
- Series of User Account Control dialog boxes appear for permission to run Registry Editor. Click on Run followed by Yes > OK, to enable the changes in the file registry.
- Next, open Settings on your PC via Control Panel.
- Select Apps > Default apps.
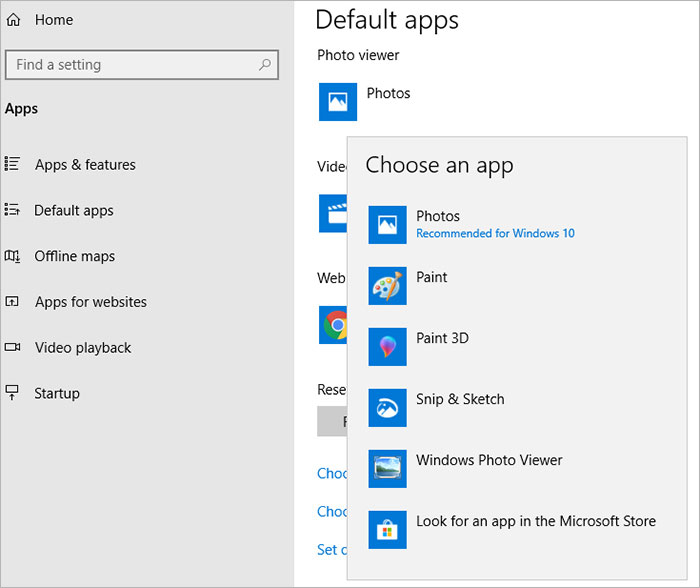
- On the right pane, scroll down to Photo Viewer. Click on the Photos app under it.

Case 2: Steps to follow in case you upgraded to Windows 10 from Windows 7/8
- Open Settings on your PC.
- Select Apps.
- Click on Default apps on the left pane. On the right pane, scroll down to Photo Viewer. You will see your current default photo viewer, i.e., Photos app in Windows 10.
- Click on the Photos app. A list of new image viewer programs appears.
- Select Windows Photo Viewer and lose the window. Now your photos stored on Windows 10 computer will open Windows Photo Viewer.
Method 2: Add Windows Photo Viewer option to ?Open with?
You can also add Windows Photo Viewer as one of the apps to open your images.
Steps to view Windows Photo Viewer in ?Open with?:
- Follow the steps given in method #1 to set Windows Photo Viewer as your Default App.
- Now, right-click on any picture, select ?Open with?.
- Choose Windows Photo Viewer to view the photos.
Method 3: Create a new Shortcut for Windows Photo Viewer
You can create Shortcut to open stored pictures in Windows Photo Viewer on Windows 10. This method uses a command line to open a particular photo or image folder with Windows Photo Viewer.
Steps to create shortcut to view photos in Windows Photo Viewer on Windows 10 PC:
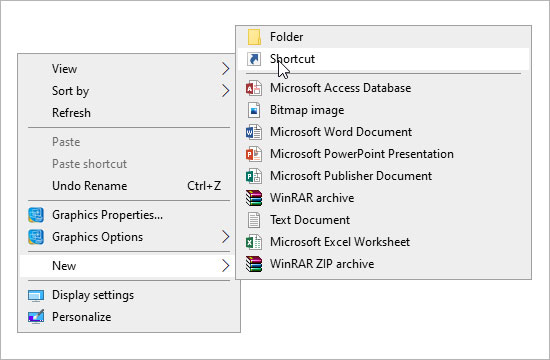
- Right-click on an empty space on your desktop.
- Select New.
- Click on Shortcut to open the Create Shortcut window.

rundll32 “%ProgramFiles%\Windows Photo Viewer\PhotoViewer.dll”, ImageView_Fullscreen <full path of either image file with extension or image folder>
E.g.:
rundll32 “%ProgramFiles%\Windows Photo Viewer\PhotoViewer.dll”, ImageView_Fullscreen C:\Users\nishat.paiker\Desktop\offic pixs\team treat.jpg
OR


rundll32 “%ProgramFiles%\Windows Photo Viewer\PhotoViewer.dll”, ImageView_Fullscreen C:\Users\nishat.paiker\Desktop\offic pixs


Next, go to your desktop. Open the new shortcut and view the pictures of the specified folder.
This method is not for all the saved images on your Windows 10 PC. It only works for the image folder for which you?ve created the shortcut. However, you can create multiple such Windows Photo Viewer shortcuts for different image folders.
Also read: Unable to see photo thumbnails in Windows 10? Learn how to fix it.
Lost photos from Windows 10 PC after upgrade or restoring to Windows Photo Viewer?
Many users reported missing files and folders after Windows upgrade. Unfortunately, if you have also lost your photos after upgrade to Windows 10 or while restoring the Photo Viewer app, immediately download Stellar Photo Recovery. The advanced algorithms of the software thoroughly scan the Windows drives and recover deleted or missing photos. If you remember the name or file extension of the photos, the software can give you the desired results after the scan. Additionally, you can also get back lost video and audio files.
It?s advisable to try the free version of Stellar Photo Recovery software first to assess its photo recovery capabilities. You can preview the recoverable pictures in the free trial.


Finally
You love Windows Photo Viewer. It is fast, simple, and occupies less RAM than the built-in Photos app of Windows 10 systems.
You have the option to restore missing Windows Photo Viewer on Windows 10 by using the different methods shared above. You can make Windows Photo Viewer the default image opening application on Windows 10 or even choose to open specific photos in the application with the shared techniques.
Also read: Fix Photos App Crashing Issue on Windows 10


