Summary: In this blog post, we will bust some popular myths related to file deletion. Learn why it is important to permanently wipe the deleted files from your PC or Mac. And explore Bitraser File Eraser, a professional file erasure tool, which permanently wipes all deleted files from your PC or Mac.
Contents
We often delete files and folders from our PC and Mac’s hard drives. The most common way to do so is to use the ‘Delete’ setting/button on your PC or Mac. You select the file(s) you wish to delete and then press Delete to send it over to Recycle Bin (Windows) or Trash (Mac). Then you clear the Recycle Bin/Trash and the file vanishes making you believe that the deletion is done.
In reality, the file(s) your deleted files are still present on the system and can be recovered easily with the help of a data recovery software. In this blog post, you will look at the myths surrounding deletion of files from Windows PC and Mac and then discover how you can permanently erase these file(s) beyond any scope of recovery.
Myths about file deletion
Deleting files and folders using PC or Mac built-in settings doesn’t delete them permanently. Your operating system just erases the address of those files and allows those addresses to store new files. The old files are still there, it?s just that they are not available for immediate view.
A data recovery software (even the free ones available online) can easily recover those deleted files and render your deletion effort worthless. Only a reliable file erasure software can permanently erase these files and ensure that the deleted files cannot be recovered. Before learning more about the benefits of a file erasure software, let us first understand the importance of permanent file erasure.
Why you should permanently erase your files?
When you temporarily delete your data (using your PC or Mac’s delete settings) you expose your data for unauthorized use. Anyone who gets hold of your PC or Mac can access your personal information from the residual data on the system. The personal information can include your banking details, social media credentials, social security number, personal photos and videos, etc. Any unsolicited use of this information can cause you unnecessary emotional and financial distress. To prevent such mishaps, you should erase your files permanently and the only way to do permanent erasure is by using a file erasure software.
File Erasure software to wipe your deleted files permanently.
A file erasure software functions by overwriting on top of your data multiple times. This way, the deleted data can never be recovered and you can be assured of a permanent erasure. You should only use a trusted and reliable file erasure software to perform this operation.
One of the most efficient file erasure software is Bitraser File Eraser, which uses advanced techniques to erase files, folders, applications and system traces permanently from your PC and Mac. Bitraser File Eraser is a DIY data erasure tool from Stellar, designed to overwrite empty storage space in order to permanently erase previously deleted but recoverable files.
How to use Bitraser File Eraser to wipe deleted files?
The space occupied by deleted files in your PC or Mac is marked as ?unused? space. In order to permanently erase the deleted files, you need to permanently erase the unused space using Bitraser File Eraser.
Follow the steps shared below to wipe unused space on both Mac and Windows.
Using Bitraser File Eraser to wipe unused space in Mac
- Install Bitraser File Eraser on your Mac.
- Now run the application.
- Select ?Unused Space? option from the Main Interface window. Click Next.
- A window with list of volumes on the computer is displayed.

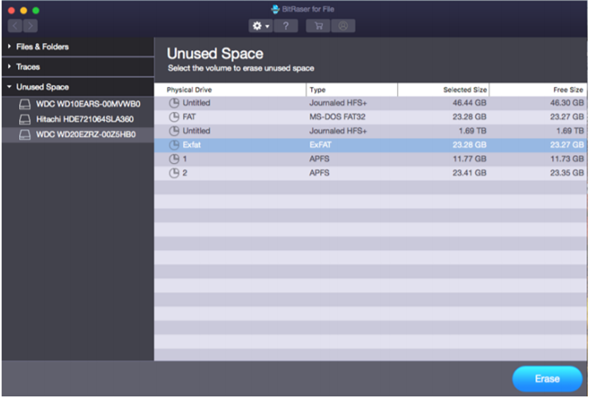
5. Select the volume from which unused space needs to be erased.
Click Erase.
6. From the Preferences button , select the desired Erasure algorithm
for secure deletion. Click OK.
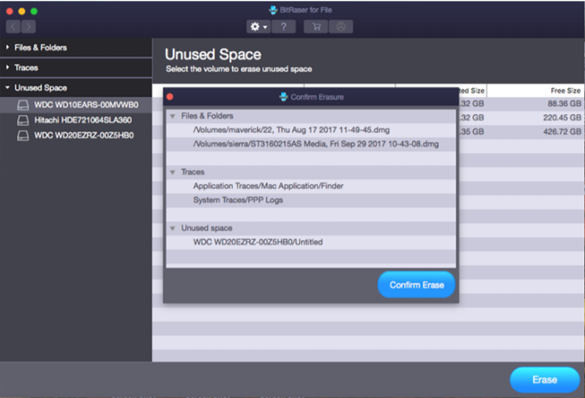
7. A Confirm Erasure dialog is displayed to confirm the erasure.
Click Confirm Erase to start the erasure process.

- You can stop or abort the process anytime by clicking the Stop button.
A message will display after the successful completion of erasure process. Restart your system to finish the process.
Using Stellar File Eraser to wipe unused space in Windows
- Install Stellar File Eraser on your PC.
- Click the Erase Deleted data button on the left pane [See Image 3].

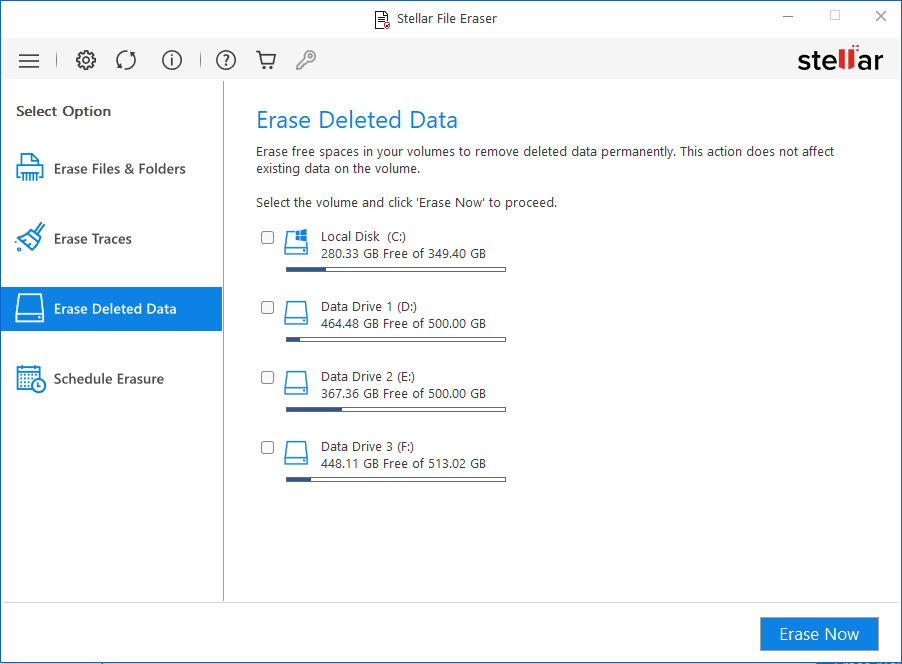
- On the next screen, you will see the details of your drive in your PC where the unused space will also be defined. Please select the drive and click on Erase Now
4. A dialog box will appear to confirm the erasure action. Once you confirm, the disk will be permanently erased (including the unused space) and no one would be able to retrieve any data from it.
Conclusion
The primary reason we delete files is that we don?t want them to be erased forever. Your Mac or Windows ?delete? settings cannot accomplish that. Only a File Erasure tool like Bitraser File Eraser can erase those deleted files permanently and give you complete peace of mind against any unwanted use of your data. Bitraser File Eraser is a professional file erasure software, purpose-built to protect your privacy by securely and permanently erasing previously deleted data from your Windows PC or Mac.

