Summary: Cutover Migration is a preferred method to migrate mailboxes from Exchange 2010 to Microsoft 365. While it may sound simple, the process is complex and involves multiple steps. Besides, the Cutover Migration depends heavily on Outlook Anywhere and many other components in your existing server. In this article, you will learn different ways to efficiently migrate mailboxes from Exchange 2010 to Microsoft 365. To save time and avoid issues, you may also use an EDB to PST converter software, such as Stellar Converter for EDB. It directly exports all mailboxes from the Exchange 2010 database (.edb) files to Microsoft 365 tenants with auto-mapping.


Contents
There are a number of ways to migrate Exchange 2010 to Microsoft 365. However, Exchange 2010 to Microsoft 365 migration is not an easy task for the System Administrator or users as it can be a little unproductive, depending on the hiccups during the process or may cause data loss if it?s not done right. Thus, to help you do it the right way, we are going to explore a few methods and tools, such as the native tool by Microsoft called the Microsoft Exchange Server Deployment Assistant and Stellar Converter for EDB to safely migrate from Exchange 2010 to Microsoft 365.
Methods to Migrate Exchange 2010 to Office 365
Exchange Deployment Assistant is by far the commonly used Exchange 2010 to Microsoft 365 migration technique. However, this technique is suggested only if you have a single-forest, single-domain environment and not a complex Active Directory system with child domains or other configurations. In this article, we?ve covered three methods to migrate Exchange 2010 to Microsoft 365. You may follow any method, based on your setup and downtime needs.
- Cutover Migration
- Hybrid Deployment
- PST Import
Exchange 2010 to Office 365 Cutover Migration
This migration method is quite simple where you just need to set up synchronization between your Exchange Server and Office 365. Once everything is seeded, you decide on a date, which is preferably being during a weekend and flip a switch and everyone is happily on Office 365. It is easier said than done. Of course, there are a number of configurations to be done. One of which is a clean and perfectly running Outlook Anywhere.
First things first, your Exchange 2010 setup needs to be upgraded to at least Service Pack 3. Though it is not required, it?s highly recommended.
Note: It?s important that before migrating Exchange 2010 to Microsoft 365 via cutover migration, make sure directory synchronization and unified messaging are disabled.
As said, Exchange 2010 to Office 365 migration is heavily dependent on a perfectly running Outlook Anywhere. In the later Exchange servers, it is enabled by default, but on Exchange 2010 if you haven?t configured it yet, you need to do it now. To set up Outlook Anywhere, you need to install an SSL certificate (not self-signed) and the RPC over HTTP component on the server hosting Exchange. To set up this, expand the Server Configuration/Client Access and right-click on your server in the Client Access area in the middle section.

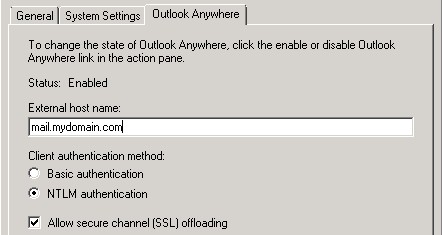
You can test it at a later stage from your Office 365 portal or use tools like https://testconnectivity.microsoft.com.
The next step is setting up the required permissions for the user that you will be using to migrate. For this migration, you need to find the ApplicationImpersonation, View-Only Configuration (On both Exchange Server and Office 365), View-Only Recipients, and User Management Administrator on Office 365.
The impersonation can be performed via the Exchange Management Shell by using the below command.
New-ManagementRoleAssignment ?Name:impersonationAssignmentName ?Role:ApplicationImpersonation ?User:<Your migration user>The next step is to create a mail-enabled security group in Office 365. This is required during the migration process as the service will not be able to provision any migrated groups as security groups in Office 365 as these don?t exist.
Now, you need to verify your domain in Office 365. This will not make anything live, just a confirmation of ownership by adding either an MX or TXT record. Now, Microsoft has introduced a feature to verify domain through email verification, where an email is sent to the owner of the domain.


Once the domain is verified, create a migration endpoint that basically contains all the information to connect your Exchange 2010 to Office 365. Here is where the big headaches start. If you have any issues or incompatibilities in your Exchange Server, firewall, or connectivity, this will surely not work as you wish.
After the endpoint is created, you need to create and start a migration batch. This batch will include all the mailboxes that need to be migrated. This is the point where the migration happens and the data is transferred. To make sure that everything is migrated, you need to assign an Office 365 license to a user, log into the user, and verify that the data is in the mailbox. After all the data has been transferred, it is time to make the switchover.
Once this is done, you need to clean up DNS after your migration. This is done by point the MX record to Office 365, along with CNames, TXT records, and SRV records. Of course, you need to modify your current setup to stop pointing your DNS autodiscover and SCP to your Exchange 2010 setup. You can now safely remove the batch and decommission your servers.
This is quite tricky to set up and requires a lot of work and time to make sure that the Exchange 2010 to Office 365 migration goes smoothly.
Exchange 2010 with Office 365- Hybrid Deployment
This method is a refined staged migration. It enables on-premises and Office 365 to co-exist at the same time. However, this is only available on Exchange 2010 onwards. This is highly recommended when you have large amount of data to migrate from Exchange 2010 to Office 365. The hybrid method is mostly recommended when you have more than 150 mailboxes.
As said, this method is not an intermediate stage as you cannot keep both sides or use it as a failover. The hybrid method is a final deployment. For this, you need to configure a dedicated Hybrid Configuration Wizard (HCW) which involves a federation trust between both Exchange and Office 365, organization relationship, MRS proxy, and connectors.
If you have a lot of data to transfer, apart from the time to transfer, it requires huge administrative efforts to set it up and to transfer the data.
Migrate Exchange 2010 to Office 365 via PST Import
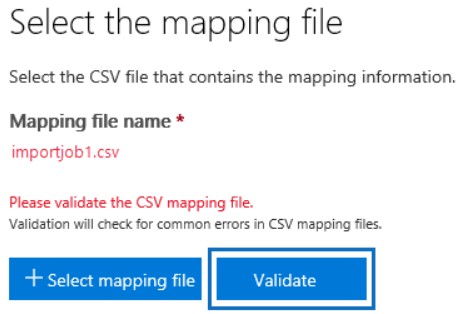
This is a kind of ?manual migration?. The process involves migrating Exchange 2010 to Office 365 with no data import at the first stage. When the records have been populated and propagated on the internet, you need to start exporting each mailbox by using the New-MailboxExportRequest. This is a bit archaic, slow, and is not reliable. On the other hand, if you don?t have a lot of data to move, this could be your way. After you export all the mailboxes to PST, you need to generate a SAS URL, upload the PST files by using AzCopy, and then create a mapping file, mapping your PST file to the mailbox (as given below).
Workload,FilePath,Name,Mailbox,IsArchive,TargetRootFolder,ContentCodePage,SPFileContainer,
SPManifestContainer,SPSiteUrlExchange,user.pst,user@mydomain.com,FALSE,/,,,,
Once done and your CSV file is validated, import will start into the users? mailboxes. It?s important to note that you?ll add the user, from which you are logging into the portal, to the import/export role.

An Easier Way to Migrate Exchange 2010 to Office 365
The easiest and most convenient way to migrate from Exchange 2010 to Office 365 is to use an Exchange EDB to PST converter tool, such as Stellar Converter for EDB. The software makes the process of Exchange 2010 to Office 365 migration quick, easy, safe, and convenient. With the help of Stellar Converter for EDB, you can migrate Exchange to Office 365 in a few clicks.
It can help you migrate the mailboxes from offline Exchange Database 2010 to Office 365. If you want to export mailboxes from Hosted Exchange 2010 to Office 365, you can first export mailboxes to PSTs and later you can import PST into Office 365. This can reduce downtime and prevent data loss.
Following are some key features of Stellar Converter for EDB software:
- Migrates mailboxes from large EDB files, without any size limit
- Converts and exports offline and hosted Exchange mailboxes to PST
- Exports mailboxes from offline mailboxes to PST, Office 365, and live Exchange server
- Saves mailboxes to multiple formats, such as EML, MSG, HTML, RTF, and PDF
- Exports Public Folder to PST and Office 365
- Exports contacts to CSV format
- Previews all mailbox items before saving
- Facilitates Exchange Dial Tone Recovery
- Automatically maps users? mailbox
- Provides an option to create a new mailbox for user mapping
- Supports Exchange 2019, 2016, 2013, 2010, 2007, 2003, 2000, & 5.5 versions


Conclusion
The above mentioned Exchange 2010 to Microsoft 365 migration methods are a great way to migrate your existing Exchange server setup, depending on the volume and how you wish to migrate. However, all the migration methods need a considerate administration effort. As an easy alternative, you can go for a reliable EDB to PST Converter that can migrate Exchange 2010 to Microsoft 365, without any intervention of the administrator. Basically, all you need to do is select the users and set up the credentials to export Exchange 2010 mailboxes to Microsoft 365 accounts.

