Summary: Mounting or dismounting the Exchange database is a common task that administrators perform when running maintenance tasks and health checks on the Exchange Servers. However, there is a systematic approach to mounting or dismounting the Exchange database to avoid errors and issues as they can lead to downtime and connectivity issues. In this article, we have discussed how you can mount or dismount an Exchange database in Exchange Server safely using built-in Exchange Management tools.


Contents
Microsoft Exchange Server stores the user mailboxes and public folders in database (.edb) files, which are mounted on the server. It may dismount automatically if the database dismounts for any reason, such as low storage or corruption.
When the database dismounts, users cannot connect to their mailboxes, access emails, or send/receive messages.
But sometimes, you may also require to dismount the database to perform maintenance tasks, such as defragging the Exchange database, performing integrity checks, etc., to ensure the database’s health.
Although mounting and dismounting a database is safe in most cases, there are steps you need to follow to avoid errors and issues while dismounting or mounting a database.
Mount or Dismount Mailbox Database in Exchange via PowerShell
In Microsoft Exchange Server, there are two ways to mount or dismount a mailbox database:
- Exchange Management Shell (EMS) or PowerShell Cmdlets
It?s a command-line-based advanced Exchange management tool. The tool is available in Microsoft Exchange Server 2010 SP1 and later versions.
- Exchange Admin Center (EAC)
A GUI-based web interface to manage and administer Exchange Server. The EAC is available in Exchange Server 2013 and later.
In this article, we will discuss the PowerShell (EMS) method to mount or dismount an Exchange mailbox database safely. The PowerShell method is much faster and more advanced than the GUI-based Exchange Admin Center.
To mount a database by using the EAC, you need to first login into Exchange Admin Center, then follow these steps:
- Click on Servers.
- Then click on Databases.
- Highlight the database you wish to mount.
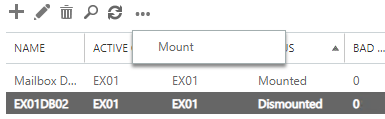
- Click on the three dots icon.
- Then click on the Mount or Dismount button
- Confirm the mount or dismount action to mount or dismount the Exchange mailbox database.

Besides, you can only mount or dismount one database at a time. You cannot mount or dismount multiple mailbox databases at once. This method is slower as compared to PowerShell. To mount/dismount a database using PowerShell, you need to start by opening Exchange Management Shell and use the Mount-Database cmdlet to mount a dismounted database or Dismount-Database cmdlet to dismount a mounted database.
TIP: If the database fails to mount, it must be inconsistent, damaged, or corrupt. In such a case, you may use Eseutil or Exchange recovery software, such as Stellar Repair for Exchange, to fix the corrupt database and restore the mailboxes from a damaged, corrupt or inaccessible database to a new database.
Steps to Mount or Dismount Exchange Database Using PowerShell
Below are the steps you need to follow while mounting or dismounting an Exchange database to avoid errors and issues.
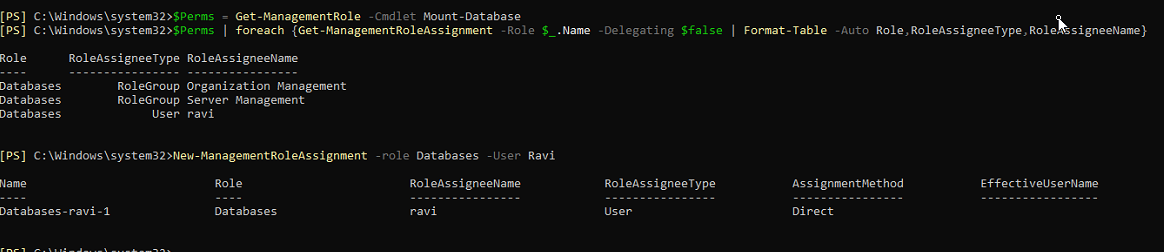
Step 1: Assign the Required Roles
You need the Databases role assigned to your account to perform the database mount or dismount task in Exchange Server. The role is already assigned if you are an administrator, and no additional action is required.
However, if there?s another user, the role must be assigned before running the PowerShell cmdlets to mount or dismount the Exchange database.
You can assign the required role by executing the following command.
New-ManagementRoleAssignment ?role Databases ?User Ravi

Step 2: Know the Database Name
You also need to know the complete database name. This can be obtained from the Exchange Admin Center> servers> databases.

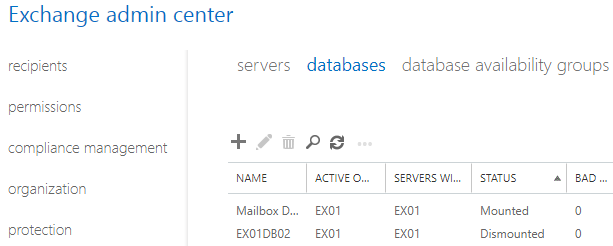
You may also use or run the Get-MailboxDatabase cmdlet to view the database names.


Step 3: Check the Database Status
Before trying to mount the database, use PowerShell to determine the status of the database or databases in the Exchange Setup.
You can use Get-MailboxDatabase and Format-Table or ft to get the required information. The command is as follows:
Get-MailboxDatabase ?Identity <database name> -Status | Format-Table Name, BackupInProgress, OnlineMaintenanceInProgress


To check all the databases, you need to change the ?identity parameter with the ?servername parameter with the server’s name.
Get-MailboxDatabase ?Server <server name> -Status | Format-Table Name, BackupInProgress, OnlineMaintenanceInProgress
Alternatively, you can use ESEUTIL /mh command to determine the state of the database, i.e., the database is in Clean Shutdown State (consistent) or Dirty Shutdown State (inconsistent).
eseutil /mh <full path to the edb file>

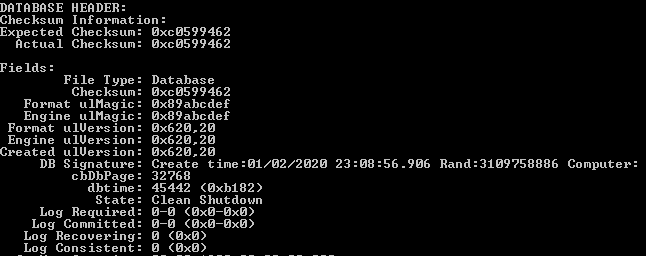
In the State, you will see either Exchange Database is in Dirty Shutdown or Clean Shutdown. Once you know the name of the database and check that it is healthy, you can mount the database with the following PowerShell command in Exchange Management Shell (EMS).
Mount-Database ?Identity <dbname> ?Confirm:$False


This will mount the desired database without confirmation.
There are two ways to mount all databases in your Exchange Server simultaneously.
- Use the ForEach loop using the Get-MailboxDatabase and then using the Mount-Database, or you can use the one-liner as below using the pipe.
Get-MailboxDatabase ?Server | Mount-Database ?Confirm:$False
This will execute the Mount-Database command for each database in the server.
Similarly, to dismount single or multiple databases, you only need to change the first part of the cmdlet from Mount-Database to DisMount-Database. See the example below.
DisMount-Database ?Identity <dbname> ?Confirm:$False
If no issue arises, your database will be mounted or dismounted easily.
The above commands apply to Exchange Server 2010, 2013, 2016, and 2019. If you are still running 2010 and 2013, upgrading it to a newer version is recommended.
Final Thoughts
If the database doesn?t mount due to missing log files, corrupted logs, or corrupted databases, there isn?t any native application to export from a dismounted database. In such cases, applications like Stellar Repair for Exchange can help restore your services as soon as possible, with minimum interruption to the user?s services.
With Stellar Repair for Exchange, you can open any version of the Exchange Database (EDB) file ? from 2007 to 2019. Exchange Recovery Software scans corrupted EDB files & recovers all mailbox items in case of missing log files. You can also export the EDB file to popular formats such as PST, EML, PDF, and others. If your database is corrupted due to an operating system, application, third-party software, or hardware failure, you can also create a new database in your Exchange setup and use the application to import it directly into a live Exchange Server. You can also use the application to import an EDB file directly into an Office 365 tenant, thus using it as a migration tool.
Rating by Expert:


Reference: Read More