Summary: Have you lost your photos from Mac after upgrading to macOS Big Sur 11? This post guides you on how to restore missing photos on Mac after Big Sur update using the best Mac Photo Recovery software. The tool has helped many to recover photos lost after macOS update.


I updated to macOS Big Sur 11.0 to elevate my MacBook Pro. But, when I opened the Photos app after the upgrade, to my utter shock, it was empty! Needless to say, all my memories were deleted. I tried the Spotlight search, but it also didn?t work after Big Sur update. Frantically, I was all through the Apple forums and support services, desperately wanting to know how I can now recover the disappeared photos after upgrading to Big Sur.
– Susana, California.
The macOS Big Sur update did not bring good news for everyone. Like Susana, some were left in shock as they suddenly found their Photos app had no pictures, neither in the ?Recently Deleted? folder nor in the ?Import? section.


Photos are your precious possessions, which you want to keep forever. So addressing the issue, here we guide you on how to get back all the photos on Mac after the Big Sur update.
How to recover the deleted pictures after updating to Big Sur
The first thing you should do is to find your photos in the backups you might have created before the Big Sur upgrade.
Unfortunately, if not, immediately take help of a Mac Photo Recovery software that can safely restore your photos without corrupting them.
Look for your photos in Time Machine backup
If the photos disappeared from Mac after updating macOS to Big Sur 11.0, find the lost files in Time Machine backup and restore.
Steps to restore photos from Time Machine in macOS Big Sur:
- Open Time Machine on your Mac.
- Scroll through the local backups available with dates. Click on the date of your last backup before the Big Sur update.
- Navigate and select your Photo library backup or the folder from which your pictures were deleted.
- Click Restore. The process would take time, depending on the size of your Photo Library.
Now go to the Photos library to view your deleted photos.
Watch this video to know how to recover Photos lost after upgrading to macOS Big Sur

Check your iCloud Drive for the missing photos after macOS update
You may be using iCloud Drive to back up your Mac photos across Apple devices. Search for the missing photos in your iCloud Drive and restore.
Steps to restore photos from iCloud Drive:
- Log in to your iCloud account from icloud.com through the browser, using Apple ID and password.
- Search for the deleted files in Photos.
- Select the desired photos and click the download icon to save them on your Mac.
No backup! A Mac Photo Recovery Software is your last hope
Mac photo recovery software works efficiently in tough situations of photo loss after macOS upgrade. You can use the advanced Stellar Photo Recovery tool that recovers deleted pictures from Mac volumes and disks, irrespective of their file format.
You can easily get back lost JPEG, HEIC from iPhone, TIFF, PNG, DNG, and other uncompressed raw files from GoPRo, Canon, Sony, Nikon, Olympus, Fujifilm, and other cameras.
Key benefits of using Stellar Photo Recovery:
- Recover deleted photos with the original name, date, and timestamp
- Preview the found photos before saving them on your Mac drive
- You can select and restore only the desired photos from recoverable list.
The software is compatible with MacBook Air, MacBook Pro, Mac Pro, etc., and supports the latest macOS, including Big Sur, Catalina, and Mojave.
Steps to recover lost photos after macOS upgrade to Big Sur:
Step 1: Download and launch Stellar Photo Recovery on your Mac.


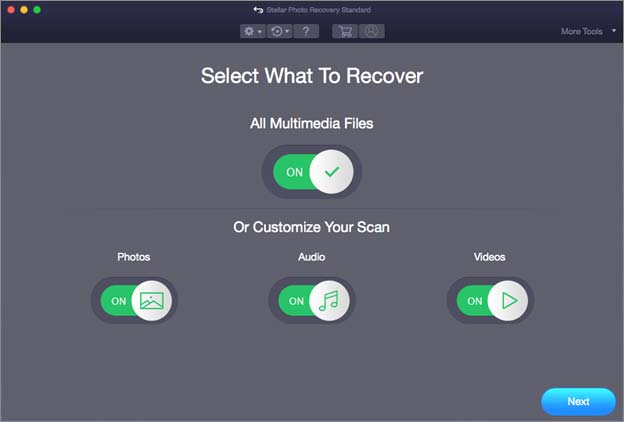
Step 2: Select Photo in the What to Recover screen.

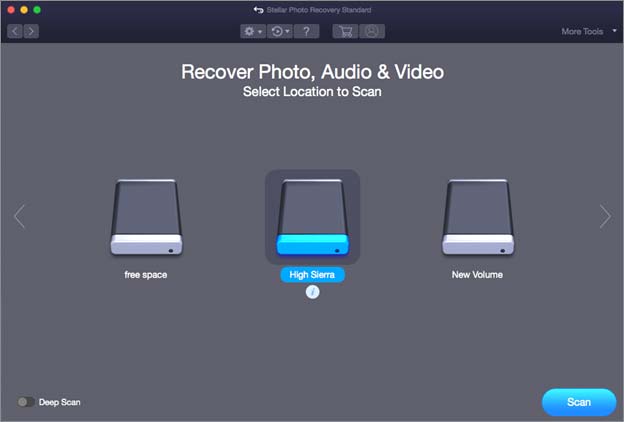
Step 3: Select the location from where you want to recover photos lost after macOS upgrade to Big Sur. Toggle on Deep Scan. Click Scan.
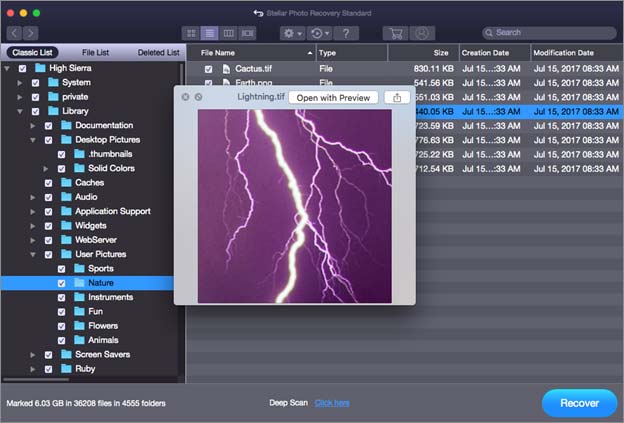
Step 4: The software displays the list of recoverable photos. You can preview the pictures and select the ones which you want to restore.

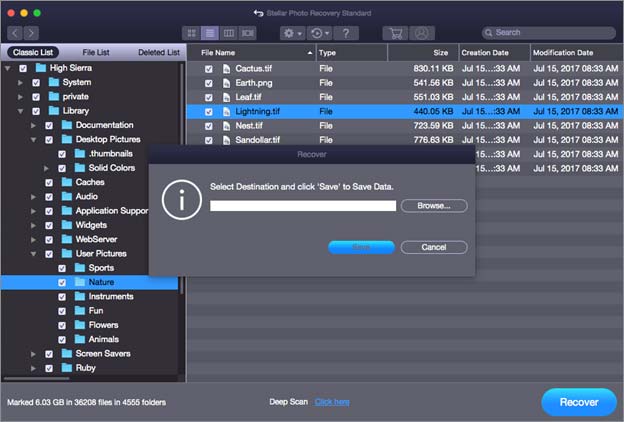
Step 5: Click Recover and Save the photos at a desired location on your Mac.
Conclusion
With backup available in Time Machine or iCloud Drive, it?s easy to recover photos lost after macOS upgrade to Big Sur. Else, you can trust Stellar Photo Recovery for Mac to restore the lost pictures after the Big Sur 11.0 upgrade.
The software is quick and thoroughly scans Macintosh drives to recover your photos with their original names. But, still, I would recommend getting the trial version of the software first. It shows the preview of the recoverable pictures. Once satisfied with the results, you can go for the licensed version to save the photos.
Also Read: Fix MacBook Pro Freezing after Big Sur Upgrade
Also Read: How to Repair Your Photos Library on Mac


