Summary: This blog highlights the best methods to erase temporary files in your Windows 10. We will discuss Windows built-in utilities like Disk Cleanup and Settings or Manual Deletion methods used to delete temporary files from a system. However, using these options does not permanently delete the files from the system; anyone can recover them using specialized recovery software. Only a professional file erasure software can permanently erase temporary files from your system using advanced erasure standards.
Contents
Whenever you use an app in your Windows 10 (for e.g. Microsoft Word), the system creates temporary files to enhance the user experience. E.g., whenever you open a Microsoft Excel document, the system creates a temporary copy of that document every minute. This ensures that you don?t lose your data in case of a mishap such as an abrupt system shutdown or power failure occurs.
These temporary files are tiny in size; however, over time, they may fill up your hard drive. Therefore, you must regularly clean the temporary files in your Windows 10 PC/Laptop.
Let us explore the different methods to clear temporary files from your Windows 10.
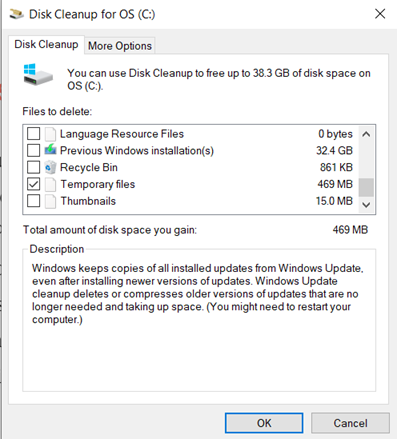
Method 1: Using Disk Cleanup
a. In the Search bar, type Disk Cleanup.
b. In the Disk Cleanup window, check the Temporary Internet Files box and click OK.
c. A dialog box will appear asking you to confirm the delete action. Once you confirm, the Disk Cleanup utility will delete the temporary files.

Method 2: Using Windows Settings
a. In the Search bar, type Settings
b. From the list of icons, click the System icon.
c. A new window will appear. Select Storage from the Settings menu on the left.
d. Double-click on the Temporary files option in the Storage window.
e. Windows will scan the temporary files available for deletion. Select the files you want to delete, and then click Remove files.
This will remove all the selected temporary files from the system.


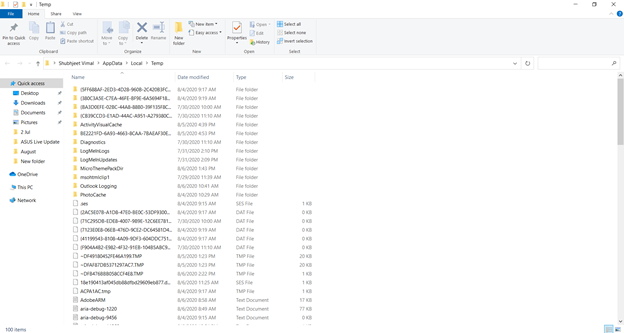
Method 3: Manually Delete the Temporary Files
a. Press Windows + R to open the Run dialog box.
b. In the Run dialog box, type %temp% and then press Enter.
c. A window will open, which will show a folder containing all temporary files.
d. Select the particular files that you want to delete or press Ctrl+A to select all files.
e. Right-click anywhere on the screen, and you will see the Delete button. Click on that.

The methods described above deletes the temporary files from your system. However, also note that the deletion is not a permanent one. Files deleted using the Windows Settings, Disk Cleanup, or manual deletion are not permanently deleted. These files move to a hidden folder but remain present on the system. A data recovery software (even the free ones available online) can easily recover these files. If you want to permanently delete the temporary files, go for a file erasure software.
Method 4: Use File Erasure Software
A file erasure software is the only fail-safe way to erase temporary files on the system permanently. A file erasure software works by overwriting on top of the files once or multiple times. This way, it completely destroys the data by making it unreadable. Permanent file erasure means no data recovery tool would be able to recover the erased data.
One of the most reliable file erasure software is the Stellar file eraser, which permanently and securely erases all temporary files from your system. It is a DIY tool to erase files, folders, and Internet files from your system. Stellar file eraser hosts an easy-to-use interface and advanced erasure technology that ensures that your temporary files are wiped permanently, and no data recovery software can recover them. You can also schedule the eraser activity so that the temporary files are deleted automatically at regular intervals. This frees up a significant amount of space in your drive and optimizes the system?s performance.
The below steps define how to use Stellar File Eraser to delete temporary files in your Windows 10 system.
- Install & Run Stellar File Eraser
- On the left menu, click Erase Traces and Click Scan
- The software will now scan through your PC and look for traces. Once the scan is completed, a dialog box will appear. Click Ok
- On the next screen, you will get the option to remove Application Traces. Click on that and then click Erase Now button on the bottom
- The tool will now erase the selected items.


Conclusion
Temporary files are automatically created in your Windows 10 system as you use various applications (preinstalled or user-installed). These temporary files, stored over time, can occupy a lot of space in your computer?s hard drive. Therefore, it is advisable to delete them regularly. This blog highlights the best methods to erase temporary files on Windows 10. The most effective method is using a file erasure tool, as it is the only permanent way to erase temporary files. One of the most efficient file erasure tools is Stellar File Eraser, which permanently erases temporary files from your system.

