Summary: With Exchange Server, you can use Microsoft Data Protection Manager (DPM) 2019 to backup and restore standalone or Database Availability Group (DAG) Exchange Server infrastructure. In this post, we will discuss the detailed process of backup and restore with Microsoft DPM. We’ll also mention an Exchange recovery tool that can help you recover mailboxes and other data from EDB file if something goes wrong.


Since Exchange Server works with databases, you need backup software that is application-aware and is fully compatible with the Exchange Server version. One such robust backup and recovery tool is Microsoft Data Protection Manager (DPM), which comes with Windows Server operating system. Microsoft DPM 2019 allows you to backup and restore enterprise data when things go wrong. Below, we will be going through the process of backup and restore with the Microsoft DPM, considering it is already installed.
Setup the Data Protection Manager (DPM) Backup
Although not required in Data Protection Manager (DPM), it?s best to back up the Active Directory server, along with the Exchange Server. This is because Exchange Server relies heavily on the Active Directory Schema and restoring an object in Exchange Server would also need to restore the Active Directory object associated with it. It?s always best to separate the Active Directory and Exchange Server in Data Protection Manager (DPM) Protection Groups.
Here?s the process to set up the DPM backup.
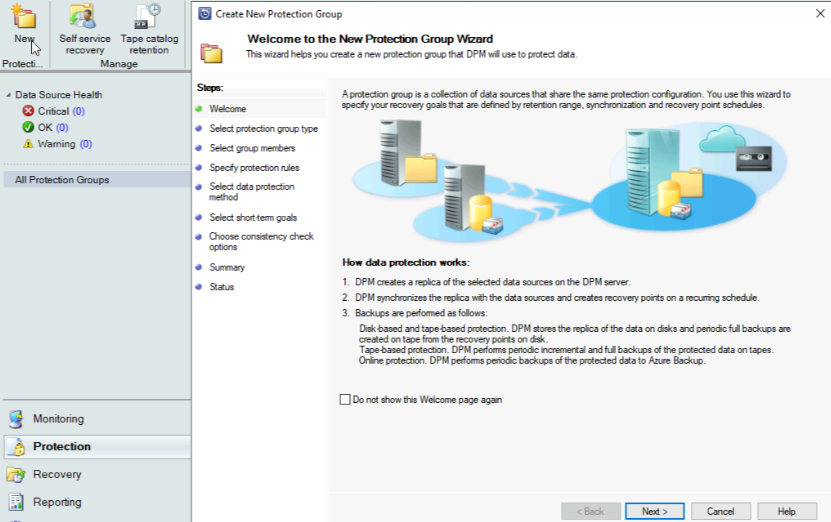
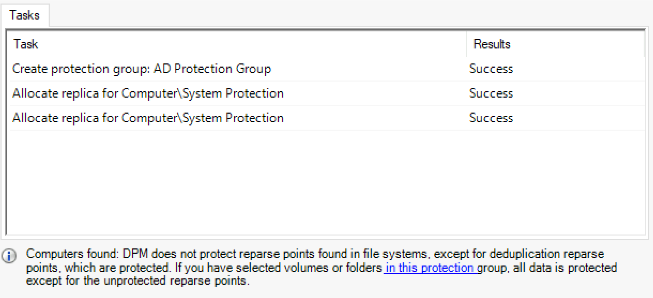
Once you open the System Center 2019 DPM Administrator Console, click on New and then click on Create Protection Group wizard. Now, you need to click on Next to proceed.

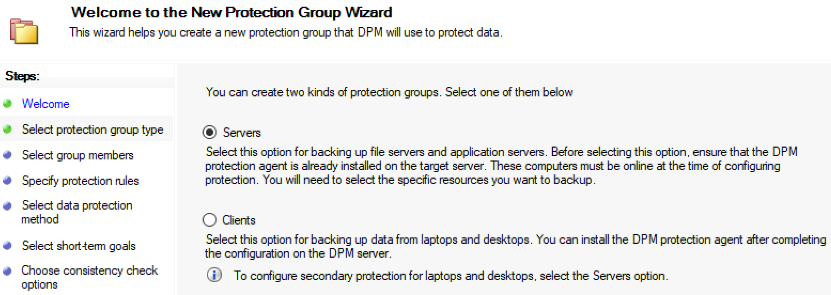
Then, select the Servers option and click Next to proceed to select the servers.

Note: Here, we will be choosing Active Directory Server from the list of servers. If you don?t see the Server, it means you might not have installed the agent on the server, there is some issue with the service, or the service of the agent is not stated.
Once selected, you will be presented with a prompt showing the things that the Data Protection Manager (DPM) cannot back up. Such things include:
- Recycle Bin
- Non-NTFS volumes
- DFS Links
- CDs
- Quorum Disks in case of Clusters
The important thing in an Active Directory Server is the System Protection area.


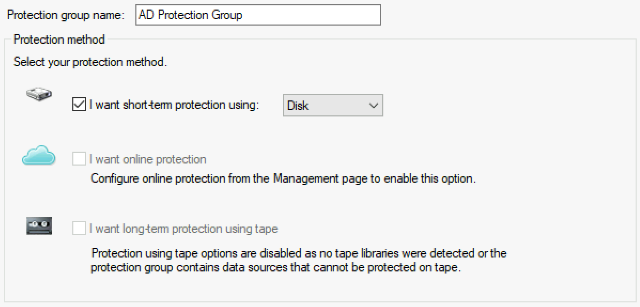
In the next screen, give the group a name and select the protection method. In this example, we will use the Disk method. However, you can also use the cloud or tape drive option, depending on your business needs.

Before going ahead with the configuration of the backup retention, you need to check that you have enough resources to hold your data, depending on the retention. It is always recommended to plan your backup and the resources needed for your backup. Data Protection Manager (DPM) does not calculate the needed disk space accurately. So, it?s always best to first run a test backup job and from there you would get a rough idea about the space needed.

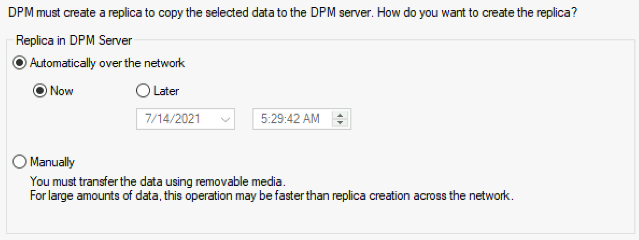
Once you have the storage and the retention period confirmed, the next step is to confirm the first seeding. There are two options: synchronization over the network or transferring the data manually. Then, see the changes.
If you are familiar with clusters and availability groups, the above falls into the same work needed for the initial copy. In the next screen, the progress will start and eventually, it will be updated as success.

Once you have the Active Directory group done, the next step is to create the Exchange Server. You need to follow the same process of the Active Directory, until the selection of the Exchange Server. In the server selection, select the Exchange Server if it is a standalone server or select the Database Availability Group from the structure.
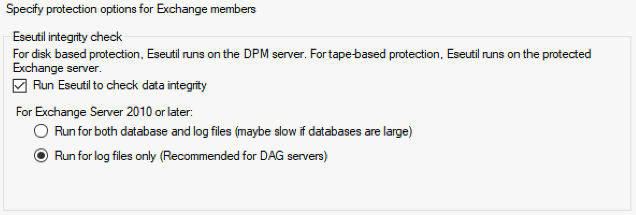
Once you come to the destination of the backup, if you have a Database Availability Group, you will need to run the integrity check (see below) on both databases and transaction logs or transaction logs only. If you run it on both, it will take a considerate amount of time depending on the size of the databases.

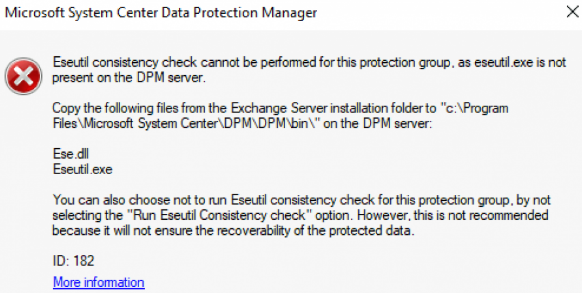
At this stage, you will get an error, since ESEUtil is an executable on the Exchange Server. All you need to do is copy the eseutil.exe and ese.dll from your Exchange Server to the server hosting the Data Protection Manager (DPM).

The next step is to specify the source server in case you have a Database Availability Group (DAG). The last step is to set up the retention.
Restoring from Data Protection Manager (DPM)
To restore to an Exchange Server, you need to first create a recovery mailbox database in Exchange. This can be created from PowerShell using the below command:
New-MailboxDatabase -Server <ServerName> -Name <database name> -Recovery -EdbFilePath <EDB file location> -LogFolderPath <logs location>

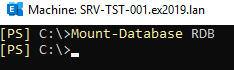
Once it is created, you need to mount it.
Mount-Database <Database Name>
Then, you need to allow the overwrite using the below command:
Set-MailboxDatabase <Database Name> -AllowFileRestore $true

In the Data Protection Manager (DPM), click on the restore job and select from the available recovery points associated with the Exchange Server protection group. Once this is selected, select the Recover mailbox to an Exchange Server database.


Next, you will need to select the server in case of DAG and the recovery database.


Now, verify the restore job and click on Restore to start the restore job.
Note: After this, you will either need to move the mailbox to the live database in case you need to restore the whole mailbox or extract it to PST in case you need specific folder/s or email/s.
Conclusion
The above procedure works when everything goes well. Restoring from the Data Protection Manager (DPM) can be an administrative burden as you will need to restore to a separately created Recovery Database in your Exchange Server. Then, you will need to move or export to PST to restore email/s or folder/s. This will take time and resources. Also, you need to have a fully functional Exchange Server. What if your Exchange Server is not working well or you cannot restore from yesterday?s backup? Data Protection Manager (DPM) will not be able to restore and you cannot granularly restore specific emails or folders.
In such cases, it would be best to use applications, like Stellar Repair for Exchange. By using this application, you can open and browse through corrupted EDB files, from any version of the Exchange Server. You can granularly export to PST and other file formats. You can also export directly to a live Exchange Server database with no need to create recovery databases and with little administrative effort. You can also export directly to an Office 365 tenant.


