Contents
When Microsoft Word suddenly crashes or shuts down, in most cases, you won?t be able to save your Word file. To recover an unsaved Word document on Mac, you can open the Word app again. If you enabled AutoSave, it would allow you to recover a lost Word document on Mac due to a forced exit or power outage.
What if you can’t find the Word document you need? Just check files from the Autosave folder or Temp Folder. If it’s not available, you can also use Stellar Data Recovery Professional to recover an unsaved Word document on Mac in a few clicks.
Let?s look through all the solutions in more detail.
How to Set Up AutoRecovery?
AutoSave is a Microsoft Office feature that allows automatically recovering an unsaved Word document on Mac. By default, it will save a Word document every 10 minutes. Just make sure the feature is enabled. To do that:
- Go to Preferences.
- Output and Sharing.
- Save.
- Adjust the options in Save every 5 minutes.
Recover Unsaved Word Documents on Mac with AutoRecovery
Commonly, reopening Microsoft Office Word on your Mac is all that is required to recover an unsaved Word document. Then, a Document Recovery window will appear, allowing you to retrieve the unsaved Word file you were working on before the Microsoft Word crash. If that doesn’t work, you can manually locate the auto-recovered Microsoft Word documents on your Mac.
How to find AutoRecover Word files on Mac?
Method 1: Use the Finder to look for AutoRecover files
- Launch the Finder.
- In the top-right search box, type “autorecovery.”
- The Finder will then automatically display all files that contain the word.
Method 2: Use the folder path to find AutoRecover files
- Launch Finder.
- Go to Folder by selecting the Go menu at the top.
- Enter the file path that corresponds to your Word version.
- On Microsoft Office 2019/2016/Office 365 in 2020/2021:
~/Library/Containers/com.Microsoft/Data/Library/Preferences/AutoRecovery
- On Microsoft Office 2011:
~/Library/Application Support/Microsoft/Office/Office 2011 AutoRecovery
- On Microsoft Office 2008:
/Documents/Microsoft User Data/Office 2008 AutoRecovery
6 Other Ways to Recover Unsaved Word Documents on Mac
I. Recover Word Documents from the Mac’s Temporary Folder
macOS stores temporary files to serve users of applications such as Word better. When the program exits, it usually deletes the temporary files. However, it may be unable to do so if an app abruptly terminates. As a result, the lost Word document could still be found.
Here is how to recover unsaved Word documents on Mac using Terminal:
1. Go to the Finder > Applications > Utilities >Terminal.
2. Enter $TMPDIR in the command line.
3. Locate files beginning with Word in the Temporaryitems folder.


4. When you’ve located the unsaved Word document you’re looking for, go to File > Save As to save it to the desired location.
Have you managed to recover an unsaved Word document on a Mac? If you haven’t been able to recover an unsaved Word document, don’t give up and proceed to the next solution listed below.
II. Recover Word Document that Wasn?t Saved on Mac from Trash
When Mac restarts, it may occasionally move temporary files to the Trash bin. As a result, you can recover an unsaved Word document on Mac from the Trash’s Recovered items folder.
Here is what to do to recover your files from Trash:
- On your Dock, select the Trash icon.
- Find the needed file and click on the Put back button.
Hopefully, you can recover the unsaved word document on Mac by following these simple steps. If it’s still not working, you can use Time Machine to recover word documents or try to restore the previous version of the lost files, as we’ll see next.
III. Recover a Replaced Word Document on Mac
Suppose you replaced the needed file with another Word document. In that case, you can recover a replaced or overwritten file by opening the current version and checking the Version History to see if the earlier version you require is still available.
If that didn?t help recover lost, unsaved, or overwritten Word files with Time Machine or special Mac recovery software.
IV. Recover Text from Damaged Word for Mac File
If your Word for Mac file is damaged, you can recover or repair the text.
The steps are as follows:
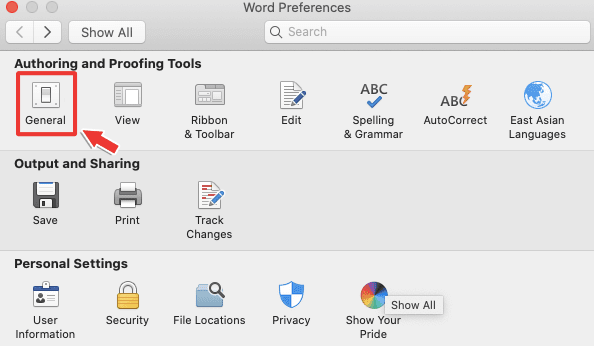
1. Click the Word menu from the Menu bar, then choose Preferences.
2. Under Authoring and Proofing Tools, click General.

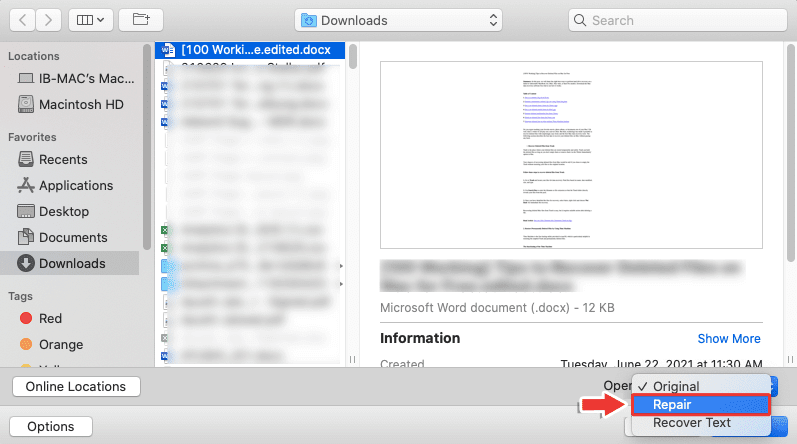
3. Select the Confirm file format conversion when opening the checkbox, then close the window.
4. Navigate to File > Open.
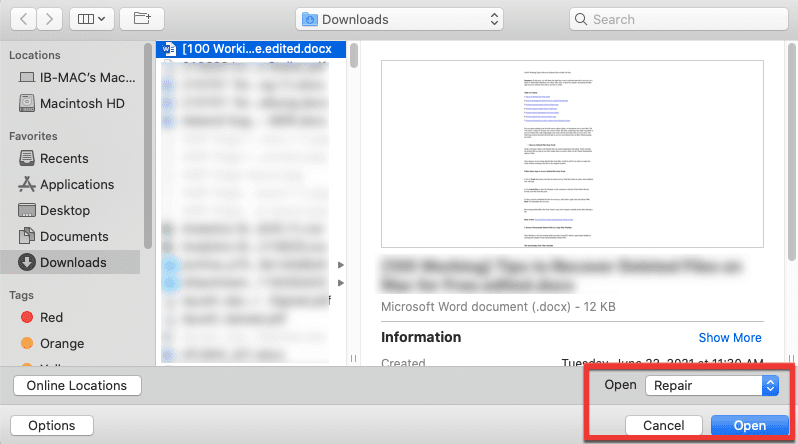
5. In the bottom-right corner, click the Open menu, and select Recover Text or use Repair.

6. Click the Open button to open the recovered or repaired Word file.

V. Recover Lost Word files on Mac with Time Machine
Here’s how to recover deleted or lost Word documents on Mac using Time Machine backup files:
1. Connect the disk with Time Machine backup to the Mac.
2. Open the folder containing the deleted Word files.
3. You can access Time Machine by clicking the Time Machine icon in the upper-right corner or by going to Launchpad > Other > Time Machine.
4. Find the deleted or lost Word files you want to restore using the timeline and arrows.


5. Choose the file and press the Restore button.
6. The recovered Word document should be visible in its original location.
VI. Recover Word File Using Stellar Data Recovery Professional
Another option for recovering a lost Word file is to use Mac data recovery software to recover your lost data. Professional data recovery software, such as Stellar Data Recovery Professional, can help you recover lost files on your Mac. It’s a helpful tool that can help you recover your files no matter when you lose them.
To recover lost data, follow the steps below:
1. Download the Stellar Data Recovery Professional for Mac software.


2. After the installation, you will be prompted to select the data you wish to recover.
3. Select the Documents option.


4. Then, decide where you want to recover the selected files from.


5. After the Stellar Data Recovery scan, you will be able to see the files that can be recovered and choose which ones you require.


6. Finally, select the destination folder on your Mac and begin the recovery process.
Wrapping Up
This guide will show you how to recover an unsaved Word document on a Mac. You can now recover your lost files on your Mac using Mac solutions and Stellar Data Recovery Software, which provides an easy way to recover all types of files.
Read more:


