Summary: The newest macOS version installations are always a risky bet. In this article, we will guide you on how to downgrade from macOS Ventura to Monterey. If you’re not willing to lose your files during the downgrade process, ensure you have software like Stellar Data Recovery Professional to get your files back.


Contents
The most recent version of macOS Ventura includes many features, such as enhanced searches and quick actions, as well as a Mail app that supports canceling and scheduling emails. However, like any other latest macOS version, macOS 13 may also have some bugs.
You always want to install the latest version of macOS to enjoy the new features and updates. However, you may find that your system does not work correctly after you have gone through the update process.
Luckily, if you need to, you can revert to the previous version of macOS you were using. Do you have questions about how to roll back to macOS Monterey? Keep reading! We’ll walk you through downgrading macOS Ventura to an older version.
How to Prepare Your Mac Before Downgrading from macOS Ventura to macOS Monterey
When you roll back the OS, all data on the computer will be deleted. That is why, in order to start rolling back from macOS Ventura to Monterey, you must first prepare your Mac.
To make sure your important files are preserved, it is recommended to back up your important data. In case of data loss, you can easily retrieve them all from your macOS backup.
Here is how to use Time Machine to create backups for your Mac:
- Plug in the external hard drive or Time Capsule
- Launch Time Machine by going to Apple Menu > System Settings > General > Time Machine > Add Backup Disk.

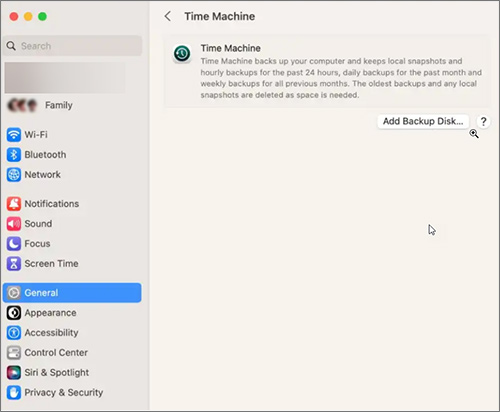
- Select the backup disk and click the Use Disk button.
Done. Your most recent system backup is now available in Time Machine.
Downgrade from macOS Ventura to Monterey
Rolling back from macOS Ventura to macOS Monterey can be accomplished in a number of ways. Below we have outlined the easiest methods to install macOS Monterey on your MacBook.
I. Downgrade macOS Ventura Using Time Machine
It is the simplest solution if you have a recent Mac backup. In fact, a backup should be the first step of any significant macOS upgrade.
- Connect the external drive that contains the copy of the OS you wish to restore.
- Choose Apple menu > click Restart.

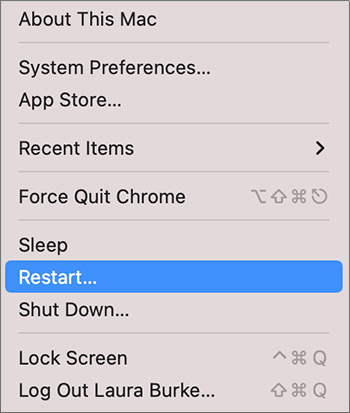
Then press the following key combination now:
- When the Apple logo appears, keep holding down Command + R on an Intel-based Mac.
- If you use an M1 Mac, press and hold the Power button on your Mac till you see the initial screen appearing. In the next menu, select Options > Continue. And choose Restore from the Time Machine Backup option.

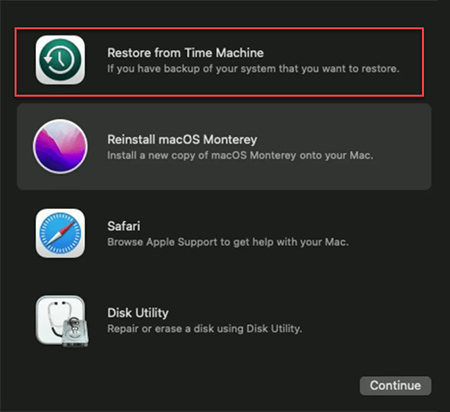
3. Follow the on-screen instructions to restore the needed macOS version.
II. Downgrade macOS Ventura Using Recovery Mode
If the above method does not work or you do not have an up-to-date backup copy from a previous version to restore, you can use the default Apple features.
Note: When restoring using this method, all user data on the Mac will be deleted. If you need to save some important files, do it manually before starting the restore.
Here is how to restore macOS Monterey using Recovery Mode:
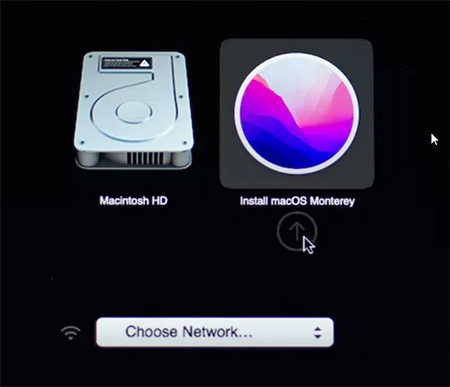
- Reboot your Mac and hold Command + Option + R (on a Mac with an Intel processor) or the Power button (on a Mac with an M1 processor) while turning it on.
- After your computer boots into Recovery Mode, select Reinstall macOS Monterey. It will download the latest up-to-date version of macOS.

- Follow the instructions you see on your screen and install macOS Monterey.
- If an error occurs during reinstallation, you need to remove your Mac device from your Apple ID account using another device.
- After a while, you will get a Mac with clean macOS Monterey installed without user data or settings.
III. Downgrade macOS Ventura Using Bootable Media
A bootable disk or USB flash drive is the most convenient option for installing an old stable system. In this case, the installation will occur as quickly as possible, even without the internet.
- Prepare the macOS Monterey bootable disk.
- Connect your bootable drive to your computer and turn off your Mac.
- Turn on the computer again while holding the Option button on the keyboard.
- You will see a list of disks from which it is possible to boot.

- Select the external drive with the installation of macOS 12.
- Follow the on-screen instructions to finish the installation.
Final Step: Recover Files with Stellar Data Recovery Professional
If you don?t have a backup of your Mac files, you can use data recovery software to get back files lost due to the Mac downgrade. Stellar Data Recovery Professional for Mac is the best way to regain your Mac data. It supports all internal and external drives, SD cards, USBs, and other storage devices. The software can recover files that have been formatted, deleted, hidden, corrupted, or broken. No matter the data’s state, the data can be recovered in any format.
Here is what to do to recover your files:
1. Download Stellar Data Recovery Professional and install it on your Mac.


2. Select Recover Everything in the ‘Select What To Recover’ screen, then click Next.


3. In the ‘Select Location’ screen, choose Macintosh HD, toggle Deep Scan on, and then click Scan.


4. Preview the files and select the necessary ones following the scan & select Recover.


6. Specify an external hard drive to store the recoverable files, and click Save.
Wrapping Up
While it’s exciting to be the first to try something new, it comes at a cost. While enjoying the features of macOS 13 Ventura, various errors can ruin your experience. So it is better to go back to the previous version and wait for Apple to roll out all the bug fixes. The rollback procedure is generally easy than it might seem at first glance. Moreover, if you make a backup copy of your files or have data recovery software handy, you can always restore your Mac without any problems.
Read more:


