Summary: Exchange Server migration is a complex task and can take significant amount of time and resources, especially when you need to migrate from Exchange Server 2007 to the latest Exchange 2019. In this guide, we’ve discussed the step-by-step procedure to help you migrate from Exchange Server 2007 to Exchange Server 2019. We’ve also mentioned about an EDB to PST converter software that can directly export mailboxes from Exchange Server 2007 to Exchange Server 2019 in a few clicks, thus simplifying the migration process.


If you?re still running Exchange Server 2007, it is important to migrate to a newer Exchange Server as soon as possible for compatibility and security reasons. Exchange Server 2007 has been out of support and end-of-life for quite some time now. Apart from this, if you have any problems and seek the assistance of Microsoft, you will not get any for Exchange Server 2007.
In this guide, we?ll be discussing the step-by-step procedure for Exchange 2007 to 2019 migration.
Before migration to Exchange Server 2019, there are a lot of things to consider, such as:
- Active Directory Forest/Domain Level
- Operating System
- Client Application Tools
- No Unified Messaging (UM)
- Server Resources
However, the first thing to check is the co-existence of the servers.
Unfortunately, Exchange Server 2007 and Exchange Server 2019 cannot exist in the same Active Directory forest. In such a case, you need to jump to another Exchange Server i.e., Exchange Server 2013. This means that you need to first upgrade to Exchange Server 2013 and then migrate to Exchange Server 2019. This will take a considerate amount of time and resources.
If you have Lync Presence Integration and Instant Messaging with Exchange Server, Lync Server 2013 Cumulative Update 10 or later is required. If you are integrating Skype for Business Presence and Instant Messaging with Exchange Server, Skype for Business Server Cumulative Update 7 or later is required.
Exchange Server 2007 needs to have the following updates/service packs to be able to co-exist with Exchange Server 2013:
- Update Rollup 10 for Exchange 2007 Service Pack 3 (SP3) on all Exchange 2007 servers in the organization, including Edge Transport servers.
- Exchange 2013 Cumulative Update 2 (CU2) or later installed on all Exchange 2013 servers in the organization.
Now you need to prepare the virtual machine to host the temporary Exchange Server 2013. The server must be compatible with the Active Directory forest and domain level of Windows Server 2003 forest functionality mode or higher. If this is not the case, then you need to upgrade the domain/forest level or the operating system hosting your Active Directory.
When this is complete, prepare the machine to host the server, which must be Windows Server 2012 R2. With regards to the specification of storage and compute, this must match the current Exchange Server 2007 and a bit more.
Once this is done and the installation of the operating system and Exchange Server 2013 is complete, you need to take care of some things first.
The client applications, i.e., Outlook 2007 onwards, are supported for Exchange Server 2013.
Once the installation is complete, you need to take care of the following to shift all your processes to the new server before shifting the mailboxes:
- Configure and install the Digital Certificates
- Exchange-related virtual directories configuration
- Offline Address Book (OAB) configuration
- Moving Internet mail flow from Exchange 2007 to 2013 from the routers
- Moving Client Access from Exchange 2007 to 2013
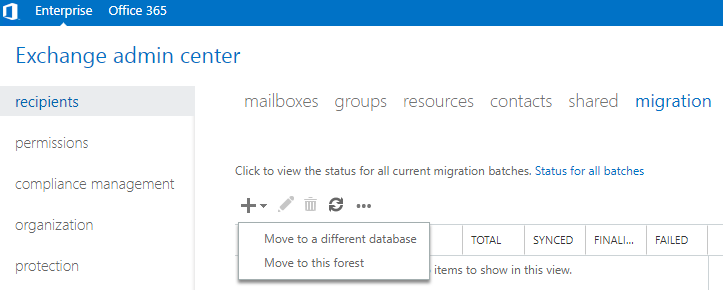
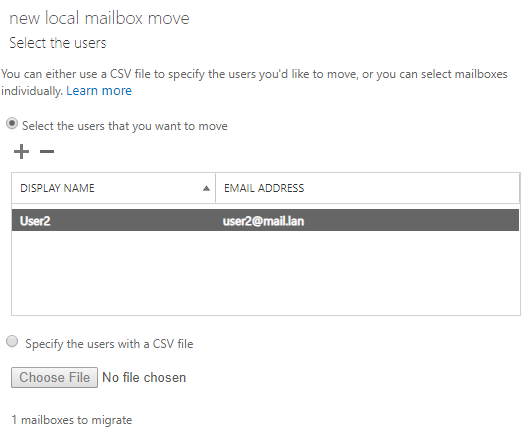
Once these are complete, you can start moving the mailboxes via the Exchange Admin Center (EAC) with a local move or via PowerShell using the command given below.

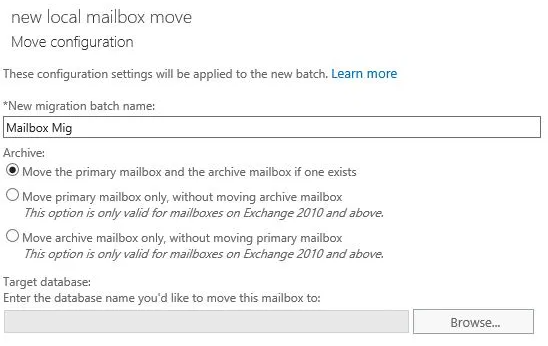
New-MoveRequest -Identity “user1@mydomain.local” -TargetDatabase “EX2013-MBX001”
Once this is done and all the mailboxes have been migrated, the next step is to uninstall and decommission the Exchange Server 2007.
After that, install the Exchange Server 2019. For this, you need to consider the following things:
- In Exchange Server 2019, you do not have any Unified Messaging (UM). It means that if you have Lync or Skype for Business Server, you will lose the ability to save voicemail messages in your mailboxes and an alternative needs to be found, like CX-E or Azure Voicemail on Office 365.
- Another thing to consider is the clients which are supported. With regards to Outlook clients, Outlook 2013, 2016, and 2019 are supported.
- The Active Directory Domain and Forest Level must be Windows 2012 R2 or higher.
- The preparation of the machine must be considered with the basic requirements of Exchange 2019, including storage and compute.
The next step is to install the pre-requisites, after installing Windows Server 2019 and all the updates. To do so, open PowerShell cmdlet and type the following:
Install-WindowsFeature NET-Framework-45-Features, RSAT-ADDS, RPC-over-HTTP-proxy, RSAT-Clustering, RSAT-Clustering-CmdInterface, RSAT-Clustering-Mgmt, RSAT-Clustering-PowerShell, Web-Mgmt-Console, WAS-Process-Model, Web-Asp-Net45, Web-Basic-Auth, Web-Client-Auth, Web-Digest-Auth, Web-Dir-Browsing, Web-Dyn-Compression, Web-Http-Errors, Web-Http-Logging, Web-Http-Redirect, Web-Http-Tracing, Web-ISAPI-Ext, Web-ISAPI-Filter, Web-Lgcy-Mgmt-Console, Web-Metabase, Web-Mgmt-Console, Web-Mgmt-Service, Web-Net-Ext45, Web-Request-Monitor, Web-Server, Web-Stat-Compression, Web-Static-Content, Web-Windows-Auth, Web-WMI, Windows-Identity-Foundation
In the command prompt, type the following to prepare the Active Directory for the installation.
Setup.exe /PrepareSchema /IAcceptExchangeServerLicenseTerms
Setup.exe /PrepareAD /OrganizationName:?Contoso? /IAcceptExchangeServerLicenseTerms
From here on, the installation is straight forward. Once complete, you need to do the following things:
- Import all certificates
- Set all the URLs, like Outlook Anywhere, OWA, ECP, Web, ActiveSync, Offline Address Book and MAPI
- Start moving the databases

The same method applies be it the Exchange Admin Center (EAC) or PowerShell.

Once this is done and the emails are being routed to the new Exchange Server, you can now decommission the Exchange Server 2013 and the process would be complete.
What if there was a simpler and safer way?
You can use EDB to PST converter by Stellar to migrate from Exchange 2007 to Exchange 2019 in a quick and secure way. With this application, you can safely decommission the Exchange 2007, install the new Exchange Server 2019, and import the mailboxes and public folders directly from the EDB into the live Exchange Server database.


