Migrating mailboxes from on-premises Exchange Server to Office 365 is easy and straightforward. However, when it comes to migrating public folders, the process is relatively complex and time-consuming as involves a set of scripts and procedures that require a lot of preparation work and resources. In this post, we will be explaining the stepwise process to migrate Exchange 2019 public folders to Office 365.
Process to Migrate Exchange 2019 Public Folders to Office 365
Here’s the step-by-step process to migrate public folders from Exchange Server 2019 to Office 365.
1. Fulfil the Prerequisites
Before starting the migration, you need to ensure the following:
- The traffic between the server and the internet is open and there are no bandwidth restrictions.
- The Exchange Server and the underlying operating system are updated.
- There are no scanning or backup jobs running during the migration.
- The Active Directory is prepared if you have the Exchange Server 2019 migrated from an Exchange Server 2013 or 2016.
- The user performing the operation must be a member of the Organization Management Role Group on the local Exchange Server and Exchange Online.
In addition, here are some considerations you need to keep in mind:
- There is a limitation of 1000 public folder mailboxes in Office 365.
- MRS proxy is required and must be enabled on Exchange Server 2019.
- Migration can be done and executed from the Exchange Management Shell (EMS).
- The migration batch cannot have multiple migration batches running simultaneously.
- The user performing the migration cannot have the Multi-Function Authentication (MFA) enabled.
- Each public folder cannot exceed the 25 GB size limit.
2. Download the Scripts
To start the migration process, you need to first download the migration scripts from the Microsoft website.

Then, extract the files into C:\Scripts\PFMigration or any folder of your choice.
3. Create the Accepted Domain
Now, you need to add the Office 365 domain as an accepted domain in the local Exchange Server.
New-AcceptedDomain -Name PublicFolderMigration -DomainName mycompany.onmicrosoft.com

4. Clean Up Process
The next step is to clean up the local public folders from unnecessary data, run a retention process, and take a backup of the public folders. This will ensure that the migration will be faster and that only the needed data is migrated.
You need to remove any started, completed, or locked public folder migrations and any listed public folder migration requests. To do so, use the below command:
Get-PublicFolder -Recurse -ResultSize Unlimited | Where {$_.Name -like "*\*" -or $_.Name -like "*/*"} | Format-List Name, Identity

5. Remove any Locks on Public Folders
You need to also remove any migration locks on the public folders. For this, run the below command:
Set-OrganizationConfig -PublicFoldersLockedforMigration:$false -PublicFolderMigrationComplete:$false -PublicFolderMailboxesLockedForNewConnections:$false -PublicFolderMailboxesMigrationComplete:$false

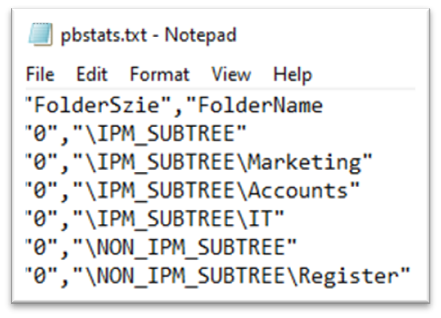
6. Get the Local Public Folders Statistics
Now, you need to get the local public folder statistics. From the downloaded scripts, you can run the Export-PublicFolderStatistics.ps1 command to get the results (see the example below).
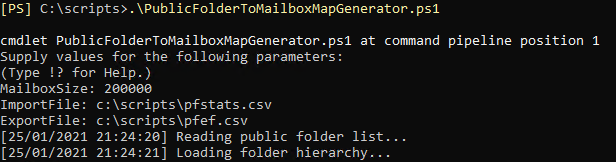
7. Generate the Source to Destination Mapping File
You need to run the PublicFolderToMailboxMapGenerator.ps1 to generate the mapping file.
8. Create Empty Public Folders in Office 365
Next, you need to run the script to create the local public folders, from the files you created, into the Exchange Online. For this, use the Create-PublicFolderMailboxesForMigration.ps1 file. When executing this command, you will be asked to enter the Global Admin of your Exchange Online.
.\Create-PublicFolderMailboxesForMigration.ps1 -FolderMappingCsv pfef.csv -EstimatedNumberOfConcurrentUsers:<estimate number>
9. Start the Synchronization
After creating the local folders in Exchange Online, you need to synchronize the data from the local server to the cloud.
To synchronize the mail-enabled folders, you can run the following command:
.\Sync-MailPublicFolders.ps1 -Credential (Get-Credential) -CsvSummaryFile:log.csv
10. Add Local Credentials and URLs
Next, you need to add the local credentials. To do so, execute the below command:
$Source_Credential = Get-Credential <MyDomain\MyPublicFolderAdministrator>
To input the Outlook Anywhere URL for the server, Remote Public Folder DNS, and the Remote Mailbox legacy DN, you can run the below commands:
$Source_OutlookAnywhereExternalHostName = "<URL>"

$Source_RemotePublicFolderServerLegacyDN = "<URL>"

$Source_RemoteMailboxLegacyDN = "<URL>"
11. Create the Migration Batch
Once this is complete, you need to create the migration batch. For this, run the following command:
$PfEndpoint = New-MigrationEndpoint -PublicFolder -Name PublicFolderEndpoint -RPCProxyServer $Source_OutlookAnywhereExternalHostName -Credentials $Source_Credential -SourceMailboxLegacyDN $Source_RemoteMailboxLegacyDN -PublicFolderDatabaseServerLegacyDN $Source_RemotePublicFolderServerLegacyDN -Authentication Basic

[byte[]]$bytes = Get-Content -Encoding Byte <folder_mapping.csv>

New-MigrationBatch -Name PublicFolderMigration -CSVData $bytes -SourceEndpoint $PfEndpoint.Identity -NotificationEmails <email addresses for migration notifications>
Then, run the Start-MigrationBatch command as given below.
Start-MigrationBatch <migration batch name>
You can confirm the status of the migration batch in the Exchange Admin Center (Online). When the Status is Synced, you can start the cutover and close the migration.
12. Close the Migration
Before closing the migration, you need to run last synchronization to take the changes from the seeding. Here’s the command to do so:
Complete-MigrationBatch PublicFolderMigration
Once this is done, you can decommission the local public folders.
Set-OrganizationConfig -PublicFoldersLockedForMigration:$true

Set-OrganizationConfig -PublicFolderMigrationComplete:$true

An Alternative Solution for Migrating Public Folders to Office 365
As you can see, the above process of migrating public folders from on-premises Exchange Server to Exchange Online is not very intuitive and requires technical expertise to execute successfully. To make the migration process simpler and more efficient, you can use a specialized third-party tool such as Stellar Migrator for Exchange. This powerful software helps you migrate user mailboxes, shared mailboxes, archive mailboxes, inactive mailboxes, and public folders directly to Office 365 or another live Exchange Server. It supports direct and secure migration of Exchange data, including public folders, without the need for complex scripting or manual configurations.
Conclusion
In Exchange Server environments, public folders are often used to store crucial organizational data. When transitioning to Office 365, it’s essential to migrate these public folders along with user mailboxes. While a manual migration process is available, it is often lengthy, complex, and prone to errors. To streamline and simplify the migration, Exchange Migration software offers a more user-friendly and reliable solution. It enables seamless migration of public folders and other Exchange data to Office 365 with minimal effort and downtime.