Summary: You may need to export the shared mailboxes to PST due to various reasons. In this post, we’ve mentioned different methods to export shared mailboxes to PST. Also, we’ve mentioned an EDB converter tool that can easily open EDB file of any Exchange version and export the mailboxes to PST and other file formats in just a few clicks.


Shared mailboxes are usually used for centralized mailboxes, which are shared with several people. One can also say that a shared mailbox is a common mailbox which can also have rules, configuration, and in-place archive. There is no difference between a shared mailbox and a user mailbox in functionality. However, the only difference is that there is no Active Directory user associated with shared mailbox. Since it?s a normal mailbox, the Exchange Server admin or the business would need to export the data of the shared mailbox to PST for various reasons, such as for archiving, decommissioning of the mailbox, and migrating to another server or cloud (Office 365 or Microsoft 365). In this post, we will be discussing different methods to export shared mailboxes to PST, along with the pros and cons of each method.
There are three methods to export a shared mailbox to PST:
- Using Outlook
- Using Exchange Admin Center (EAC)
- Using Exchange Management Shell (EMS)
1. Using Outlook
You can use Outlook to export shared mailbox to PST. However, it is not much recommended as Outlook would crash when dealing with large mailboxes, apart from the fact that it?s a messy operation. You can use this process only when the other two choices don?t work. Here are the steps to export shared mailbox to PST via Outlook:
- Open Outlook.
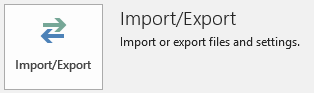
- Click on File.
- Click on Open & Export.

- Click on Import/Export.

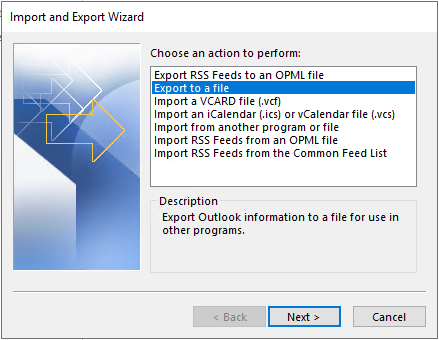
- Click on Export to a file and click Next.

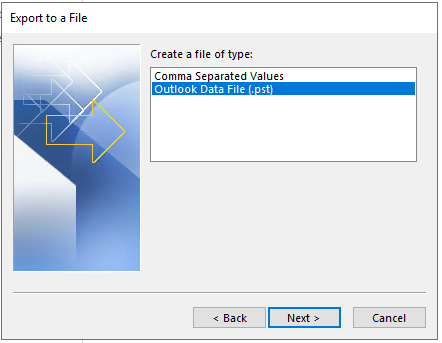
- Click on Outlook Data File (.PST) and click Next.

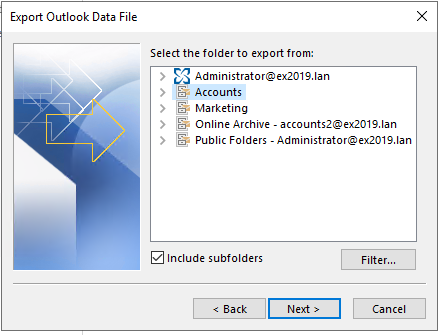
- Select the shared mailbox to export. Make sure to tick Include subfolders. If you wish to filter the export, click on the Filter. Once ready, click Next.

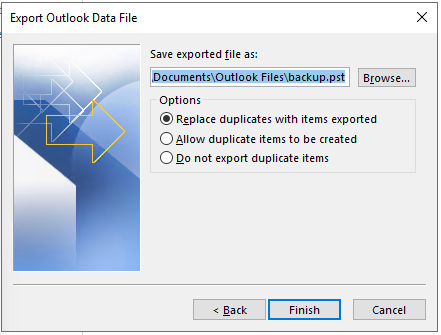
- Enter the filename or location and click Finish to start the export.

Once done, your file will be available.
To export mailboxes using the Exchange Admin Center (EAC) or Exchange Management Shell (EMS), you need to fulfil some requirements.These two methods share the same requirements:
- Creation of shared location
- Having the right permissions
Exporting Exchange mailboxes to PST using Exchange Server native tools required a shared folder. You cannot export to an absolute location, for example: D:\PST\mailbox.pst. You will need to provide a UNC Path, i.e., \\fileserver\pst\mailbox.pst. After this has been created, you need to specifically change the permissions to give the Exchange Trusted Subsystem and the user being used to export the shared mailboxes read and write permissions (see below).


The next step is to give the user which you will be using to export the shared mailboxes, the right permissions. Even if you are a domain administrator, you will still need to be part of the administrative role to export mailboxes.
This can be done using the Exchange Admin Center (EAC) or the Exchange Management Shell (EMS).
To assign roles and permissions using the Exchange Admin Center (EAC), follow these steps:
- After login, click on Permissions and Admin Roles.

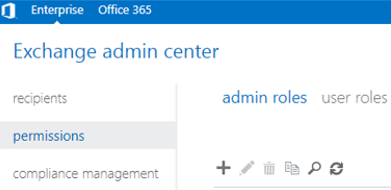
- Click on the Add button to create a new role.
- Find the Import/Export role and assign the user which will be exporting the mailboxes accordingly.
The Exchange Management Shell (EMS) method involves the use of PowerShell commands to achieve the same results. After opening the shell window, you will need to use the PowerShell command New-ManagementRoleAssignment as given below.
New-ManagementRoleAssignment ?Role "Mailbox Import Export" ?User "<Username>"

New-ManagementRoleAssignment -Role "Mailbox Import Export" -SecurityGroup "Organization Management" -Name "Import Export"

2. Export using Exchange Admin Center (EAC)
To export shared mailboxes using the EAC, follow these steps:
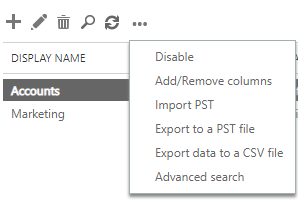
- After logging into the portal, click on recipients and then click on shared.

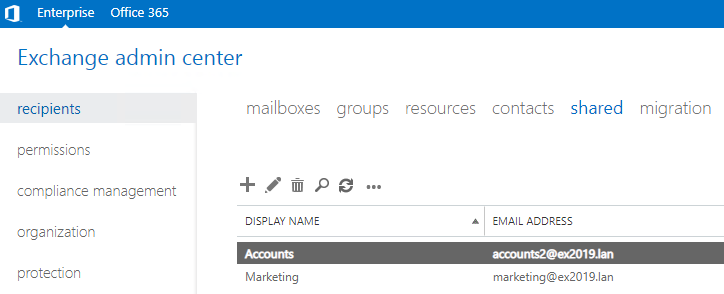
- Here, you will see a list of all the shared mailboxes. Click on the More button and click on the Export to a PST file.

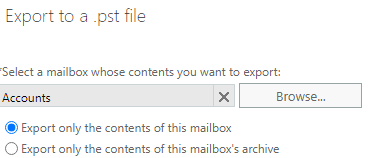
- Now you need to select if you want to export the main mailbox or the mailbox?s in-place archive. You cannot export both in one job. You need to select one. When ready, click Next.

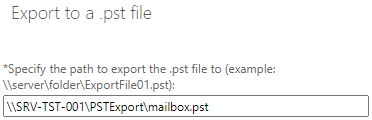
- Specify the path to export the file to. You cannot use an absolute path for your PST destination. A UNC path is required, along with the filename. Once done, click Next.

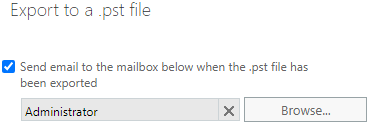
- If you wish to send a notification to a mailbox, you can select it here. Once ready, click on Finish.

3. Export using Exchange Management Shell (EMS)
After opening the link from your server or the Exchange Management Tools installed on your computer, you need to use the New-MailboxExportRequest command as given below.
New-MailboxExportRequest -mailbox <shared mailbox name> -filepath "<unc patch>"

To include or exclude particular folders in the shared mailbox, use the -IncludeFolder or -ExcludeFolder parameter (see below).
New-MailboxExportRequest -Mailbox "<shared mailbox name>" -Filepath "<unc path>" -IncludeFolders "#Inbox#", "#Outbox#"

To exclude folders:
New-MailboxExportRequest -Mailbox "<shared mailbox name" -Filepath "\\Exchange\PST_Export\User-a.pst " -ExcludeFolders "#Spam#", "#Outbox#"

The command also allows you to export by date or range using the -ContentFilter parameter, with -gt for greater than or -lt for less than (see below).
New-MailboxExportRequest -ContentFilter {(Received -lt '01/01/2020')} -Mailbox "<shared mailbox name>" -Filepath "<unc path>"

New-MailboxExportRequest -ContentFilter {(Received -gt '01/01/2020')} -Mailbox "<shared mailbox name>" -Filepath "<unc path>"

You can also export a date range by using the combination of both lt and gt and including the folder parameters too (see below).
New-MailboxExportRequest -ContentFilter {(Received -gt '01/01/2020') -and (Received -gt '01/07/2020')} -IncludeFolders "#Inbox#" -Mailbox "<shared mailbox name>" -FilePath "<unc patch>"

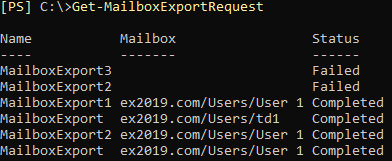
To check the progress of the export, use the command Get-MailboxExportRequest.

Conclusion
What do all these methods have in common? The Exchange Server must be online and the databases are mounted to export. You can export only one mailbox at a time with a limit of the PST file size. However, there is an easier and hassle-free alternative. You can use Stellar Converter for EDB ? Best EDB to PST Conversion software which can open multiple EDB files from any version of Exchange Server at once without having an Exchange Server installed. You can browse through the content and granularly export to PST and other file formats. The application can be used for migration purposes as it exports directly to a live mailbox database of any Exchange Server version and also to Microsoft 365.

