


How to Copy all Emails from One Shared Mailbox to Another Shared Mailbox?
October 9, 2025| 4 min read


Our content follows trusted Editorial Standards - accurate & unbiased.
Summary: In Exchange Server, the New-MailboxExportRequest cmdlet is used for exporting mailboxes or personal archives to PST. For running this command, you must have the Mailbox Import Export RBAC role. Also, you need a UNC network share to export the PST files. In this article, we will explain how to use this cmdlet in Exchange Server. We will also mention an EDB to PST converter software that can export mailboxes from EDB file to PST without the need of any additional permissions.
Free Download 100% SecureThe PowerShell command - New-MailboxExportRequest - exports mailbox or personal archive to a PST file onto a shared network path. This requires the Mailbox Import Export RBAC role, which is not even assigned to an Exchange Server Administrator. This article will cover all the aspects of the command, along with all the parameters.
This PowerShell command is used to export user mailbox, shared mailbox, or user archive to PST file. This is ideal for exporting and distribution copies, since PST file is portable and used in any Microsoft Outlook without specific logins or profiles. It is dependent on the Microsoft Exchange Mailbox Replication (MRS) service, As this command runs in the background. there is no need to leave the PowerShell window open.
This command is available only in on-premises Exchange Server - from 2010 SP1 till the latest Subscription Edition (SE).
Here are some commands related to mailbox export.
|
Command |
Purpose |
When to use it |
|
New-MailboxExportRequest |
Creates a new mailbox export request |
Exporting a new mailbox to PST |
|
Checks the status of export requests |
Monitoring progress or finding failed exports |
|
|
Removes completed or failed export requests |
Cleaning up after export completes |
|
|
Modifies or resumes a suspended request |
Resuming a failed or suspended export |
Here are some requirements you need to meet to use this command.
This role is required for running the New-MailboxExportRequest command. However, it is not assigned - by default - to any user, even to the Enterprise Administrator. Follow these steps to assign this role:
New-ManagementRoleAssignment -Role "Mailbox Import Export" -User username

You can also assign this role to a security group (a best approach). To do so, use the below-given command:
New-ManagementRoleAssignment -Role "Mailbox Import Export" -SecurityGroup "<group name>"

Once it is successfully executed, close the EMS and open it again.
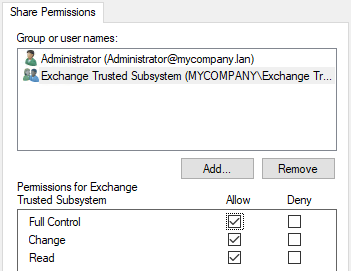
To be able to export a mailbox, you must have a share on a server. This must be created with the right permissions in hand. Here are the steps:

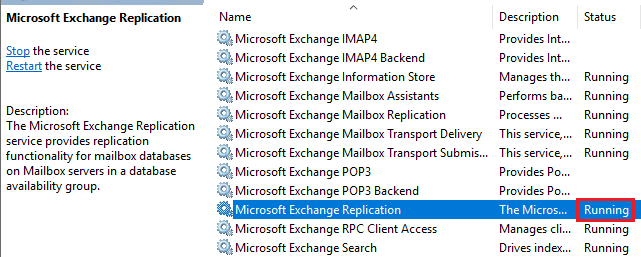
You should check that the service of the Mailbox Replication is running. This can be checked from Services Management window.
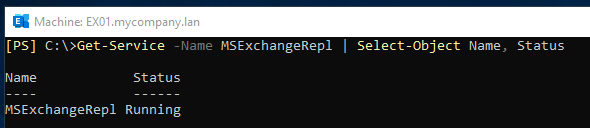
Alternatively, you can also check this by using the PowerShell command as given below.
If the service is not running, make sure that the service is started before exporting any mailboxes.
For more on MRS health monitoring, see Test-MRSHealth.
This is very important for the export success. You must make sure that there is ample space on the destination path.
Below is the full syntax of the command.
Let’s understand the different parameters used with the command.
|
Parameter |
Required? |
Description |
|
-Mailbox |
Required |
The mailbox to export. Accepts email address, alias, display name, or GUID. |
|
-FilePath |
Required |
UNC path for the output PST file. Must be a network share (e.g. \\server\share\Export.pst). Local paths not supported. |
|
-Name |
Optional |
Name for the export request. Default: MailboxExport. Use a unique name if running multiple exports for the same mailbox. |
|
-BadItemLimit |
Optional |
Number of corrupt items to skip before the export fails. Default: 0. Set to Unlimited for corrupt mailboxes. |
|
-LargeItemLimit |
Optional |
Number of items exceeding the maximum size limit to skip. Default: 0. |
|
-Priority |
Optional |
Request priority: Emergency, Highest, Higher, High, Normal, Low, Lower, Lowest. Default: Normal. |
|
-IncludeFolders |
Optional |
Export only specific folders. E.g. #Inbox#, #SentItems#, \Subfolder. |
|
-ExcludeFolders |
Optional |
Exclude specific folders from the export. |
|
-ContentFilter |
Optional |
Filter to export only specific items. E.g. {Received -gt "01/01/2024"}. |
|
-IsArchive |
Optional |
Switch to export the personal archive instead of the primary mailbox. |
Exporting a mailbox using this command can be used for various reasons. Let’s list a few common ones:
A single mailbox can be exported by using the below command.
New-MailboxExportRequest -Mailbox "<username to export>" -FilePath "<full UNC Path with file>"

For this, you have to use the -IncludeFolders parameter with the command (see below).

For exporting multiple folders in a mailbox, you can mention the folders’ name and separate them with commas (see the below command).

For this, you need to use the ContentFilter parameter with the Received condition by specifying the starting day, month, and year (see the below example).
New-MailboxExportRequest -Mailbox "<username to export>" -FilePath "<full UNC Path with file>" -ContentFilter {Received -gt "<yyyy-mm-dd>"}

You can use the command with the -IsArchive parameter, if you want to export only a user archive (see below).

For exporting a mailbox with bad items or corrupt items, you can add the BadItemLimit parameter at the end of the command, along with AcceptLargeDataLoss. This is required when having a count of over 50.
New-MailboxExportRequest -Mailbox "<username to export>" -FilePath "<full UNC Path with file>" -BadItemLimit <total number> -AcceptLargeDataLoss

You can use a CSV file (specifying the mailboxes) and file path with the command and PowerShell loop for exporting multiple mailboxes.
Here is an example of the CSV file:
Mailbox,FilePath
user1@mycompany.lan,\\ex01\PSTExports\user1.pst
user2@mycompany.lan,\\ex01\PSTExports\user2.pst
user3@mycompany.lan,\\ex01\PSTExports\user3.pst
Once the file is populated, run this command.

For exporting all the mailboxes, you can use the below-given script.
Get-Mailbox -Database "<database>" | ForEach-Object {
$alias = $_.Alias
New-MailboxExportRequest -Mailbox $_.Alias -FilePath "<\\server\share>\$alias.pst"}
This will export all the mailboxes and create PST files based on the aliases of users.
You have to use the command - Get-MailboxExportRequest to get the status of all export requests. If you want to see the status of a specific mailbox, use the command with the -Mailbox parameter (see the below example).
Get-MailboxExportRequest -Mailbox "<email address>
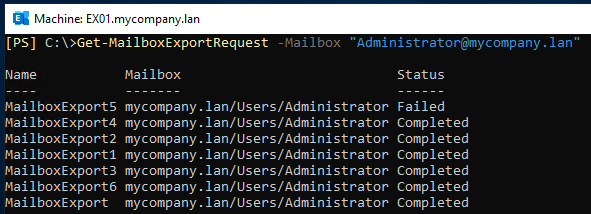
It will display the status as InProgress, Success, Failed, or Suspended. Let’s see their specific meaning.
|
Status |
Meaning |
Action needed |
|
Queued |
Request created and waiting to start |
No action needed — will start automatically |
|
InProgress |
Export is running |
Monitor with Get-MailboxExportRequestStatistics command |
|
Completed |
Export finished successfully |
Remove the request with Remove-MailboxExportRequest command |
|
Failed |
Export failed due to an error |
Check error with Get-MailboxExportRequestStatistics | fl * command |
|
Suspended |
Export was manually suspended |
Resume with Set-MailboxExportRequest -Status InProgress or Resume-MailboxExportRequest command |
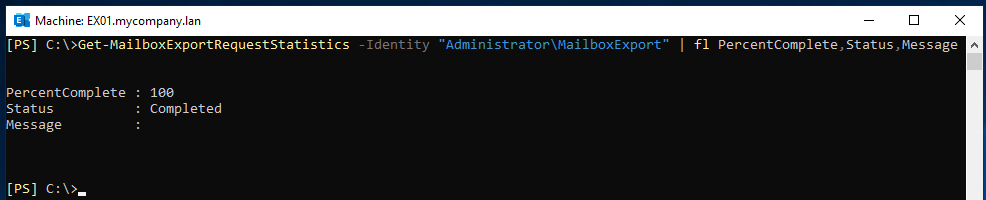
You can run the Get-MailboxExportRequest command with the Get-MailboxExportRequestStatistics command to see the percentage status of the export (see the below example).

To know the mailbox statistics of a specific user, use the below command.
Let’s have a look at some issues that you might face and the solutions to fix them.
|
Error |
Cause |
Fix |
|
Mailbox Import Export role is not assigned |
Assign the role by using New-ManagementRoleAssignment -Role "Mailbox Import Export" -User "admin" |
|
|
Error: Cannot open file because it is being used by another process |
Another export request is writing to the same PST file |
Use a unique -Name parameter or different -FilePath for each export |
|
Error: The file path must be a UNC path |
Using a local path (C:\) instead of a network share |
Change -FilePath to a UNC path: \\server\share\export.pst |
|
MRS service stopped or overloaded |
||
|
Export fails with BadItemCount exceeded |
Mailbox contains more corrupt items than -BadItemLimit allows |
Increase -BadItemLimit and add –AcceptLargeDataLoss |
Here are some challenges you may face while exporting the mailboxes using the above command:
Additionally, if the Exchange Server is not working, the database is not mounted, or there are issues with the server, you are not able to export the mailboxes. In such situations, you have to take then help of Stellar Converter for EDB - a specialized EDB to PST converter tool. You can open database - be it live or offline - from any version of Exchange Server and without any size limit. It allows you to save user mailboxes, user archives, shared mailboxes, disabled mailboxes, and public folders to PST and other file formats. There is also an option to export the mailboxes to a live Exchange Server or an Office 365 (Microsoft 365) tenant with automatic mailbox matching.
In this guide, we have explained how to export mailboxes to PST by using the command - New-MailboxExportRequest. The native command is best for a one-time export job or to export one mailbox at a time. You can use EDB to PST converter tool, like Stellar Converter for EDB to export multiple mailboxes to PST at a time. You can also export public folders and disabled mailboxes with this tool.
Senior Content Writer
This article was written by Shelly Bhardwaj, a Content Writer at Stellar Data Recovery.
Curious about our content creation process? Take a look at our Editor Guidelines.
October 9, 2025| 4 min read
October 9, 2025| 4 min read
October 9, 2025| 4 min read


 4 min read