


At times, Exchange admins need to move mailboxes from one database to another database. There could be many reasons why they need to move mailboxes from one database to another. Below are some common reasons:
- Storage Optimization
If a database, which is residing on a specific disk or volume, is running low on space or experiencing some performance issues, moving the mailboxes to a different database will reduce the size of mailbox database and help improve the performance.
- Load Balancing
If all the mailboxes are on a single database, moving the mailboxes across different databases depending on the size, department, or priority, can help prevent database overload. One can have multiple databases stored in different types of disks with different performance.
- Performance Optimization
If certain mailboxes, which would be used for systems and any production machines that are consuming resources, moving them to a different database or server with better performance will distribute the load on storage consumption and computing power.
- Hardware/Storage/Server Upgrades
When upgrading the server or moving to faster storage solution or drives, mailboxes need to be moved to databases stored on the new server or drives.
Whatever be the reason, let’s see how to move mailboxes from one database to another.
Methods to Move Mailboxes to Another Database or Server
There are two native methods to move mailboxes from a mailbox database to another database on the same server or another server. These are:
- Using the Exchange Admin Center (EAC)
- Using the Exchange Management Shell (EMS)
Let’s explore each option and their pros and cons.
Before proceeding, you should ensure that you have the necessary roles and permissions in the Exchange Server (see the below list).
- Organization Management
- Recipient Management
- Mailbox Move Management
- Help Desk
Method 1: Using the Exchange Admin Center (EAC)
The Exchange Admin Center (EAC) is the graphical user interface of the Exchange Server. Below is the stepwise process to move mailboxes to another database.
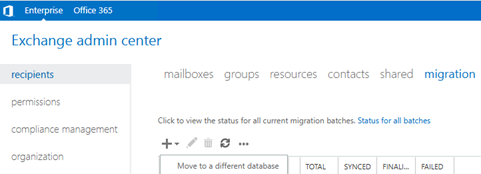
- Sign in to the Exchange Admin Center (EAC).
- Navigate to Recipients and click on migration.
- Select the mailbox you wish to move.
- Click on the + (plus) button and click on Move to a different database.
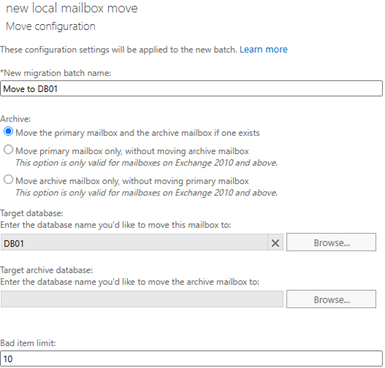
- Click on the + (plus) button to add the user/s to move to another database and click Next.

- Give a name to the batch.
- Select the option about the archive mailbox.
- Choose the Target database by clicking on the Browse button. You can also select the Archive database, if it applies.
- Select the Bad Item limit. By default, it is 10. This means that if there are up to 10 bad items in a mailbox, the mailbox move will continue. If the bad items are more than 10, the operation will be stopped.
- Once ready, click Next.
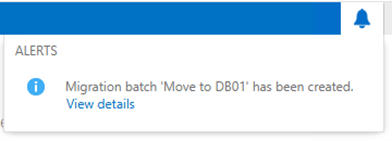
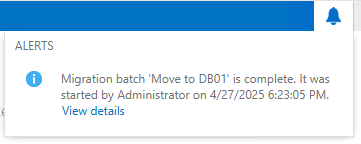
- Select the user to be notified about the operation and the batch options. When ready, click on New. The process will begin. You will be alerted in the Alerts tab on the top bar where you can see all the details.
- You can check the migration tab to see the details and monitor the mailbox/s move.
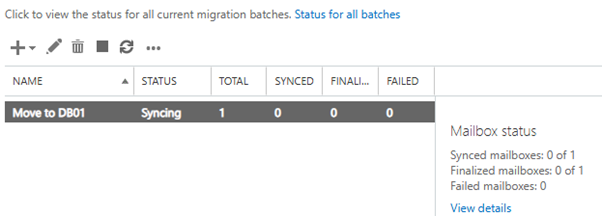
Once the operation is complete, the user selected during the move request will receive an email with the operation outcome.
Pros and Cons of the Above Method
Pros
- This method doesn’t involve any scripting.
- Easy-to-use.
- Less risk of errors.
- Simplified batch migration.
Cons
- Database must be online.
- Not so detailed reporting.
- Limited automation.
- Potential interface glitches.
- Limited control.
- Can only be used for user mailbox, shared mailbox, and archive.
Method 2: Using the Exchange Management Shell (EMS)
The Exchange Management Shell (EMS) is the command-line tool of the Exchange Server. You can use specific PowerShell commands to move mailboxes to another database - on the same server or same infrastructure.
To move a mailbox, you can use the New-MoveRequest PowerShell command (see the below example).
Here, Identity is the email address of the mailbox that is being moved and the TargetDatabase is the destination database.
Similar to the Exchange Admin Center (EAC), you have the below options:
- PrimaryOnly: To move the mailbox only.
- ArchiveOnly: To move the archive mailbox only.
- BadItemLimit: To specify the number of corrupted items to be moved.
- BatchName: To assign a name to the batch.
With the PowerShell command, you can get more options and more flexibility for scripting and automation. You can use the below parameters with the PowerShell command.
- AcceptLargeDataLoss
This will allow to move and continue the process if there would be significant data loss detections.
- SuspendWhenReadyToComplete
This will process the move request until the final step. It will pause the move request and will wait for the manual intervention of the administrator.
- LargeItemLimit
This will define the number of large items which can be skipped during the move request of the mailbox/s specified.
You can use the below command to check the status of move request.
Once the move request is completed, the entry doesn’t get automatically removed from the list. To do so, you need to use the below command.
Pros and Cons of the Above Method
Pros
- Detailed logging.
- Bulk migration.
- Automation.
Cons
- Database must be online.
- Manual cleanup.
- Performance impact.
- Potential data loss if not used correctly.
- Can only be used for user mailbox, shared mailbox, and archive.
Conclusion
When moving mailboxes to another database or server, you must use the right solution to ensure effectiveness and data integrity. Above, we have discussed two options to move mailboxes from one database to another. We have seen the pros and cons of the above options. Simplification is a very important aspect when moving data. To simplify the process, you can use Stellar Converter for EDB – a powerful EDB to PST converter tool that can independently open live and offline databases from any version of Exchange Server and of any size. It can granularly export user mailboxes, user archives, shared mailboxes, disabled mailboxes, public folders, and deleted/purged items to PST and other formats. It can export the mailboxes and other EDB file items to a live Exchange Server database with automatic mailbox matching, parallel export, and priority exports. This tool can also export directly to Exchange Online (Microsoft 365).


 4 min read
-to-Office-365-1733.jpg)


