
Contents
When you start your Mac, you presume everything will immediately mount and function as intended. However, after upgrading to macOS Ventura, you might encounter a problem in which an external HDD does not mount or function properly. Ideally, you should be able to solve your issue within a few minutes. However, drive or system errors and other factors might prevent this from occurring.
So if you are having issues with that external HDD not mounting on your Mac, then you are in the right place to find a solution.
Steps to Perform Before Fixing the Issue When External HDD Is Not Mounting on macOS Ventura
Before moving forward with the fix, you should create backups of your important data to ensure that it will be preserved even if something goes wrong.
In case something goes wrong, and your data is lost, you will be able to restore it all by making the backup created by macOS Ventura.
Using Time Machine to back up your Mac can be done in the following way:
- Connect the external hard drive or Time Capsule.
- To start Time Machine, navigate to Apple Menu > select System Settings > go to General > open Time Machine > choose the Add Backup Disk option.
- After selecting the backup disk to use, click the Use Disk button.
Done. The most recent system backup is currently stored in Time Machine.
Ways to Resolve the Issue When External HDD Is Not Mounting on macOS Ventura
I. Reinstall macOS Ventura
The simplest way to fix the issue is to reinstall the macOS.
Follow the next steps to reinstall macOS Ventura:
Step 1: Launch the macOS Recovery Mode on your computer:
If you are using a Mac with Apple silicon:
- Shut Down your Mac from the Apple menu.
- Press and hold the Power button until you see “Loading startup options.”
- After that, select Options, click Continue and proceed with the instructions on the screen.
If you are a user of a Mac powered by Intel:
- Select Restart from the Apple menu.
- Then immediately press and hold one of the following key combinations depending on what you want:
- Download and install the most recent macOS version suitable for your device: Option-Command-R.
- Reinstall the initial macOS version that came with your computer (along with any available updates): Option-Shift-Command-R.
- Command-R will reinstall the most recent version of macOS that you have.
Step 2: Click Continue after selecting Reinstall for your macOS release in the window that appears when you launch the Recovery app.
Step 3: Follow the instructions you see on your screen.
Step 4: In the section of the settings that allows you to choose a volume, choose the volume that is currently active on your macOS device (in most cases, this is the only option).
II. Mount External HDD Using Disk Utility
If the external HDD does not mount automatically, let’s try to do it manually using Disk Utility.
1. Open Disk Utility. To do that, find the Applications folder in the Finder > then choose Utilities.

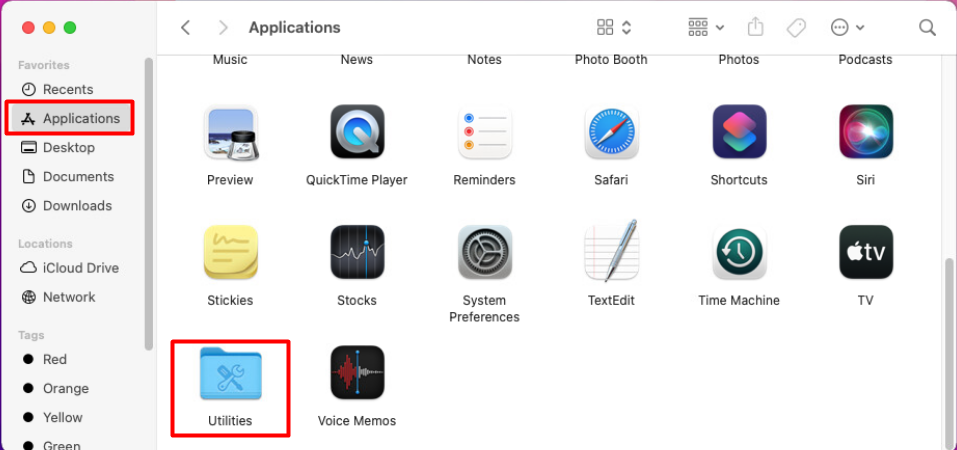
2. Find and select the needed HDD from the list and click Mount.


III. Repair a Disk by Using Disk Utility in Recovery Mode
You can check each of your disks by selecting the First Aid option from the menu. Using the First Aid feature of Disk Utility, it will be easier for you to locate and fix disk errors that are related to the formatting and directory structure of a disk.
First, start up Disk Utility while it’s in Recovery Mode.
Users of Macs with an Intel-based processor:
- Restart your Mac.
- While holding down Command, click the R key.
- After opening the macOS Utilities menu, choose Disk Utility from the available options on your screen.
If you are using a Mac that has Apple Silicon:
- Restart your Mac.
- Keep holding the Power button until the moment you see the Loading Startup Options screen.
- Select the Disk Utility after selecting the Gear menu.
The next step is to run Fist Aid to repair the external HDD
1. Select View from the Disk Utility menu > click on Show All Devices.

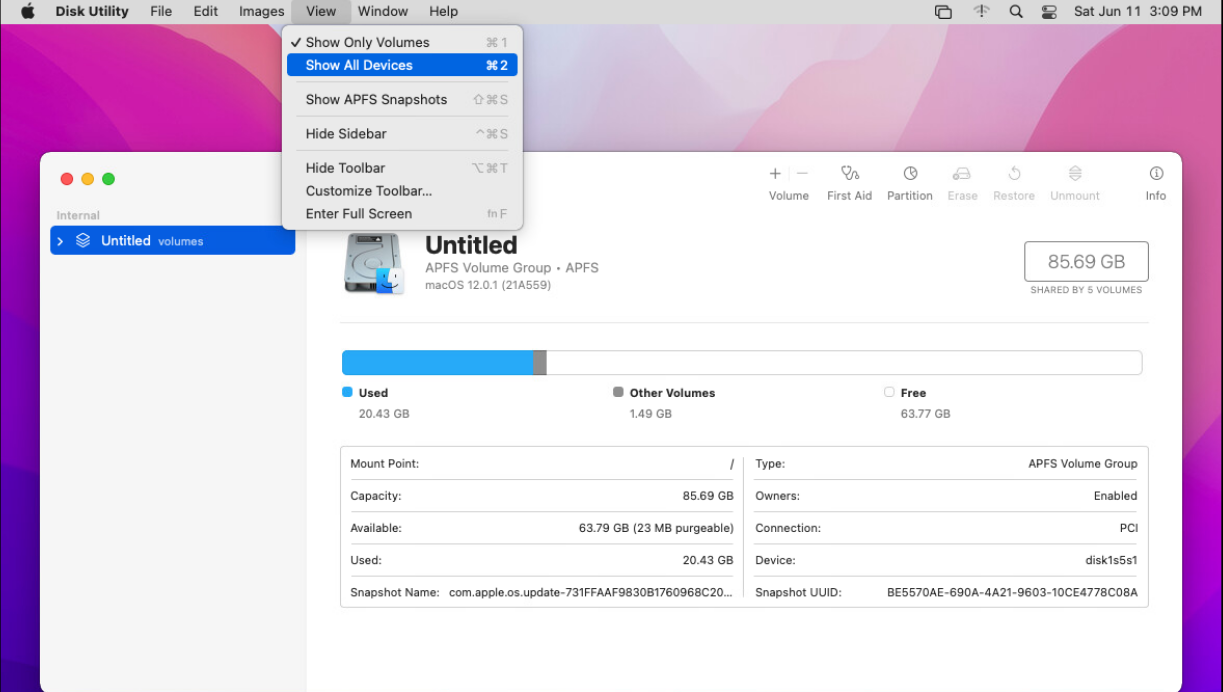
2. Choose the disk with the name of your HDD > click the First Aid button > click Run.
3. Restart your Mac to see if the issue is fixed.
IV. Use Terminal to Mount the external HDD
Using a Terminal is yet another method that can be used to mount the external HDD. To do that:
1. Launch Terminal by using Spotlight.
2. Type the command diskutil list into the Terminal command window. It will display each disk that is connected to the Mac. The next step is to locate the identifier for the required drive.


3. Once you have located the required disk, proceed to mount the hard disk by entering the following command: diskutil mount/dev/disk0.
Note: You should replace disk0 with the identifier of the external hard drive you want to mount.
How to Restore Files If Lost When Fixing the Issue with External HDD not Mounting on macOS Ventura
I. Restore Files with Time Machine
Once the procedure has been completed, it will be necessary for you to restore your Mac from the backup.
To accomplish this using Time Machine do the following:
- You can access the Utility window on a Mac with Apple Silicon by pressing and holding the Power key, or you can access an Intel-based Mac by pressing and holding the Command and R keys simultaneously.
- Select Continue after selecting Restore from a Time Machine backup.
- Choose the storage volume from which you wish to restore your files.
- Choose a date of the backup that is required.
- Select the disk you want to restore on your Mac, and click the Restore button.
- In the end, you should restart your Mac.
II. Restore Files with Stellar Data Recovery
1. Download and install Stellar Data Recovery Professional.


2. Open the app > select the file types you need to recover or just select the Recover Everything option > click Next.


3. When you have chosen the file types to recover, click the Next button.
4. Select the disk where to do a search for the lost data and click on Scan.


5. After the scan, perform a preview of the files and choose the required ones.


6. After selecting the required files, click on Recover to finish.
Wrapping Up
If your hard drive is not mounting on your Mac, you should now be aware of the various potential solutions as the problem is relatively fresh. If the instructions from the guide did not help you, you need to wait till the next macOS Ventura update, or you are likely dealing with a hardware issue, which can only be fixed by replacing the defective hardware.
Read more: