Summary: A tidy and organized Mac system undoubtedly enhances productivity. This article gives you many methods that you can apply for File Management to declutter your Mac system and keep all your files and folders organized as per your convenience. Using these methods will not only make your Mac user-friendly but also eliminate the chances of data loss.
File management on any system is nothing but a digitalized form of one of the essential steps of the KonMari Method? that is to organize similar items together to keep them within reach whenever you need them. The file management on Mac is no exception. Most people prefer a third-party software to accomplish the task of file management on Mac.
In this post, we will be discussing how to do file management on Mac without the help of any software. We will further provide answers to some popular queries, like ?what is the best way to manage files on a Mac?, ?how do I clean up my Mac without the software? and ?does Mac have a file manager?. So, let?s begin file management on Mac.
Use Finder for File Management on Mac
Finder is the primary solution that helps you find and organize the data on your iMac, MacBook Pro, MacBook Air, or Mac Mini. It is the first thing that appears once your Mac starts up. A blue square-shaped smiling face icon present in the Dock represents it.


A general view of Finder window is as under.

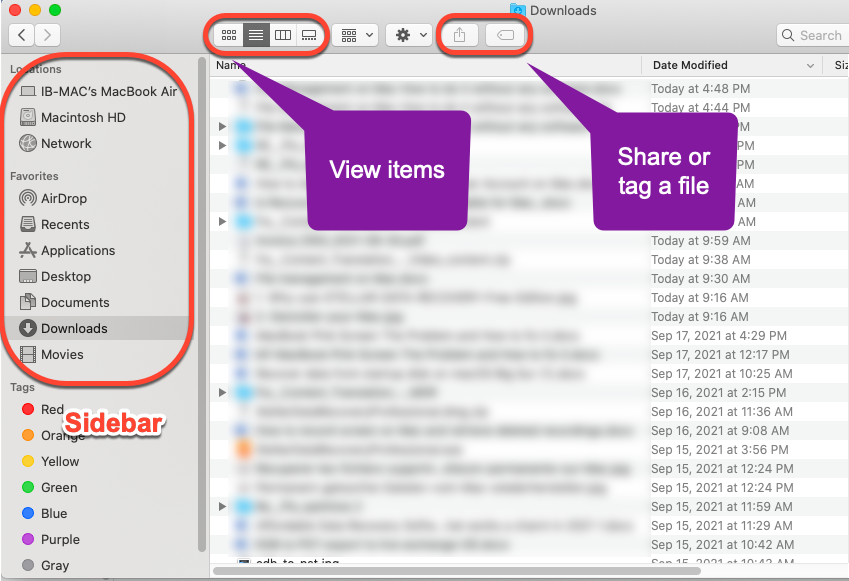
Here is the list of functions you can perform with the Finder application to manage and organize your data.
1. Utilize Finder as macOS File Manager
You can look out for desired folders, files, apps, etc. in the Finder sidebar section and make the sidebar further user-friendly by customizing it as described below:
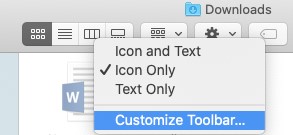
- Change the Toolbar Content: Click the ?View? tab and select ?Customize Toolbar?. Drag the desired items into the Finder toolbar or out of it. You can further choose to show or not to show the text with the concerned icon.

- Rearrange the Toolbar: Press and hold the ?Command? key and drag the desired item to a new location on the toolbar.
- Add or Remove File/App: Use ?Command? key (press and hold) to drag the item to the toolbar and wait until a plus sign of green color appears then release the item. Similarly, use the Command key to drag and drop an item out of the toolbar.
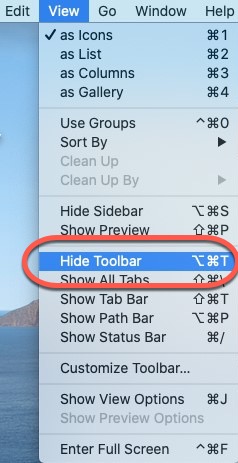
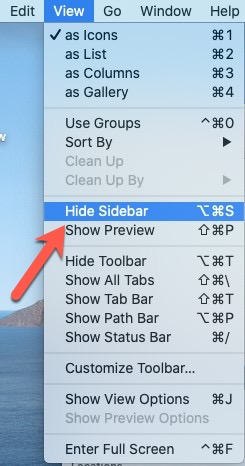
- Show/Hide Toolbar: Click on the ?View? tab of the finder and select ?Show Toolbar/Hide Toolbar?. You must know that hiding the toolbar would also hide the Finder Sidebar.

- Resize Toolbar: You can click on the >> button to expand your toolbar and see all the items present on it.
In the similar manner, you can customize the Sidebar as per your requirements:
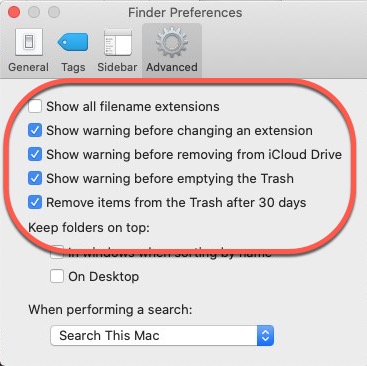
- Add Folder/Disk to Sidebar: Open the ?Finder? tab, select ?Preferences?, and choose the ?Sidebar? icon. From the list, check or uncheck the items as per your choice and close the Preferences tab to save changes.

- Hide/Show Sidebar: Click ?View? tab and choose ?Hide/Show Sidebar? option.

- Change Sidebar Content: Open the ?Finder? tab on the top left, select ?Preferences?, click ?Sidebar? option, and ?check/uncheck? the items as per your preferences.

- Rearrange Items in Sidebar: Drag items to drop them at preferred location.
- Resize Sidebar: Pull the right end of the divider bar to left or right.
2. Unclutter the Desktop through Stacks
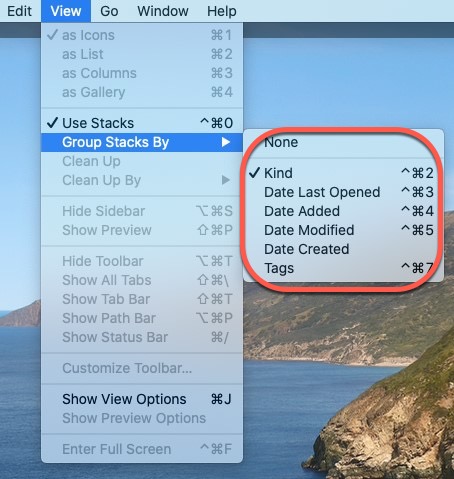
To arrange your files in defined and clear groups, you can utilize Stacks on the Mac. Group stacks the files according to type, date, tags, etc. You can further perform the undermentioned functions on your Mac.
- Open Stacks: Select the stack and double-click the file that needs to be opened.
- File Browsing inside the Stacks: Swipe right/left on the trackpad with two fingers to browse the files categorized under that stack.
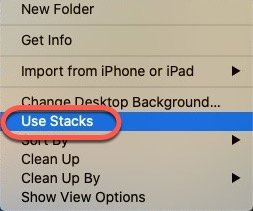
- To Turn the Stacks On: Press ?Command + Control + 0? or press ?Control + click Desktop? and choose ?Use Stacks?.

- Change Stacks Grouping: Click ?Desktop?, choose ?View?, select ?Group Stacks By?, and lastly, choose an option.

3. Smart Folders: Smarter Way to Organize your Files
The Mac systems provide the option of creating a ‘Smart Folder’ that could be customized as per your usage habit and file requirements. A smart folder contains a list of your files that have some matching properties. Here is how you can create a smart folder on your Mac system:
- Click on the ‘Finder‘ icon in the dock to open it.
- Click on the ‘File’ tab at the top left corner.
- Select ‘New Smart Folder’ from the dropdown list.


- To define the types of files to be included in your Smart Folder, set the first rule.

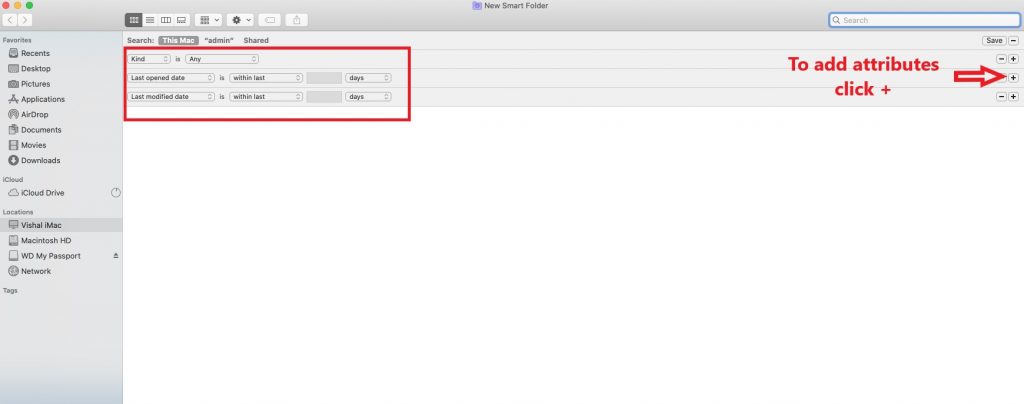
- You can specify any of the attributes – date of creation, file type such as Word doc or pdf etc., topic, a sentence, title/phrase, etc.
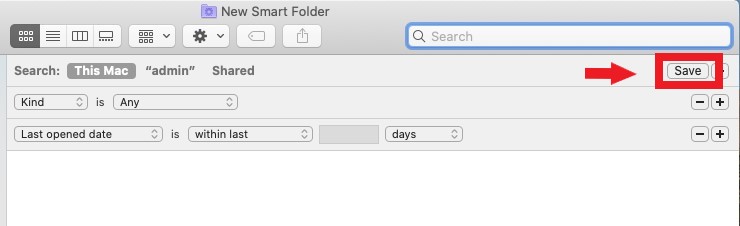
- Use ?Add Rule? (+) button to insert more than one attribute.
- Once you are done with the criteria, click ?Save?.

- Enter a name for your Smart Folder and specify the location to save it.

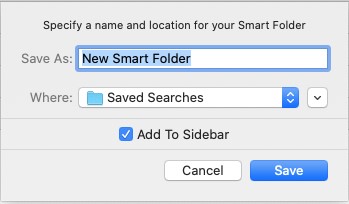
- To remove the smart folder from sidebar, uncheck the option ?Add to Sidebar? while saving the location of folder.
4. Create Folders to Manage your Files
Apart from the option of using Smart Folders, you can also use simple folders to arrange your files in an organized manner. Creating a folder and adding files into it is quite simple. The process is as follows:
- Open ?Finder? from the dock by double-clicking the finder icon.
- Choose the destination where you want to create the folder.
Note: You can directly create a folder on the desktop by clicking on the desktop.
- Select the File tab and click on the New Folder option.

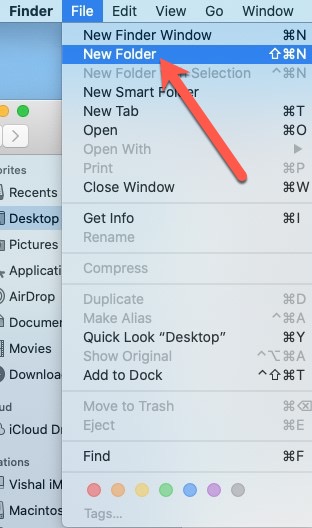
Note: You cannot create a new folder at the desired location if the New Folder command is dimmed.
- Designate a name to the created folder and click ?Return?.
Once the folder is created, you can move your files into it using the drag-drop or copy-paste option.
Note: If you need to create a folder for a group of files, select all the files, press Control + Click, and choose New Folder. Lastly, enter the name of the folder and click Return. The files you selected are grouped into this new folder.
5. Manage Files/Folders on iCloud
iCloud is a free online storage feature of Apple that allows you to access data from multiple Apple devices, like Mac computers (OS X 10.10 and above), iOS devices (iOS 8 or later), and even Windows devices with iCloud. However, iCloud first needs to be set up on your device that requires a valid Apple ID. You can set up iCloud on your device by following these steps:
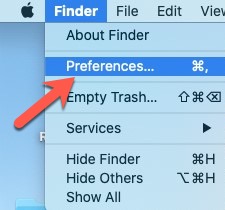
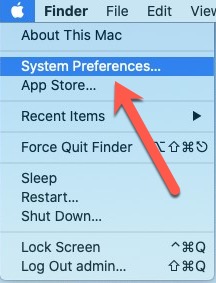
- Click the Apple menu on your device and select System Preferences.

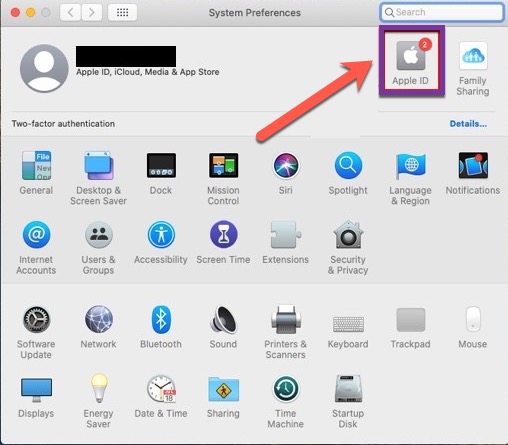
- Click Apple ID and select iCloud from the sidebar.


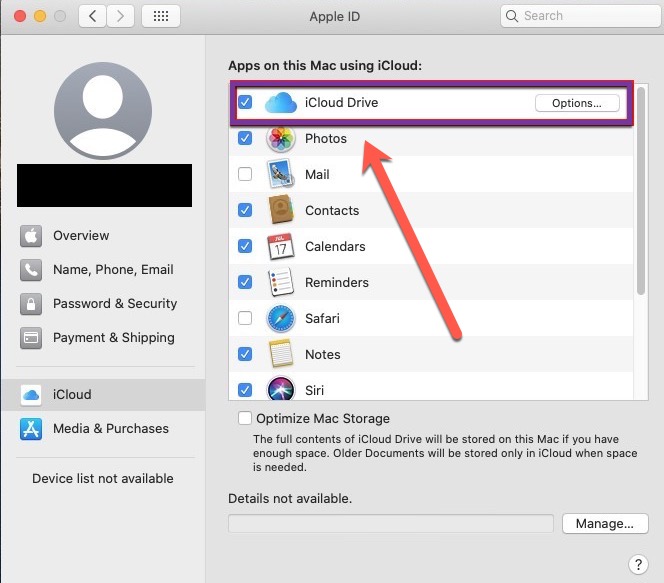
- Click on the ?Options? tab in front of ?iCloud Drive?.

Note: If you are asked to Update, it means you haven?t used the iCloud feature yet. Upgrade to move the data currently stored in iCloud to iCloud Drive.
- To store your data on iCloud Drive again, click the Apple menu and choose the System Preferences option.
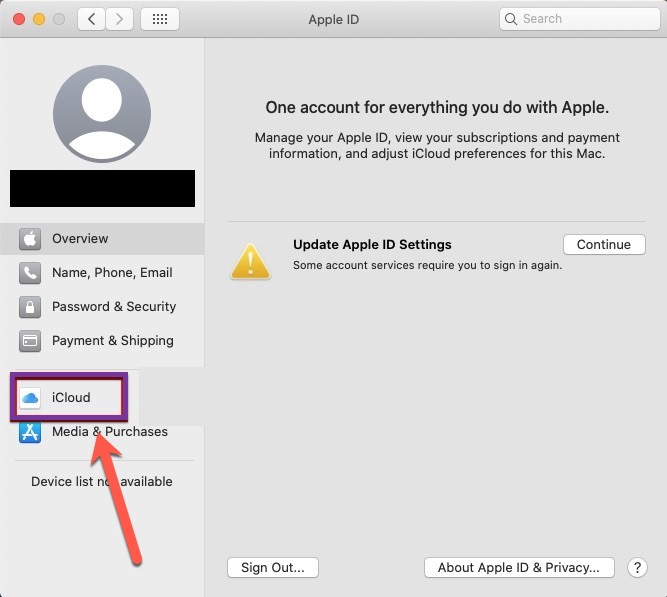
- Click on Apple ID and select iCloud in the sidebar.
- Click the ?Options? tab adjacent to the iCloud Drive tab.
- Select the ?Desktop and Documents Folders? option and press ?Done?.
Now, your Desktop and Document folder would appear under the iCloud Drive section of the Finder Sidebar. You can access them from any of your devices with iCloud services available.
6. Delete Files/Folders on Mac
To free up space on your Mac?s drive, you should get rid of unnecessary files and folders from time-to-time. Deleting files and folders on Mac is simple. Drag the item to the trash bin located in the Dock and drop it. You can also select the item and click Command + Delete. If the item you wish to delete is locked, you can?t delete it instantly. When you select the item and press Command + Click, a window appears to confirm the deletion. Click Continue and the item will be deleted. Please note that the deleted file/folder is still present in the trash and you need to empty the trash to delete the files permanently. Here is how you can empty the trash:
- Click the Trash icon in Dock.
- To delete a single item, Control + Click the item and choose to Delete Immediately and again click Delete in the warning message.
- To remove everything from trash, click the Empty button in the Finder window.
- Alternatively, you can click the Finder icon in the Dock and click Empty Trash.
- Again, click Empty Trash in the warning message that appears.
While freeing up the space on your Mac, there are chances that you accidently delete some useful files completely. If you haven?t created a backup, then the concerned file can?t be recovered using Mac functions. In such a case, you can take the help of Stellar Data Recovery Standard for Mac. Using the Stellar Data Recovery software, you can easily recover your files/folders in three simple steps:
STEP 1: Select File type and location drive.

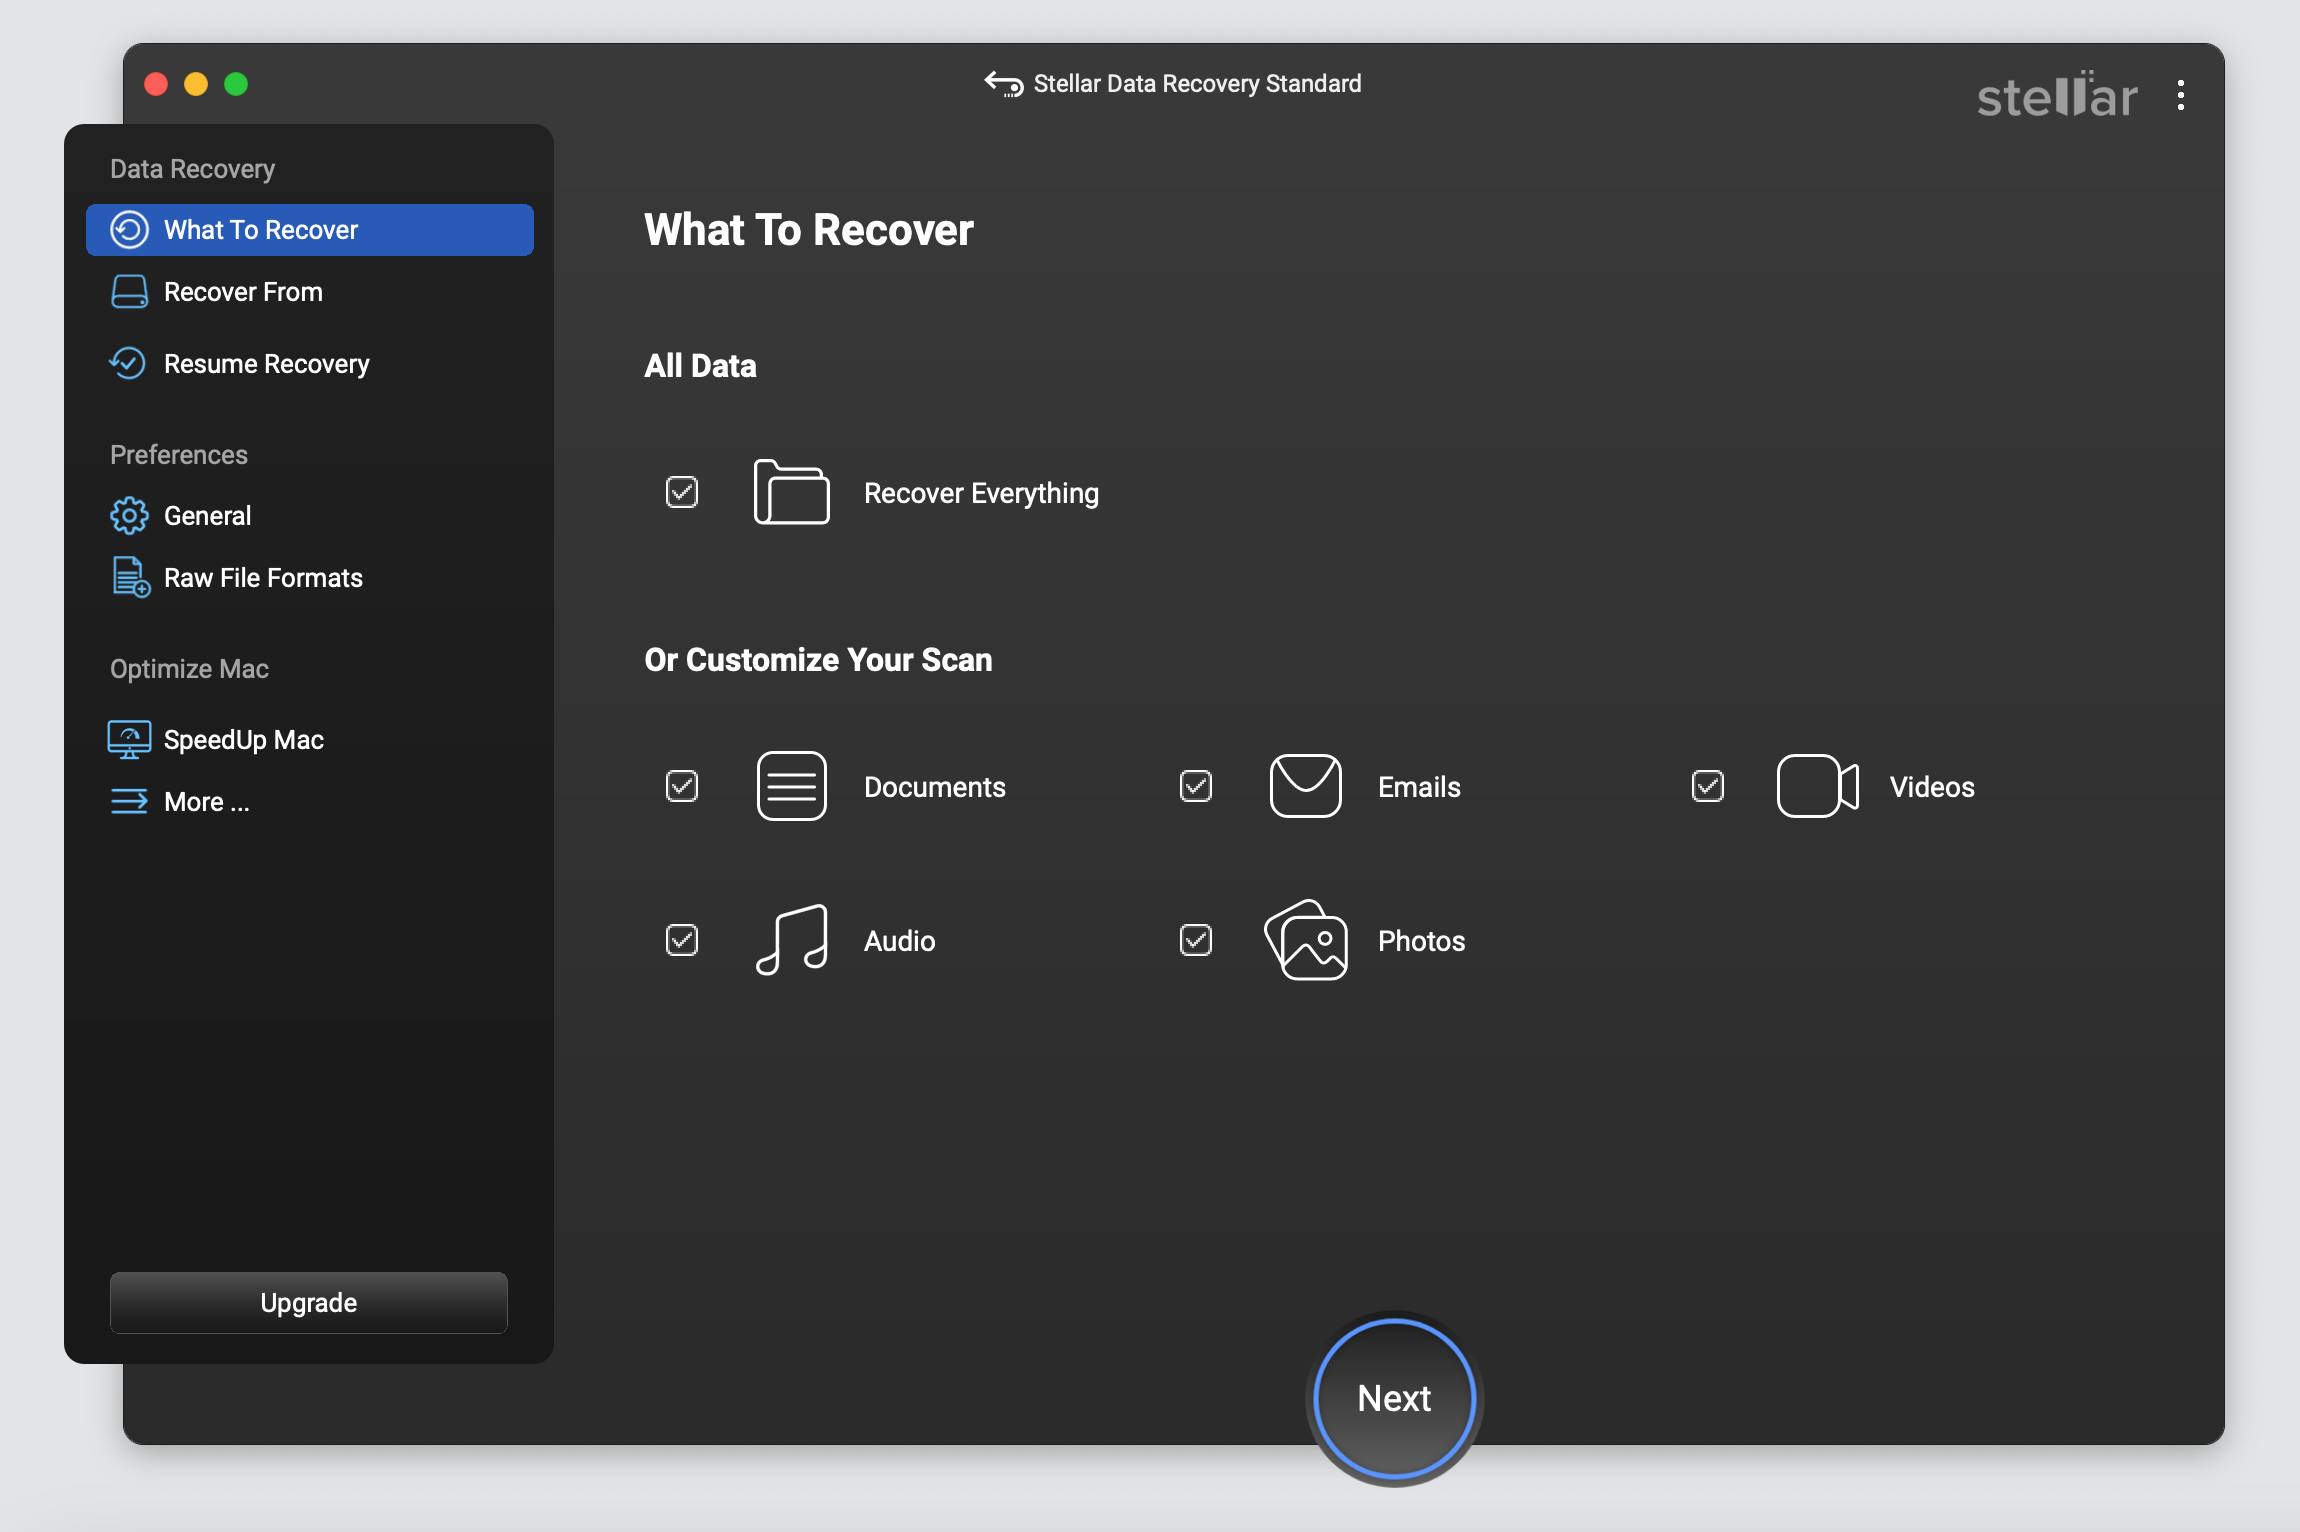
STEP 2: Scan the concerned storage drive.

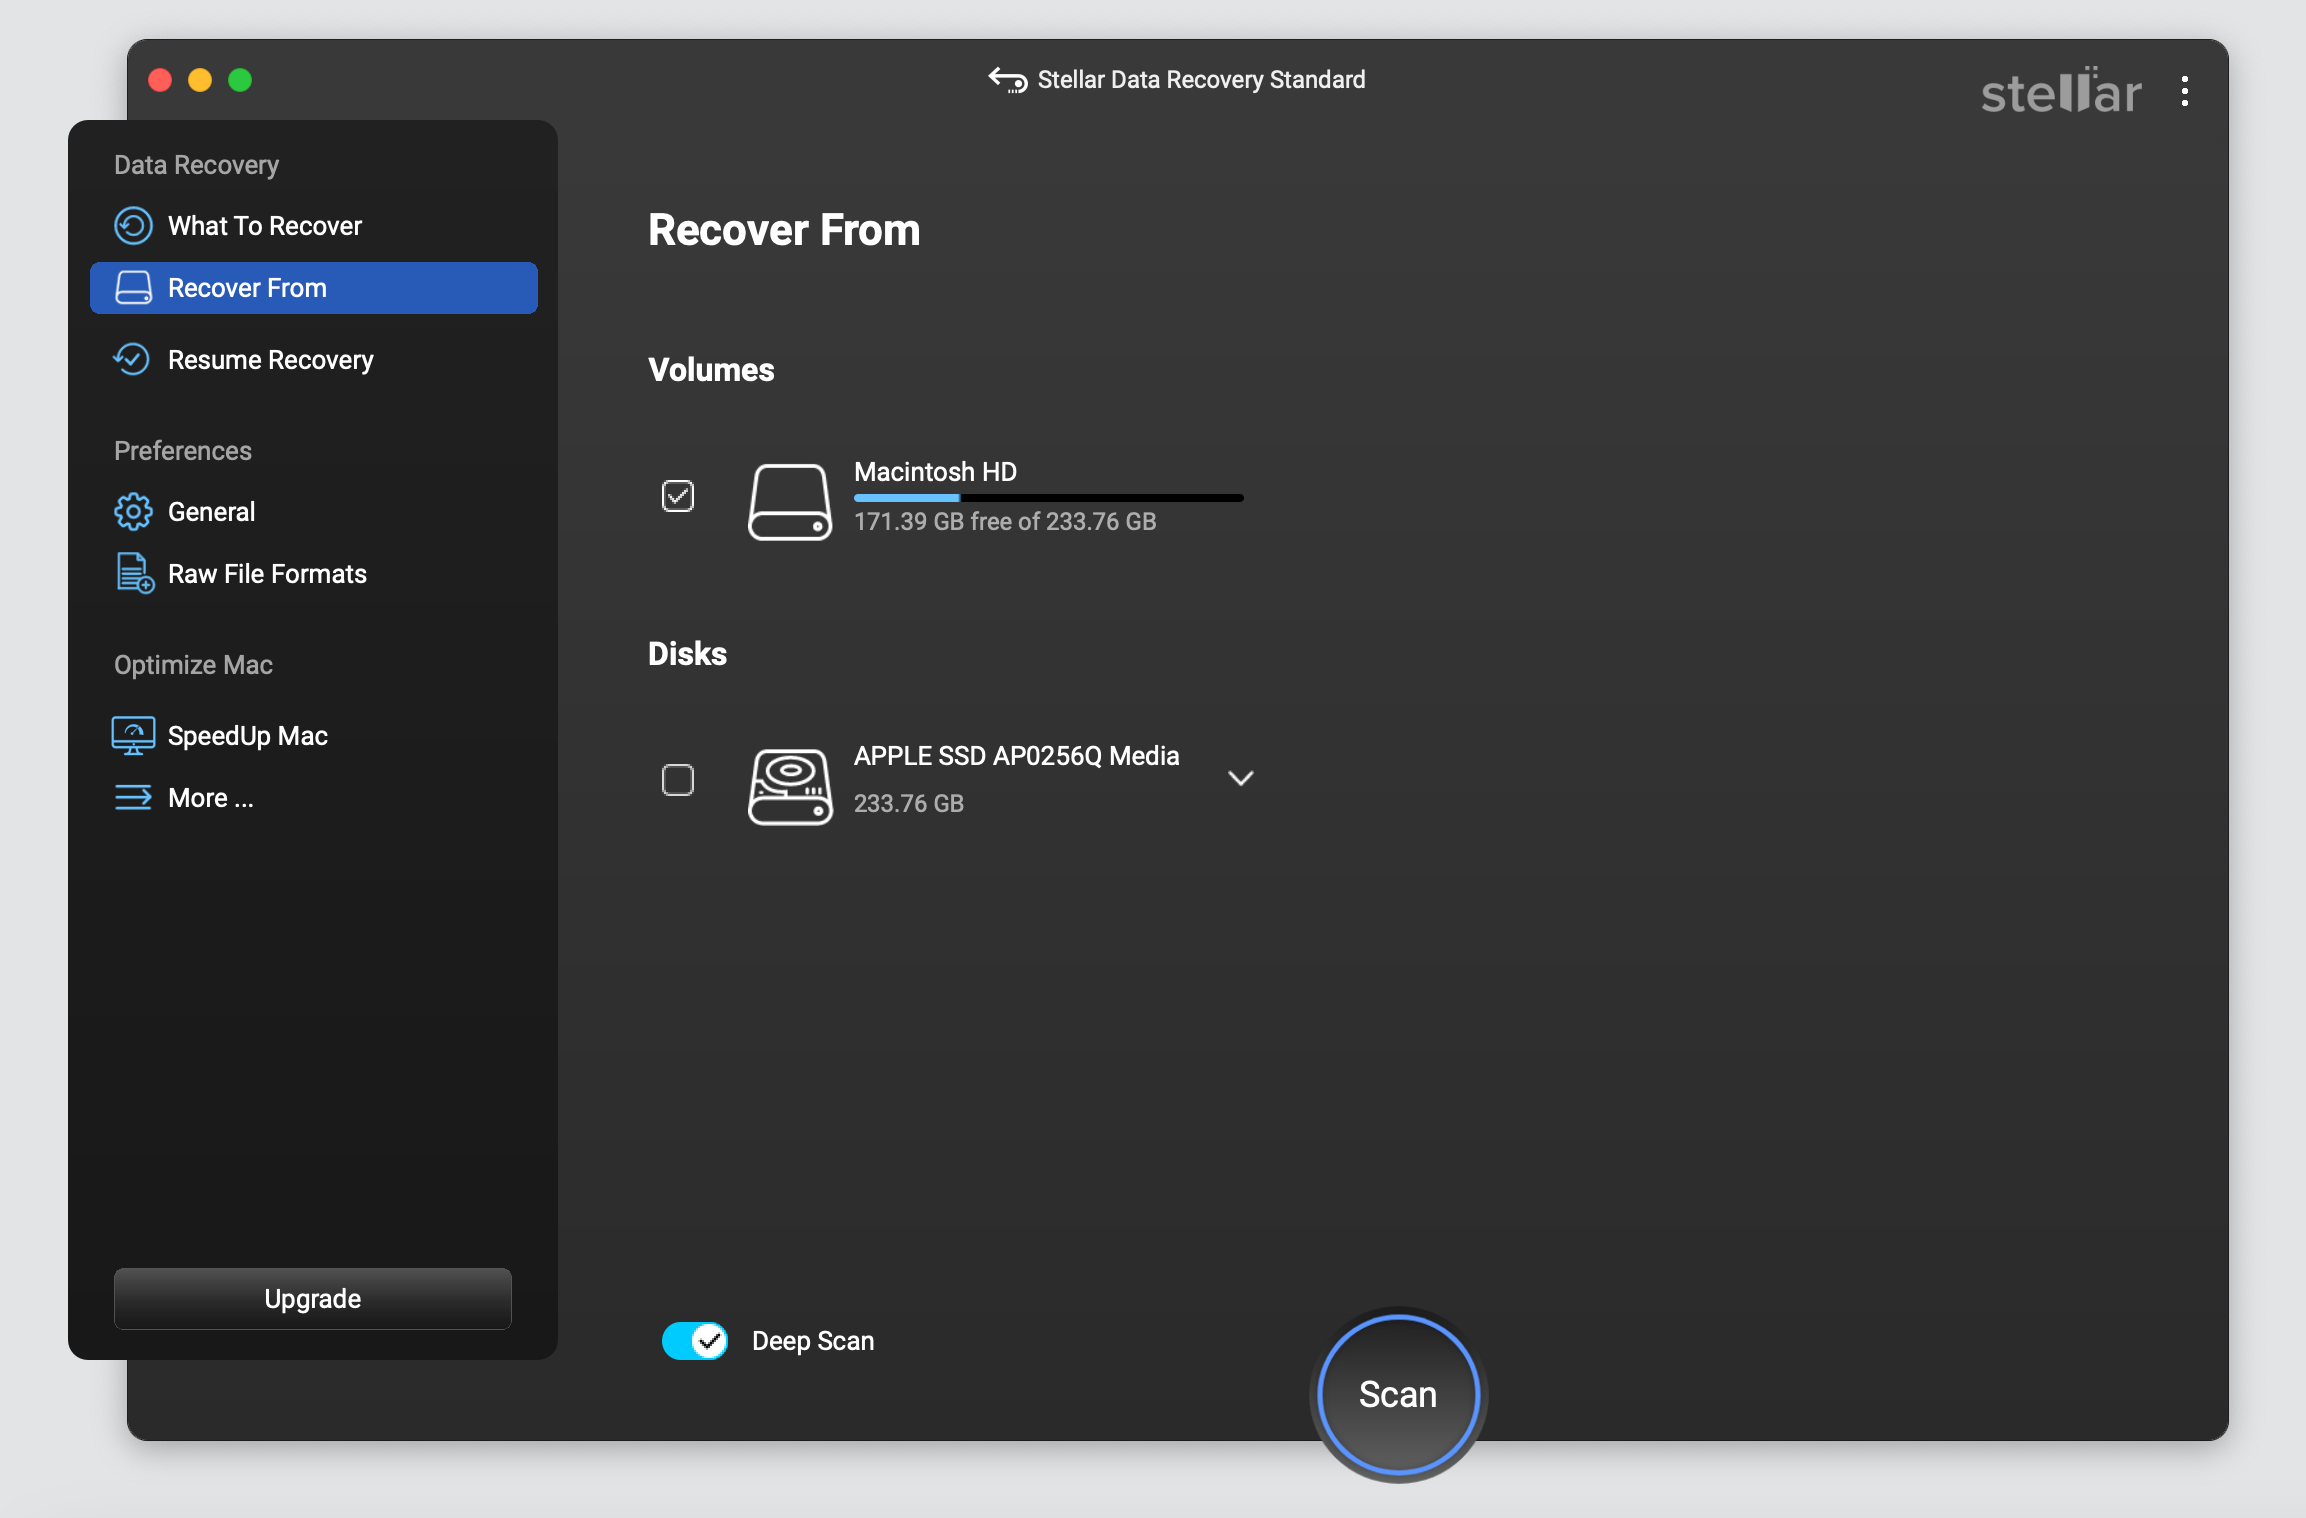
STEP 3: Preview the file/folder and click Recover.

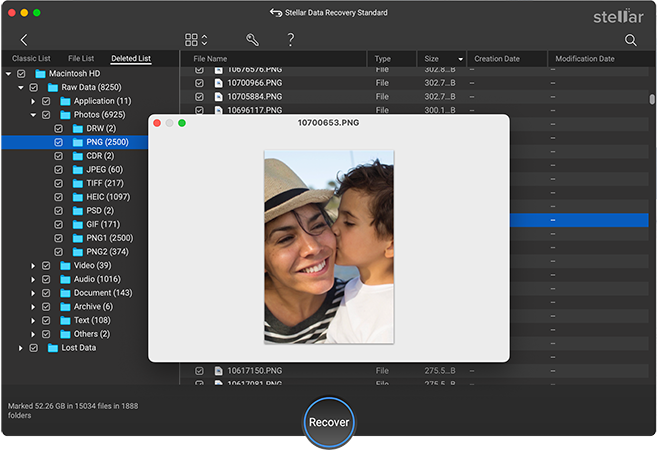
Your file is back and ready to be used.
7. Use Time Machine to Manage and Recover your Files
You can also manage your files and folders using the Time Machine feature of the Mac system. The Time Machine feature allows you to create a backup of all the data on your system using an external hard drive.
1. How to use Time Machine on Mac
2. How can I Recover Permanently Deleted Files in macOS?
To Wrap Up
You can do your Mac file management with ease by understanding the processes explained above. Apple provides macOS file manager options and all you need to do is to adopt and use them to keep your Mac system organized and arranged.
In the end, a word of caution! If you haven?t stored or back up your data, do it now as there are always chances of data loss due to accidental deletion, loss of data due to corruption, or virus attack.


