Time Machine uses a dedicated external storage device that you need to set up for the first time. Also, the drive must be kept connected to your Mac to perform an initial full backup and subsequent incremental backups. The following section describes the setup process.
A. Set Up a Time Machine Backup Drive on Mac
-
Connect an external storage drive that you wish to create as a backup disk for your MacBook Pro, MacBook Air, Mac mini, Mac Pro, iMac, or iMac Pro.
-
If macOS prompts you to use the drive to back up with Time Machine, select the Encrypt Backup Disk checkbox (if required) and click Use as Backup Disk.
-
When macOS doesn’t prompt, go to Apple menu > System Preferences > Time Machine. Then, click the Select Backup Disk option.
-
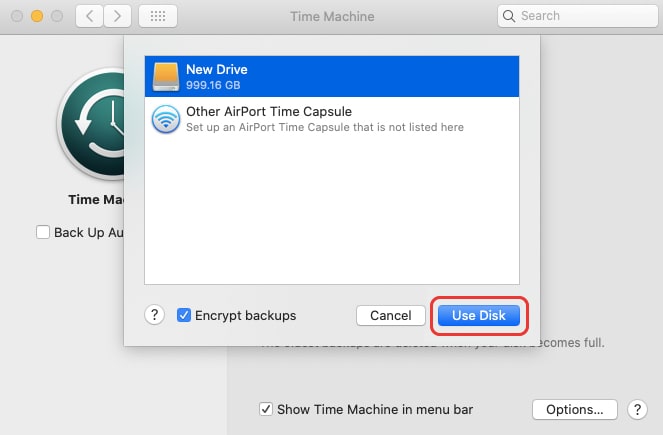
Select your connected external storage drive, check the Encrypt backups checkbox, and finally click the Use Disk button.
-
If the external drive is not in the correct format, macOS prompts you to erase the disk. Click Erase. Please note macOS now supports APFS format for Time Machine backup drive.
-
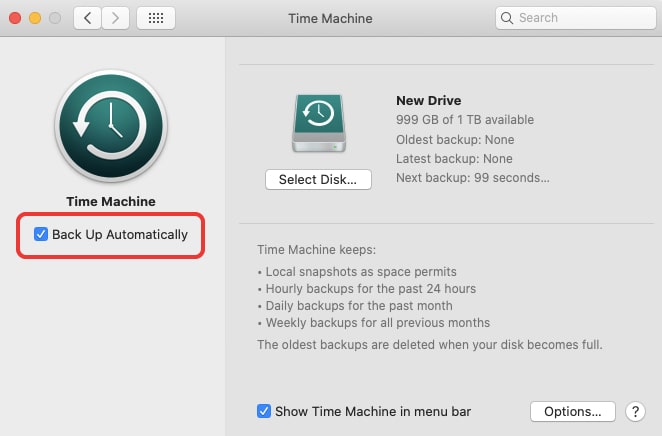
Once Time Machine erased the drive, it shows the drive information on the right pane. Next, select the Back Up Automatically checkbox from the left pane to perform automatic backups.
-
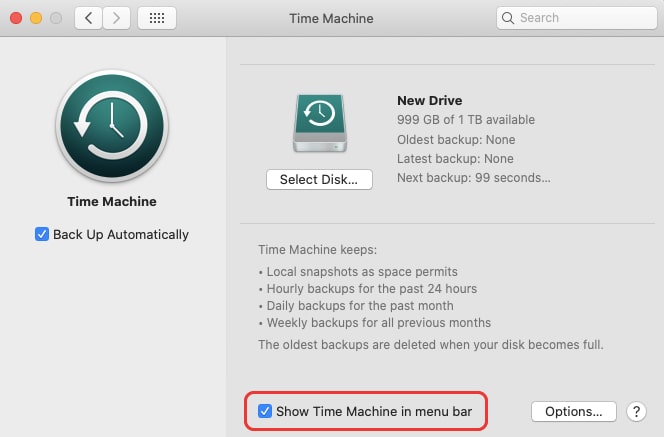
Select Show Time Machine in menu bar checkbox to find the Time Machine icon on the menu bar, which lets you Back Up Now, Enter Time Machine, or Open Time Machine Preferences.
-
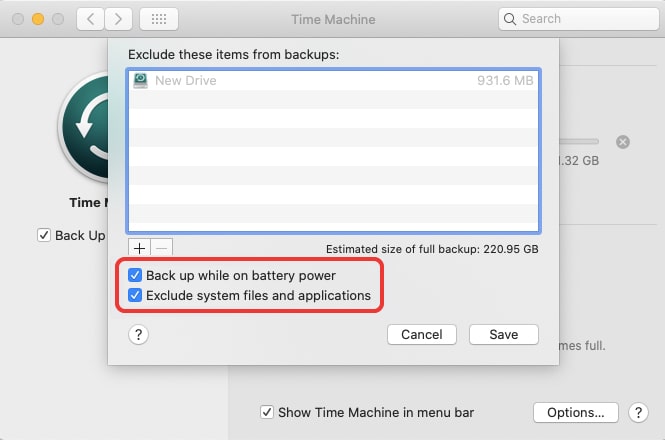
By default, Time Machine backs up the entire Mac—system files, applications, and personal data (documents, photos, etc.) To exclude certain items from backup, click the Options button.
-
In the pop-up window, click the + sign present on the bottom left of the list box, navigate to the folder that you want to exclude, then click the Exclude button.

-
To allow backup on battery, select the Back up while on battery power checkbox. To back up only your files, click Exclude system files and applications checkbox. Click Save.
-
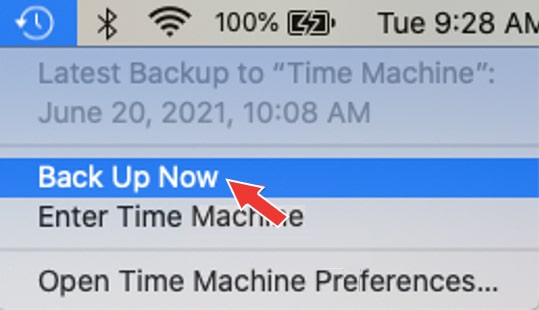
Time Machine automatically backs up your Mac once you’ve selected the backup disk. To manually back up, go to Time Machine > Back Up Now from the Menu bar.
To use the Time Machine app, set up a Time Machine backup drive using the following steps.
Allow the backup to finish. It will take longer to perform a full backup for the first time, but subsequent incremental backups will be much quicker. When you set up your Time Machine backup drive on your Mac, rest assured that all your data loss incidents will no longer exist.
Besides, you can set up more than one Time Machine backup drives and back up to multiple disks. For that, press the Time Machine icon from the menu bar, press and hold the Option key, and select Browse Other Backup Disks. Then, specify the disk to perform the backup of your Mac.
When you are using Time Machine to back up to a network disk, you can verify the condition of those backups. Click the Time Machine icon, press and hold the Option key, and choose Verify Backups.
B. Restore Data from Time Machine Backup Drive on Mac
The actual use of Time Machine comes into the picture when you lose your data due to any reason, or the Mac fails to boot due to system file corruption. Time Machine helps you restore any particular file or the entire Mac together with data.
1. Restore a couple of files
-
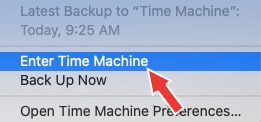
Ensure your Time Machine backup drive is connected to your Mac. Now, go to Time Machine > Enter Time Machine from the menu bar.
-
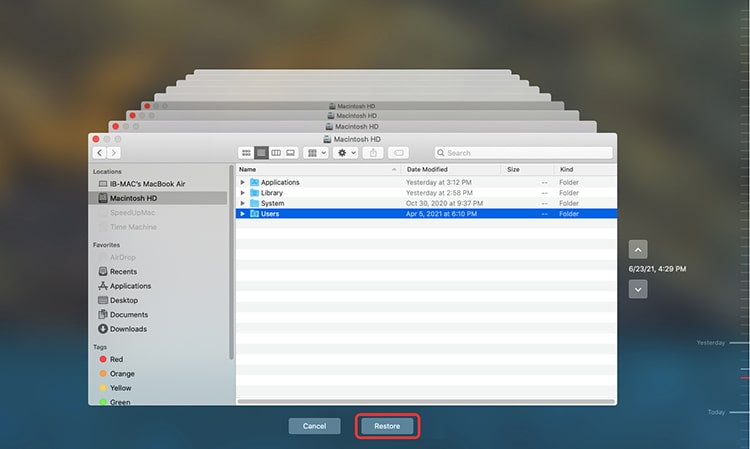
Navigate to backups using the TimeLine or Up/Down arrow button. Find and select the required file, then click Restore.
2. Restore all personal files
-
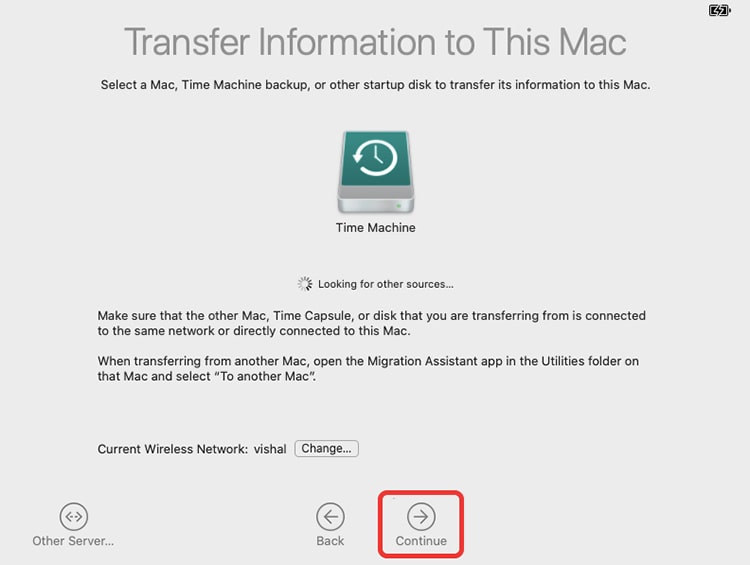
Ensure the backup drive is plugged into your Mac. Press Command + Spacebar to open Spotlight. Type Migration Assistant and open the application, then click Continue.
-
Select the From a Mac, Time Machine location, or startup disk option. Then, perform as per the instruction to restore all files from the backup drive.
3. Restore your entire Mac
-
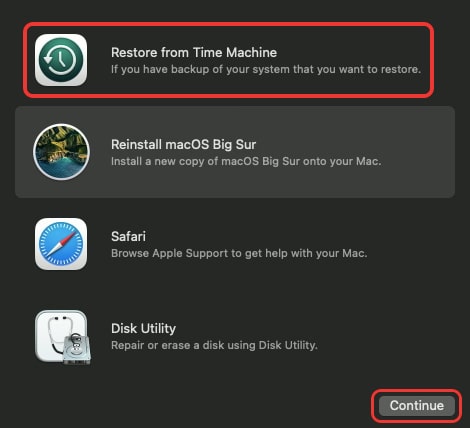
Start or restart your Mac, then immediately press and hold Command + R keys. Release them when the Apple logo appears. Then, let your Mac boot into macOS Recovery.
-
In the macOS Utilities window, select Restore from Time Machine Backup, then click Continue. Next, choose a Restore Source and perform onscreen instructions to restore macOS and data.
C. Time Machine Backup Unavailable?
Time Machine backup of your Mac may not be available due to any of the following reasons:
- Time Machine backup drive isn’t set up for your Mac
- Time Machine backup drive isn’t kept connected to your Mac
- File creation and deletion occurred after the Time Machine’s hourly backup
- Time Machine backup drive has turned corrupt
- The backup file present in the Time Machine isn’t accessible on Mac
In such situations, you can’t use the Time Machine application to restore your lost data.
D. Data Recovery on Mac without Time Machine
When Time Machine backup isn’t available, try using a professional Mac disk recovery software to recover your lost data. The data recovery steps are as follows:
Step i) Download and install the *trial version of Stellar Data Recovery Professional for Mac.

Step ii) Launch the software, and from the Select What To Recover screen, click Next.
Step iii) From the Select Location screen, select the drive, toggle on Deep Scan, and click Scan.

Step iv) Let the software scan the selected drive. Once the scanning is over, preview the files.

Step v) Select the required files and click Recover. Provide a storage location, then click Save.

Step vi) Let the software save the recoverable files. View the files from the specified location.
*Trial version of Stellar Data Recovery Professional for Mac software works wonderfully to scan and preview files. To make the software recover files, please activate the tool.
Conclusion
Now you know how to use Time Machine on your Mac without any trouble. By implementing the methods presented in this article, you can set up a backup drive, set auto backup preferences, and restore files in case of any data loss event. Even restore macOS when your Mac crashes or fails to boot. When you don’t have a Time Machine backup, using a Stellar Data Recovery Professional for Mac to recover your lost data is a no-brainer.


Data recovery expert on Mac & Windows platforms, with 10-year experience in writing
 6 min read