Summary: Struggling to free up space on your Mac? One of the ways is to remove unneeded software update files. In this guide, we will show several working ways to delete old Mac updates.
Contents
Installing software updates can consume a significant amount of storage space on your computer, which is especially problematic if you have a small amount of storage. Your computer may become increasingly sluggish due to the cumulative effect of these updates. Consequently, if you want to maintain the smooth operation of your Mac, you should remove any outdated software updates that you no longer require.
How to Prepare Your Mac Before Removing Old Mac Software Updates
Before removing the software update files, initiate a backup of your critical data to ensure its safety in case of a problem.
The macOS backup will enable you to restore all of your data in the event of a data loss.
Here is how to use Time Machine to back up your Mac:
1. Connect a hard drive external to your Mac.
2. Launch Time Machine by selecting Apple Menu from the upper left corner of the screen > System Preferences > choose Time Machine.

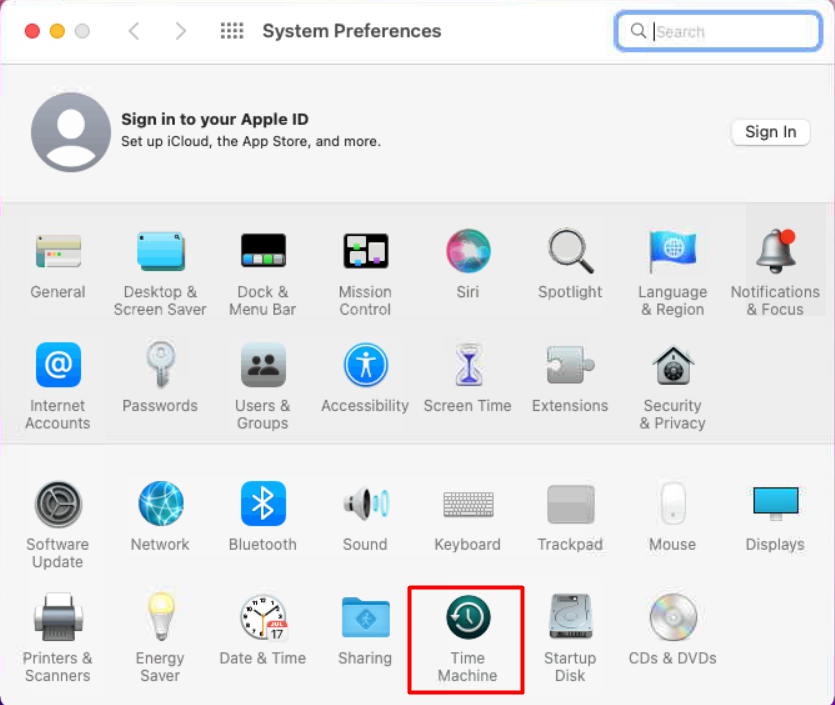
3. Click Select Backup Disk next.


4. Select the required disk and then click the Use Disk button.


5. Done. Time Machine will now have the most recent system backup.
Is It Possible to Remove Old Mac Software Updates?
Sure, you can remove the macOS software update application from your Mac (but never do it while the app is in use ?i.e., running through its setup or install procedures).
If you want to delete the macOS software update app, you can do it when it isn’t being used at the time you do it. Since none of the Install macOS apps make up the operating system itself, it is safe to remove them.
Four straightforward methods are available for removing the macOS Installer application from your Mac. Here is how.
I. Delete Software Updates Using Terminal
You have one more option available to you if, for whatever reason, your Mac does not automatically remove outdated software file updates. You will need to manually delete outdated software update files using the Terminal application on your Mac.
Follow these steps:
1. Open Finder > find and select Applications > Utilities > Terminal.


2. Enter the command sudo softwareupdate ?clear-catalog. By completing this command you will remove old software update files.
II. Delete Software Updates From theApp Store
There is one more possible way to delete old updates on Mac. You can do it via App Store.
Here is how:
- Open App Store.
- Go to the Updates tab.
- You will then be able to locate the update that you don’t need and select it by clicking the “X” that is located next to it.
III. Delete Software Update From Library
You can also locate the updates by navigating to the Library folder and looking for them. You will then be able to delete the updated files directly from that location. If you downloaded the installers from the Apple website, you can delete them at any time.
Follow these steps to find software updates in Library:
1. Click on Go on the menu bar > Go to > enter /Library/Updates.

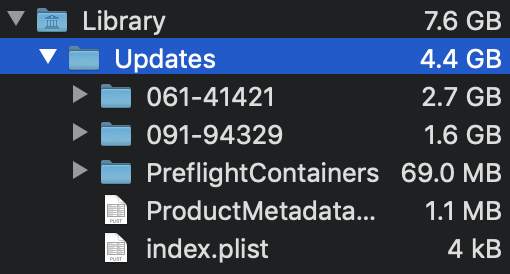
2. If there is something in the opened folder, you will be able to move those files to Trash.
IV. Delete Software Update Installation File
If you have noticed a software update file on your Mac computer, there are two ways to remove them.
Delete Old Updates on Mac via Finder
One of the ways to find and delete old Mac updates is to use Finder:
- Open Finder > click Go on the menu bar.
- In the drop-down menu, choose Applications.
- Look for the macOS software update file > right-click on the file > Move it to Trash.
- The last step is to Empty the Trash.
Delete Old Updates on Mac via Launchpad
Another method is to delete software updates using Launchpad:
- Open Launchpad on your Mac computer.
- Find the software update installation file.
- Hold the Option key and click the X button that will appear.
- If you have done everything correctly the software update file will disappear.
How to Restore Possibly Deleted Files with the Stellar Data Recovery App
Using Mac-specific data recovery software is an additional method for restoring lost files. You can recover lost Mac files using data recovery software such as Stellar Data Recovery Professional. It is a simple tool that will assist you in retrieving your files.
Follow the steps below to retrieve lost data:
1. Visit the official Stellar Data Recovery website and click Free Download.


2. After installing the software, launch it and select the data type you wish to recover (photos, videos, documents, etc.). You can recover everything or modify the necessary file types.


3. You will then be prompted to select the location from which you wish to recover the selected files.


4. When the scan is complete, the recoverable files will be displayed. Choose the ones you require.


5. Choose the destination folder on your Mac and initiate the recovery process as the final step.
Wrapping Up
As you see, deleting unneeded and old software update files is quick and easy. Of course, you will need to find the method that will be applicable to the macOS you are currently using. Also, remember to have a backup plan in case you lose any of the important files by installing restoring software like Stellar Data Recovery Professional to make sure you will be able to rescue all your essential files.
Read more:


