Summary: Beep-beep-beep…When your MacBooks screen is still blank, such a sound sequence might play at its startup. It’s hard to confuse these 3 beeps with the chimes that usually play when your Mac boots up. Also called 3 beeps of death, this unusual beeping signals your Mac might have startup issues, such as not turning on and loading to a black screen. This guide will dwell on possible reasons and equip you with four solutions that may help resolve the issue.
Contents
Why Does Your MacBook Beep Three Times?
In case of memory or firmware-related conditions, your MacBook may beep once or more times during the startup process.
Here are the two most typical reasons for MacBook beeping 3 times at startup:
- RAM issues: the RAM hasn?t been properly inserted or replaced.
- Physical damage: you?ve accidentally hit or dropped your Mac. Thus your RAM may have become damaged.
Sometimes 3 long beeps may be followed by 3 short beeps. It means that the firmware fails to be installed correctly. The leading cause of firmware issues is a power failure or problems during the macOS updates.
A series of 3 beeps at a startup means your MacBook is signaling that the operating system you’re about to boot into is incompatible or that it can’t recognize some hardware on your Mac.
If your MacBook Air or Pro beeps 3 times in a row at five-second intervals, it is the signal that the RAM didn?t pass the data integrity check (in other words ? the RAM couldn?t load correctly). As we’ve mentioned above, you may have recently replaced or upgraded the RAM. However, it wasn’t installed correctly.
How to Fix the Mac ?3 Beeps of Death??
??Before performing any heavy troubleshooting, try restarting your Mac. If that did help and your MacBook keeps beeping, read on.
1. Reset the SMC
Note for M1 Mac owners: Skip this part as it?s impossible to reset SMC on Apple Silicone Macs. Everything that SMC was responsible for before has been incorporated into the M1 processor.
Your MacBook Air/Pro beeping and not turning on might be saying it?s a RAM-related error. Let?s resolve it by resetting the System Management Controller (SMC). The process varies depending on your Mac model.
To reset the SMC on Macs with T2 chip:
- Turn off your Mac.
- Hold down the Power button for approximately 10 seconds and then release it.
- Wait a few more seconds before pressing the power button to turn the machine back on.
If you?re using a desktop Mac, follow these steps:
- Turn off your Mac > unplug the power cord.
- Press and hold the Power button for 15 seconds.
- Release the button > connect it to the power supply.
- Wait 5 seconds > press the Power button to turn on your Mac.
If your Mac doesn?t fall into the two categories we?ve described above ? follow the instructions to reset SMC on other Mac models.
Upon resetting the SMC, try using your Mac the way you usually do to check if the issue is gone. If not ? follow the procedures below.
2. Reset NVRAM
Note for M1 Mac users: Resetting the NVRAM on the M1 Macs is another troubleshooting method that won?t work. The Apple Silicone Macs can ?rescue? themselves from wrongly set up NVRAM. So, if something goes wrong with the RAM, it is automatically reset on M1 Macs.
NVRAM (non-volatile random access memory) stores the basic settings of your Mac. Macs store some of the settings in a special area of ??memory called NVRAM. Its settings are saved when the computer is turned off. Resetting NVRAM might help if your Mac?s continuous beeping. However, keep in mind that you may lose some of these settings once the reset of NVRAM ? you’ll most likely need to adjust your date and time.
To reset NVRAM on a Mac on Intel-based Macs:
1. Connect your Mac to the power supply.
2. Restart your Mac.
3. Immediately press and hold these four keys as it is booting up: Option + Command (?) + P + R.


4. You can release the keys after the second startup sound or once the Apple logo appears and disappears for the second time.
3. Replace or Remove Extra RAM
If resetting SMC and NVRAM didn?t help and your MacBook still won’t start giving you 3 beeps, you may try replacing or reinserting the RAM. However, it will work with those Mac computers where RAM is removable and not soldered to the motherboard (as it?s done in modern models). The only way to fix damaged RAM is by visiting the Apple Store. Consult the official Apple website to see if you can replace the RAM of your Mac.
4. Run Apple Diagnostics
Another way to discover why your Mac is consecutively beeping when starting up is to use Apple Diagnostics. It helps in finding out what component might be damaged. Besides, Apple Diagnostics recommends solutions and assists you in contacting Apple Support if needed.
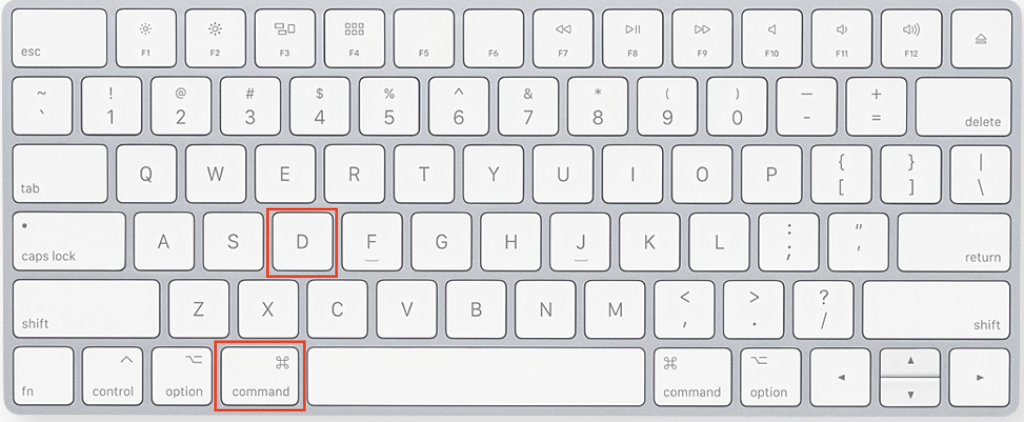
To run the Apple Diagnostics on Apple Silicon:
1. Turn off your Mac.
2. Press and hold the Power button until you see the startup options window. A gear icon will be labeled Options.
3. Press Command (?) + D.

To run the Apple Diagnostics on Intel processor:
1. Turn off your Mac completely.
2. Next, turn it on > press and hold the D key on your keyboard as it begins to boot up.
3. When you see a progress bar or are asked to select a language, release the D key.


When Apple Diagnostics is finished, it’ll display a list of the issues and possible ways to fix them effectively, including reference codes.
Wrapping Up
MacBook beeping 3 times is not a common Mac problem. The good news is you can fix these glitches with viable workarounds and troubleshooting solutions. If you?re an M1 Mac owner ? run the Apple Diagnostics tool. If you?re an Intel-based Mac owner, you can try any of the four methods we?ve described in this article.
FAQ
How to Reset Mac?s RAM?
On Intel Macs, resetting RAM is done by pressing the Option + Command + P + R keys. Consult the Reset NVRAM section of this article for more details.
How to Replace Mac RAM Safely
As Apple doesn’t sell RAM directly, you’ll have to get it from a third-party vendor. If you want to upgrade your Mac’s RAM, make sure you get the correct memory modules. The incorrect ones won?t simply fit or function with your Mac. Fortunately, many RAM vendors like OWC offer online tools to assist you in selecting the correct memory modules for your Mac.
To replace your Mac safely, follow the official Apple recommendations:
- Install memory in an iMac
- Install memory in MacBook Pro
- Install memory in Mac Pro
- Install memory in Mac mini
Read more articles:


