Summary: Things get frustrating when you type in the correct password at the login screen, but the system doesn’t accept it. This guide covers the most common reasons for getting locked out of a MacBook and provides effective ways to unlock the Mac and get access back. Some of the solutions might result in data loss, so we recommend using Stellar Data Recovery to easily restore all important files.

![[Fixed] MacBook Air/Pro Won’t Accept Passwords](https://www.stellarinfo.com/public/frontEnd/images/product/free-download-mac-blue-button.png)
Over many years Mac users have encountered a problem when MacBook won’t accept their password. The issue becomes especially absurd when you are sure that the password is correct. In this case, you may doubt your own memory and be unaware of the reasons why you get locked out of your Mac.
Fortunately, you are not the only one facing the issue of Mac passwords not working. There are plenty of reasons why Mac won?t accept the correct password and in this article, we will provide 5 easy solutions to fix the login problem.


Basic Troubleshooting
Before we hop on to more complicated instructions, it?s worth checking your keyboard for typing errors. In most cases, mistypes are the most common reason MacBook won?t accept password issues.
- Do you have uppercase and lowercase characters in your password? If the answer is yes, you need to take a look at the Caps Lock key. When it is on, this significantly changes the look of your password, so it can?t be accepted as correct by the system. Turn the caps lock off and try to type in your login password once again.
- Being in a hurry may also cause some login problems. Even when you see the login screen, the system might still need a few moments to boot properly and capture the symbols correctly. So make sure you see the Enter Password text in the box before trying to input the login credentials.
- If the Mac still doesn?t accept the password after the previous tricks, then it might be caused by the keyboard issue. A damaged or broken keyboard won?t be able to type the symbols you need. To validate this theory, use your keyboard on another Mac or connect a new keyboard and try to type in the password.
How to Fix MacBook Won?t Accept Password Problem
If you follow the basic steps but the MacBook still doesn?t accept the correct password, this means your Mac may be facing more complex system-related problems. The list is endless here, starting from login items incompatibility and startup disk errors to file damage and Mac hard drive errors.
Related reading: You can also check our guide on the 10 most common Mac system issues and their fixes.
Luckily, there are working ways to fix most of these problems and make your Mac recognize your login password again. For your convenience, we have structured the steps by their effectiveness so it is worth trying them one by one instead of immediately skipping to the last one. So, here is the complete list:
- Reset NVRAM/PRAM
- Reset SMC
- Boot into Safe Mode
- Reset your login password
- Reset your Mac
1. Reset of NVRAM/PRAM
PRAM stands for parameter random access memory. It is used in older computers to store a small amount of information in the memory needed to load the operating system. In the modern Mac?s PRAM was changed to NVRAM (non-volatile random-access memory) which serves a similar purpose and helps your machine boot faster.
Resetting your NVRAM/PRAM fixes most login problems so it is worth trying before any other steps.
Here is how to do it:
- Shut down your Mac completely.
- Turn Mac back on and immediately press Command + Option + P + R keys at the same time.
- Release the button after 20 seconds (or once you hear the startup chime).
If you own a T2 Security Chip-powered Mac you need to wait for the Apple logo to appear two times before you can release the keyboard’s buttons.
2. Reset of SMC
A system management controller, SMC is responsible for battery, fans, power, and other hardware-related features. Resetting SMC was especially useful when fixing the MacBook won?t accept password issues running macOS Big Sur.
The instructions differ for Macs with removable and non-removable batteries.
To reset SMC on Mac with a non-removable battery:
- Make sure the power cord is connected and shut down your Mac.
- Hold Shift + Control + Option keys and Power button simultaneously.
- Release the buttons after 10 seconds and press the Power button again to turn on the Mac.
Removable batteries were used on older MacBooks and had a special slider that was used to easily extract the battery. Apple?s guide covers the details on how to reset SMC on the MacBooks with removable batteries.
3. Boot into Safe Mode
Booting in the Safe Mode is the default diagnostic method for any startup issues which helps identify whether the issue is caused by some software installed on your Mac. It also deletes some system cache and runs a basic check of the startup disk.
To boot Apple silicon Mac in the Safe Mode:
- Shut down your Mac completely.
- Turn Mac back on by pressing and holding the Power button until startup options appear on the screen.
- Press the Shift button again and hold it while choosing the startup disk.
- Log in to your Mac.
To boot Intel-based processor Mac in the Safe Mode:
- Press and hold the Shift button while restarting your Mac.
- Release the key once the login screen appears.
- Log in to your Mac.
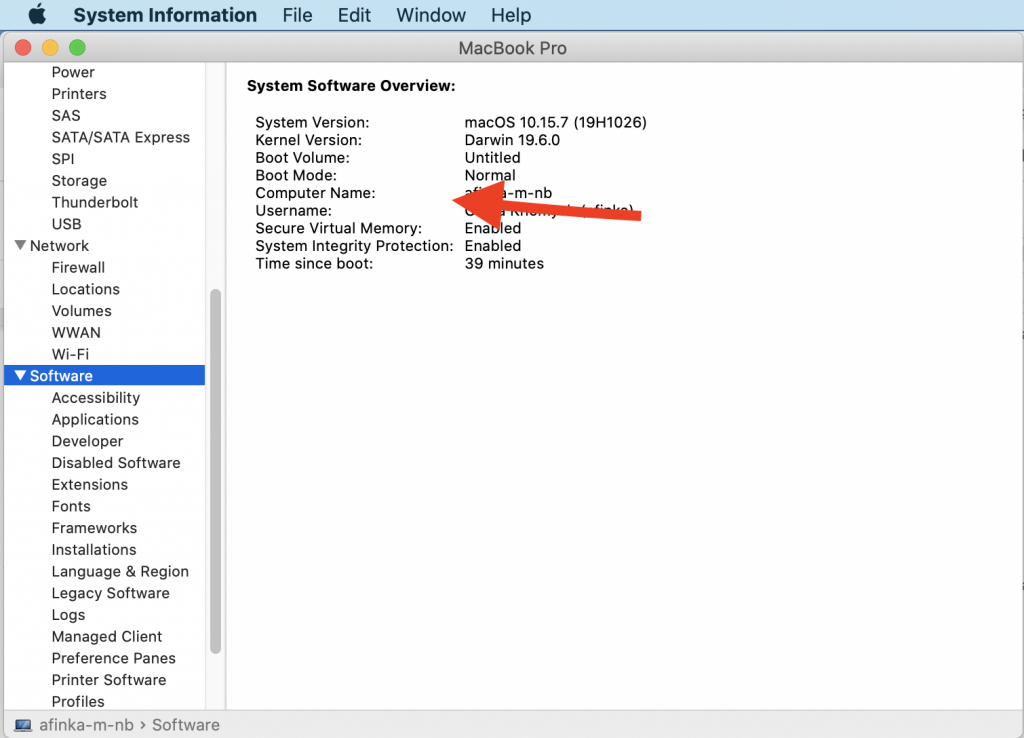
Tip: To check the boot mode: Open Applications > Utilities > System Information and click on Software. If it says Normal, repeat the steps above once again.

4. Reset Login Password
If the MacBook won?t accept the password even after all the previous steps, chances are you have used the incorrect password. Try to type in a few other passwords that come into mind. You can also add different combinations of the special symbols or numbers if you have ever used those in your previous passwords. When nothing works and you are still locked out of your MacBook, it is best to reset the password and create a new one.
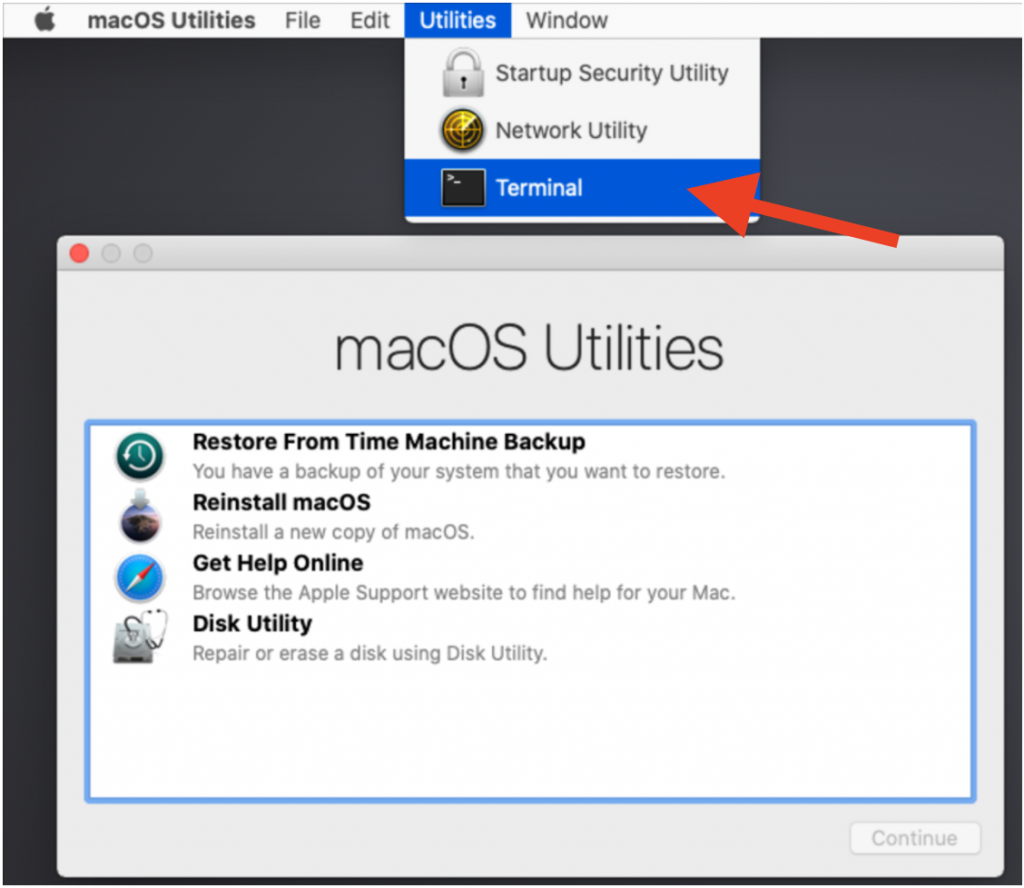
To reset the login password in the Recovery Mode:
- Restart the Mac.
- Press and hold Command + R on the keyboard simultaneously.
- Release the keys once you see the Apple logo.
- Click on Utilities in the Apple menu at the top.
- Choose Terminal.
- Type in resetpassword and hit Enter.
- This will open the Reset Password Assistant where you can create a new password.
- Reboot your Mac and try to login.

Tip: You can also use Apple ID or FileVault Recovery Key to reset your password.
5. Reset your Mac
If you read this far, this means your MacBook still won?t accept a password. Resetting your Mac is the last resort to accessing and logging into your machine. Please note, factory resetting the Mac will erase all the content and setting of the machine.
Important: Make sure that you have a TimeMachine backup or Stellar Data Recovery Professional for Mac to recover all the important information.
You can use Disk Utility in the Recovery Mode if you need to erase the data on Mac with the Apple silicon (M1) and Intel-based Mac.
Wrapping Up
Now you know the reasons why your Mac won?t accept the correct password. We hope that the solutions provided in this guide will help you fix the issue and log in to your Mac successfully once again.
More guides:


