Summary: Are you tired of getting the notification saying that “The disk Macintosh HD can't be Unlocked”? It is nothing to worry about! In this article, we will show you how to fix the issue. Before you continue reading, please make sure you have specific file recovery software on your Mac, like Stellar Data Recovery. It will be helpful in case of possible failures during the fix.

![[Fixed] “The Disk Macintosh HD Can’t be Unlocked”](https://www.stellarinfo.com/public/frontEnd/images/product/free-download-mac-blue-button.png)
Contents
Why ?The Disk Macintosh HD Can’t be Unlocked? Problem Appears
If you get the error message saying that ?The disk Macintosh HD can’t be Unlocked?, it means that the volume with the files is locked and can not be managed by a user. And most probably there is a redundant Mac OS disk on your Mac.
Macintosh HD is a storage drive containing the docs, pictures, applications, etc. It is a read-only volume meaning that you cannot add, modify, or remove files from it. You won’t have access to those files that are available for view only after the Macintosh HD is locked.
How to Prepare Your Mac Before Fixing ?The Disk Macintosh HD Can’t be Unlocked? Issue
Before proceeding with the fix, start backing up your essential data to ensure it remains safe in case something goes wrong.
The macOS backup will allow you to restore all your data in case you lose any.
Here is how to back up your Mac with Time Machine:
1. Connect an external hard drive to your Mac.
2. Open Time Machine by clicking on Apple Menu in the top left corner of the screen > System Preferences > Time Machine.

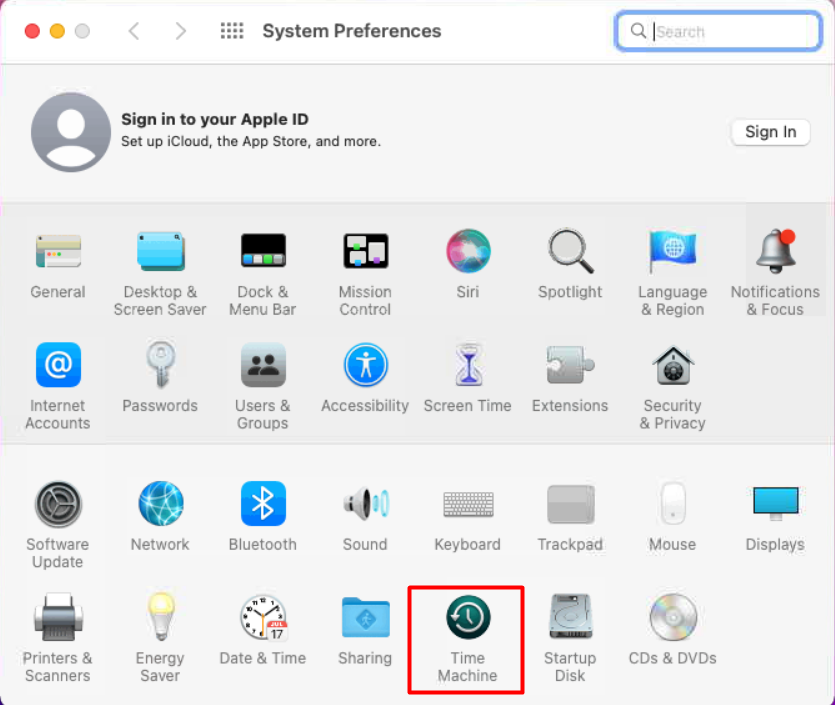
3. Then click on Select Backup Disk.

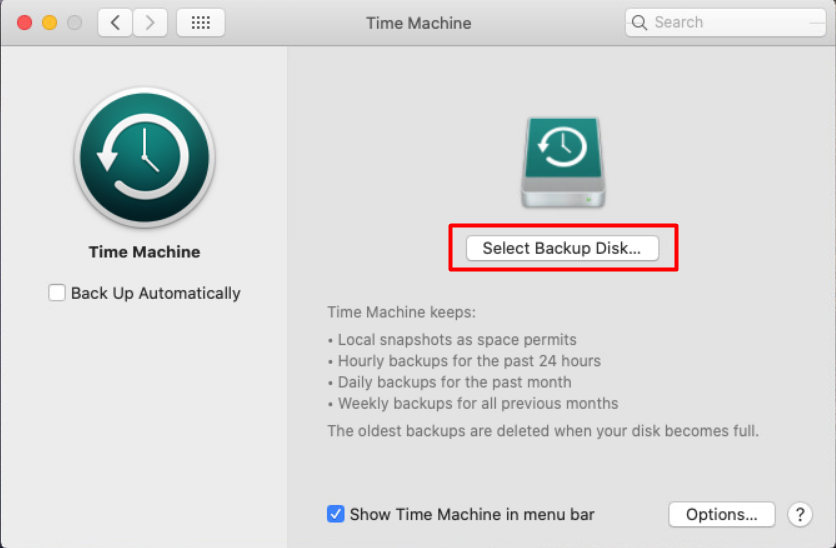
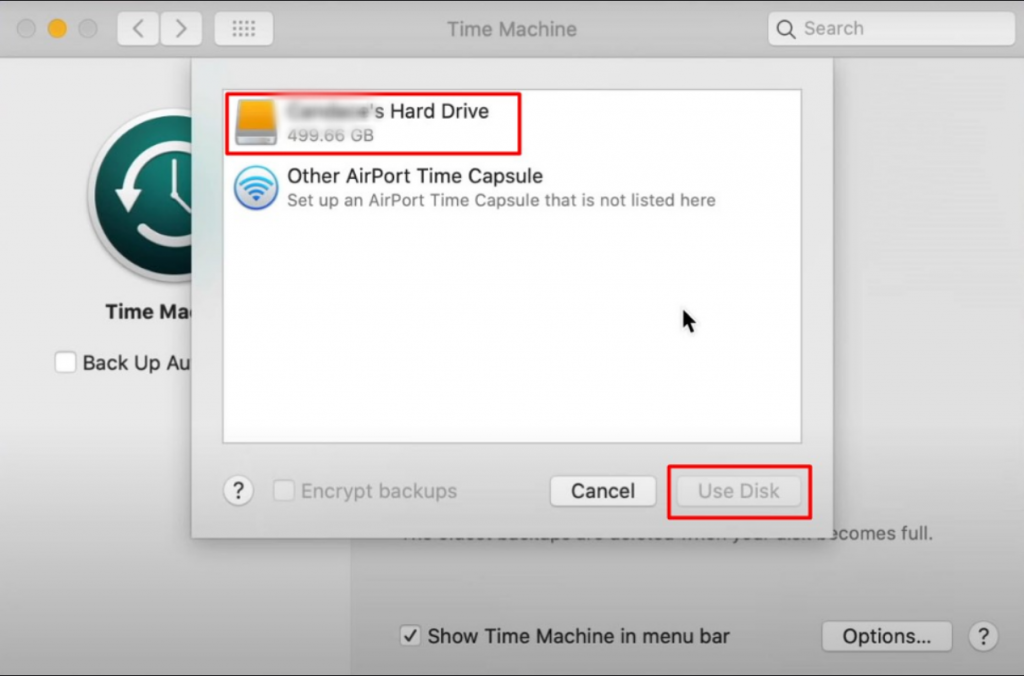
4. Choose the needed disk and click the Use Disk button.

Done. Now Time Machine will have the latest backup of your system.
3 Ways to Resolve ?The Disk Macintosh HD Can’t be Unlocked? Issue
1. Restore a Disk Using Disk Utility in Recovery Mode
Step 1. Enter Disk Utility in Recovery Mode
If you are using the Intel-based Mac:
- Restart your Mac.
- Click and hold the Command + R keys.
- When you see the macOS Utilities menu, select the Disk Utility.
In case you have a Mac with Apple Silicon:
- Restart your Mac.
- Press and keep holding the Power key on your Mac until you see the Loading Startup Options: gear and hard disk icon.
- Choose the Gear icon and select the Disk Utility.
Great. Now you are in the Disk Utility Application. Let?s move on.
Step 2. Run Fist Aid to Repair the Volume
1. Choose View > Show All Devices.

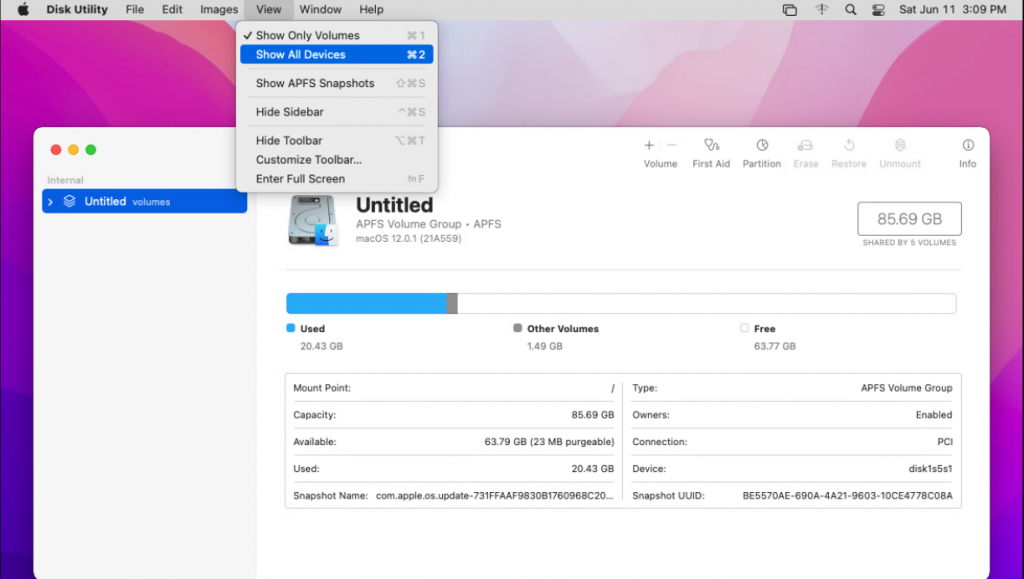
2. Select the volume with the name Macintosh HD > click the First Aid button > click Run.
3. Restart your Mac to see if the issue persists when the process is over.
2. Erase the Extra Volume
If the First Aid didn?t help, you will need to remove the duplicate Macintosh HD partition. However, please note that Macintosh HD contains all of your personal files stored on your Mac. That is why deleting the Mac OS disk permanently deletes all the data from there.
That is why before proceeding with erasing the extra volume, ensure you have prepared your Mac and made a backup of your system (see the instructions above).
To delete the redundant volume follow the next steps:
1. Open Disk Utility from the Recovery Mode again.
2. Select the extra Macintosh HD disk.
3. Click on Erase.
4. On the pop up you see select the next parameters:
Name: Macintosh HD
Format: APFS or Mac OS Extended


5. Confirm by clicking the Erase button.
6. Follow the onscreen instructions.
When the process is done you will need to recover your Mac from the backup. To do that:
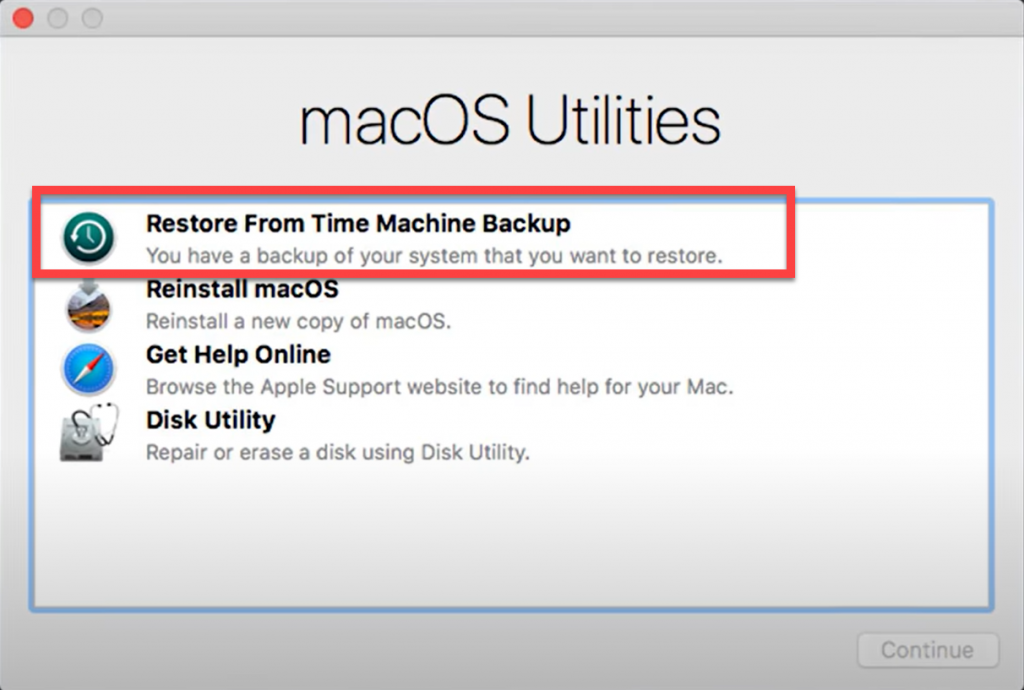
1. Go to the Utility window by clicking Command + R if you have an Intel-based Mac or pressing and holding the Power key if you own Mac with Apple Silicon.
2. Choose Restore from Time Machine backup, and Continue.

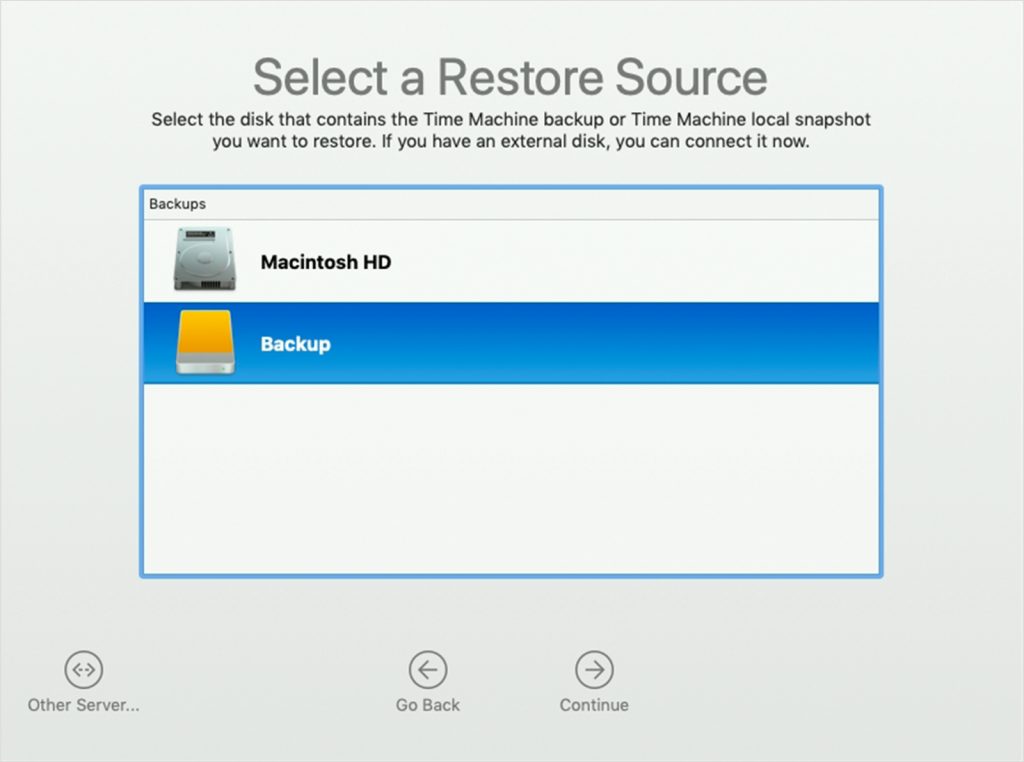
3. Select the disk you want to restore your files from.

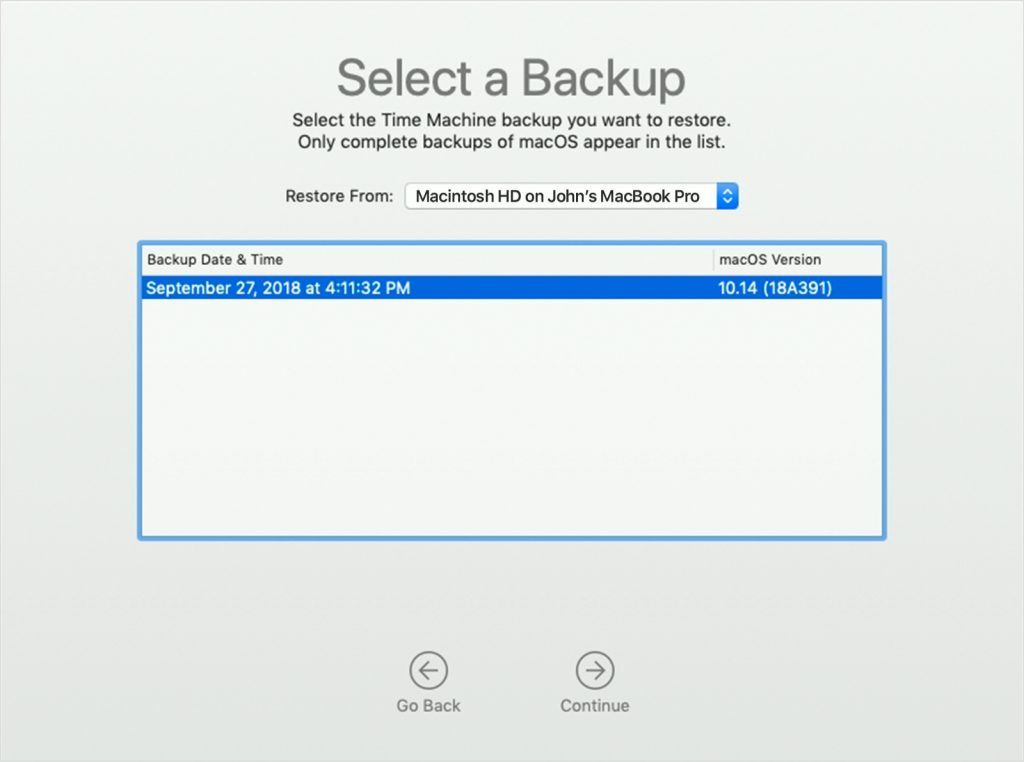
4. Select a needed backup date.
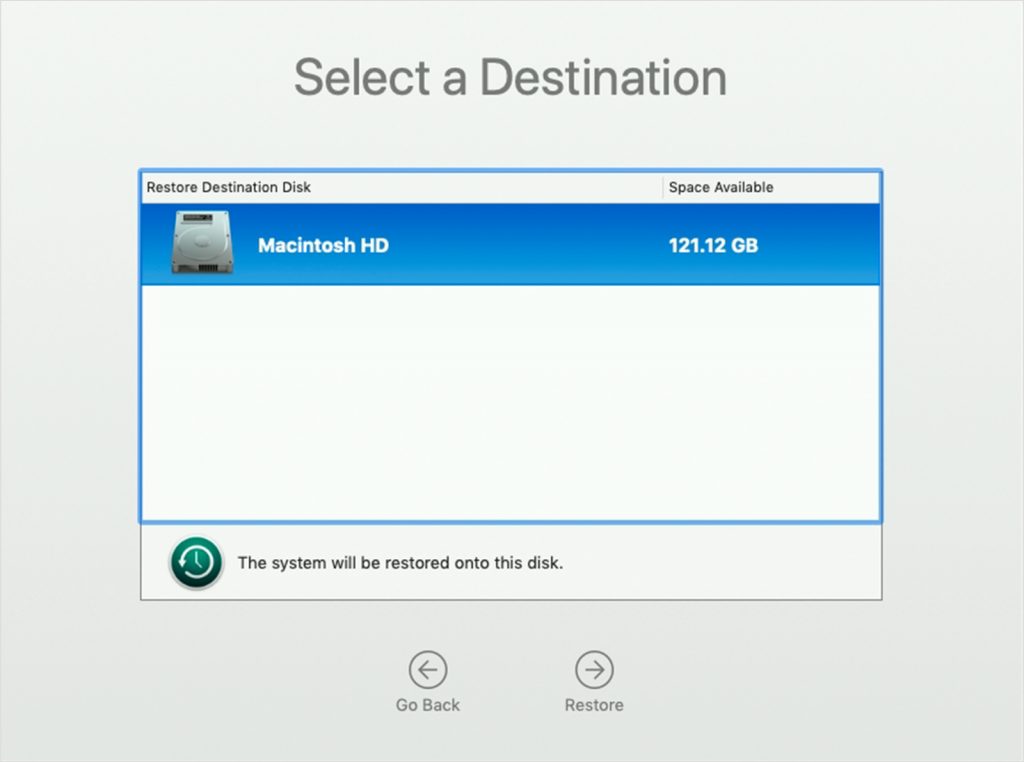
5. Choose the destination disk on your Mac and click Restore.
6. Restart your Mac.
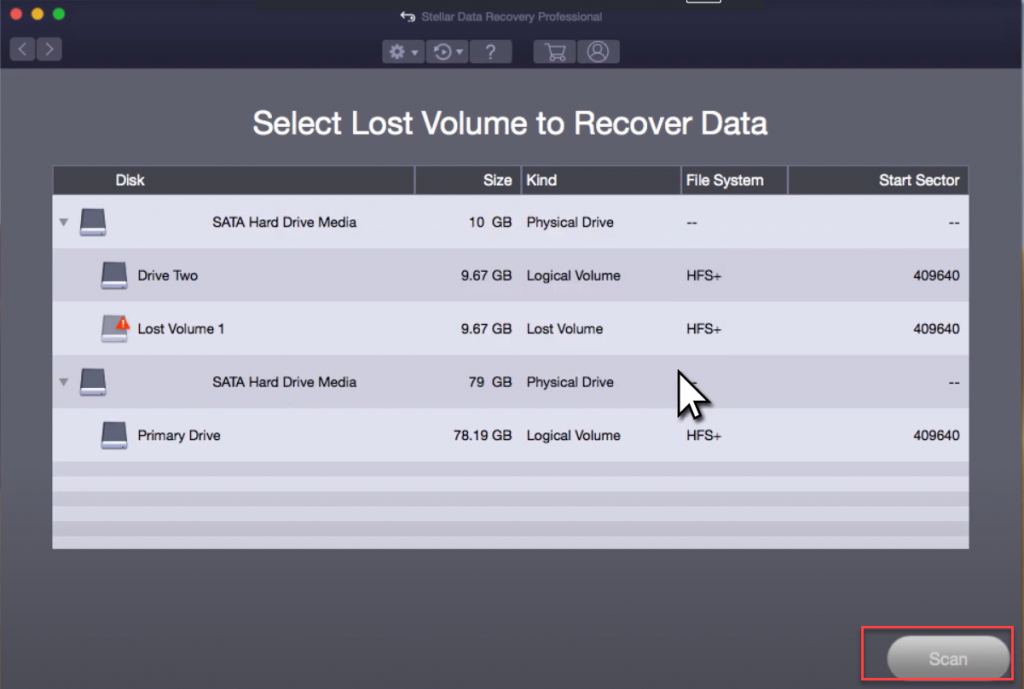
3. Recover Volume on Mac with Stellar Data Recovery Professional
We recommend using specific restoring software like Stellar Data Recovery Professional for Mac to restore disks. It?s an easy-to-use tool that will help you to restore your data despite the conditions you?ve lost them. Follow the steps below to recover lost data:
Follow the steps below to recover partitions with Stellar Data Recovery Professional:
1. Download and install Stellar Data Recovery from the official website.

2. After installing, you will be asked to select the file types you want to recover.


3. Choose Can?t Find Volume and click Next.


4. Click on the Lost Volume (always marked with a flag), choose the Deep Scan option on the bottom left, and Continue with the scan.

5. When the scan is done look through the files > select those you need to restore.
6. Click on Recover when you are done.
Wrap Up
We hope this guide will help you out with understanding the reasons for appearing and ways of fixing the ?The disk Macintosh HD can’t be unlocked? issue and other related issues that may occur.
Read more:


